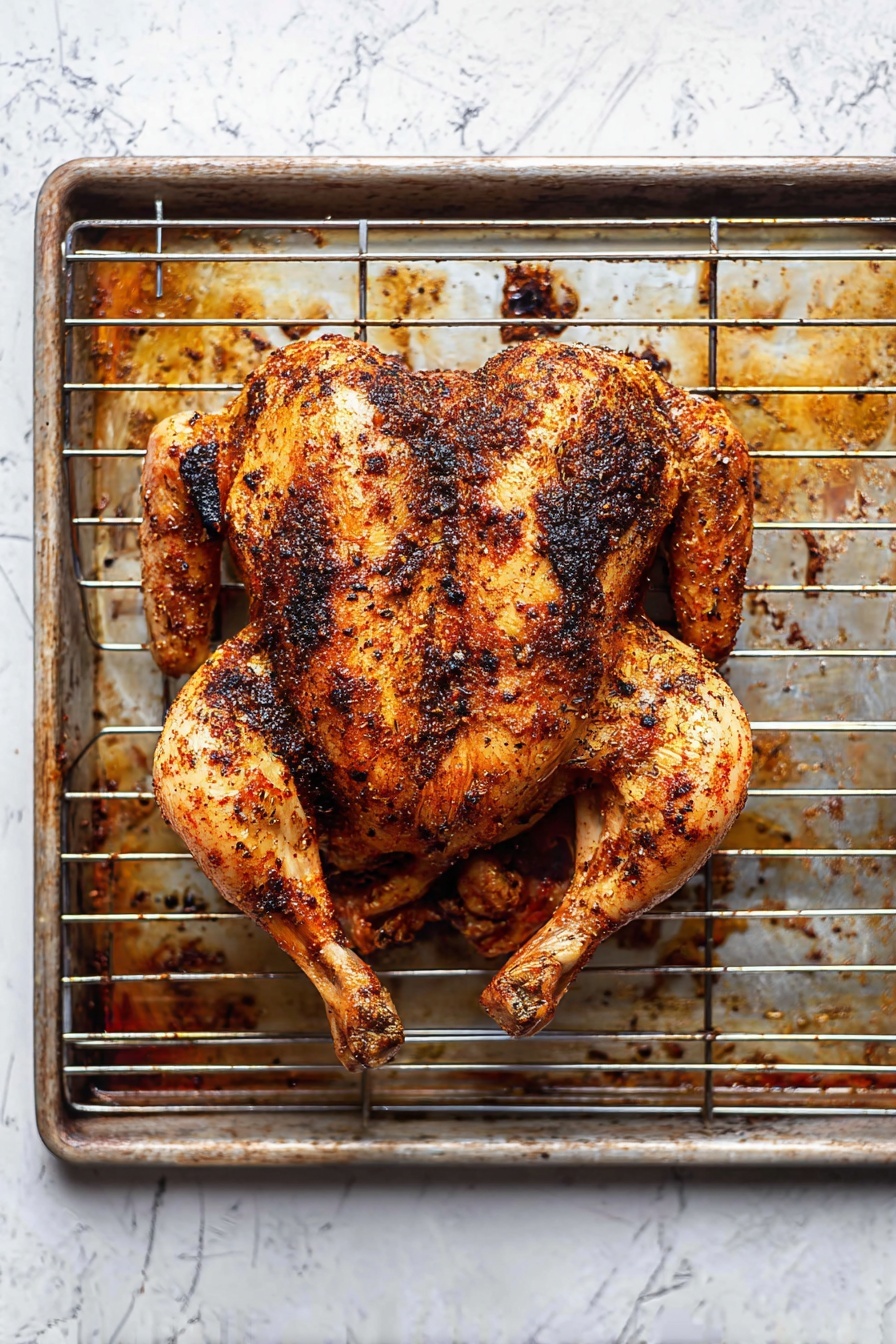
Nothing beats the mouthwatering crunch and juicy tenderness of a perfectly roasted chicken. That's why I’m excited to share this Perfect Spatchcock Chicken with Crispy Skin Recipe — it gives you golden, crispy skin and juicy meat every single time, and it comes together faster than your typical roast chicken!

Jump to:
- Why You'll Love This Recipe
- Ingredients & Why They Work
- Make It Your Way
- Step-by-Step: How I Make Perfect Spatchcock Chicken with Crispy Skin Recipe
- Top Tip
- How to Serve Perfect Spatchcock Chicken with Crispy Skin Recipe
- Make Ahead and Storage
- Frequently Asked Questions:
- Final Thoughts
- Perfect Spatchcock Chicken with Crispy Skin Recipe
Why You'll Love This Recipe
This spatchcock chicken method has quickly become one of my go-to recipes for dinner parties or a cozy Sunday meal. Flattening the bird not only cuts down cooking time but gives you crispy skin that's just irresistible. Trust me, once you try this, it’s hard to go back to a whole roast chicken the old-fashioned way.
- Fast Cooking Time: Flattening the bird means more even cooking and a juicy, tender inside without the wait.
- Unbeatable Crispy Skin: The secret is in drying the skin and roasting on a rack, which locks in that irresistible crunch.
- Flavor-Packed: A blend of herbs, spices, and a zesty pan sauce truly elevates every bite.
- Simple Yet Impressive: Perfect for weeknight dinners or special occasions without needing too much fuss.
Ingredients & Why They Work
I always love keeping ingredients straightforward but effective. Each one plays a part in delivering flavor, texture, and juiciness to the spatchcock chicken. Fresh herbs brighten the dish, the spice mix provides a subtle kick, and the pan sauce ties everything together beautifully.
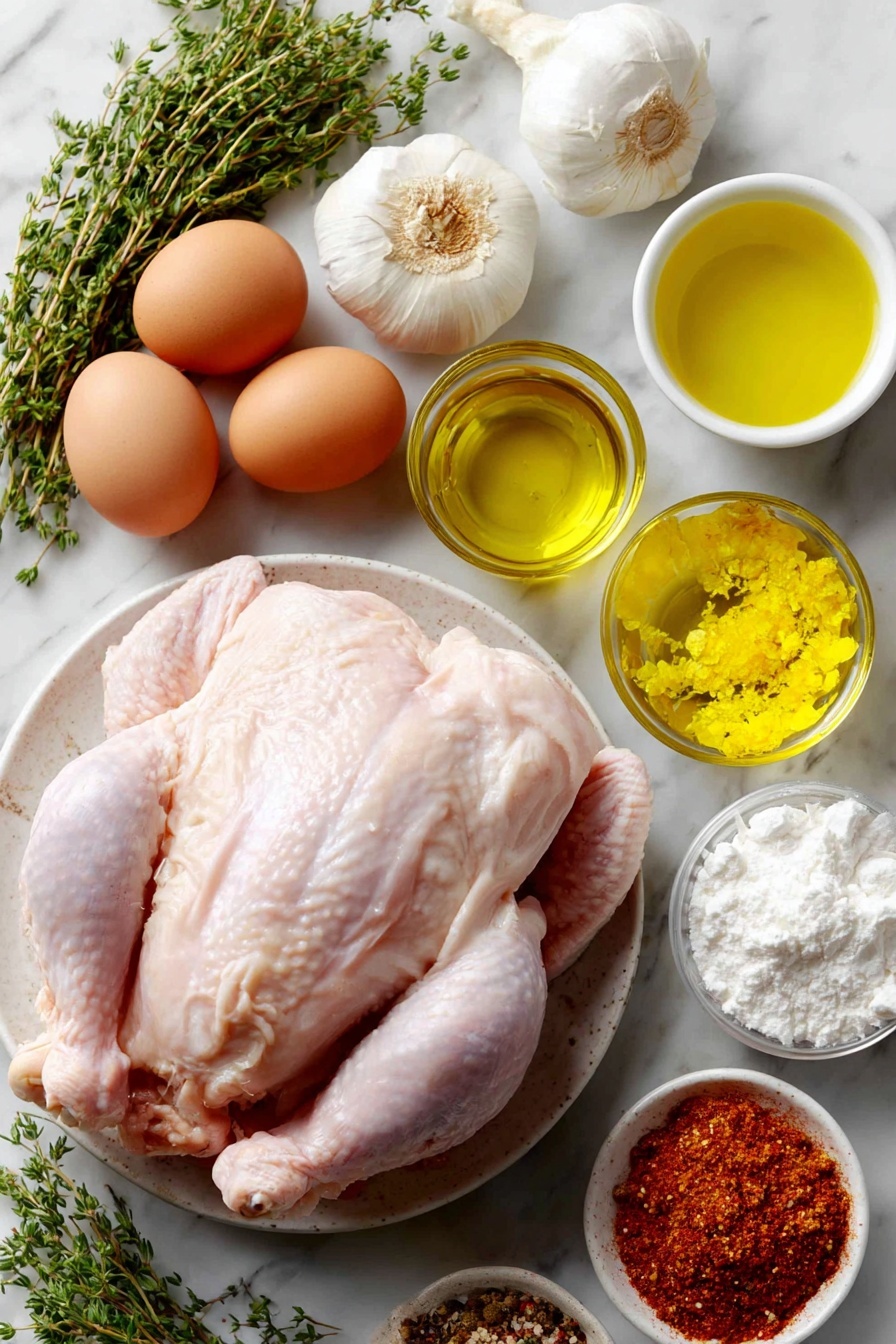
- Whole Chicken: Choose a fresh 3-4 lb chicken for best results — fresher means better flavor and juicier meat.
- Salt: Vital for seasoning meat under the skin and dries the skin to become crisp in the oven.
- Olive Oil: Helps the skin brown evenly and adds a lovely depth to the flavor.
- White Onion & Garlic: These aromatics roast beneath the chicken, infusing subtle sweetness and earthy notes.
- Fresh Thyme: The herbaceous pop complements the chicken’s rich flavor perfectly.
- Dry White Wine: Adds acidity and depth to the braising liquid for the pan sauce.
- Broth: Enhances moisture and forms the flavorful base of the sauce.
- Lemon Juice: Brightens the sauce with a zesty finish.
- Cornstarch: Thickens the pan sauce to the perfect consistency.
- Spice Blend: A mix of garlic powder, chili, cumin, herbs, mustard, paprika, and brown sugar for a balanced, savory, slightly sweet crust.
Make It Your Way
I like to keep the seasoning traditional but once in a while, I swap out the spice blend for smoked paprika and chipotle powder for an extra smoky punch. Feel free to experiment! This recipe is forgiving and open to your personal touches.
- Variation: I once added a splash of maple syrup to the spice rub for a sweet & smoky twist — incredible when paired with roasted root vegetables.
- Dietary Mods: You can easily adapt this for a lower sodium diet by reducing the salt, or swap chicken broth for vegetable broth for a lighter taste.
- Seasonal Changes: Try fresh rosemary or sage instead of thyme in the fall — it brings a cozy aroma that pairs beautifully with the crisp skin.
Step-by-Step: How I Make Perfect Spatchcock Chicken with Crispy Skin Recipe
Step 1: Mix Your Magic Spice Blend
First up, I combine all those lovely seasonings—garlic powder, chili powder, cumin, dried thyme, ground mustard, basil, black pepper, red pepper flakes, sea salt, paprika, and brown sugar—into a bowl. This blend infuses the chicken with a lovely depth of flavor, so take your time mixing it well.
Step 2: Spatchcock Your Chicken Like a Pro
Place your whole chicken breast-side down on a sturdy cutting board. Using sharp kitchen shears, cut along each side of the spine and remove it — save it for making stock if you like! Then, flip the chicken breast-side up and press firmly in the middle to flatten it out. This not only helps it cook evenly but also crisps the skin beautifully. Don’t worry if it feels a bit awkward — practice makes perfect here.
Step 3: Season Under the Skin and Beyond
Gently separate the skin from the meat—especially over the breasts—and rub about a teaspoon of salt right under the skin. This step is a game-changer for crispy skin and juicy meat. Then, slather the entire chicken liberally with your spice blend, making sure to get those legs and thighs too.
Step 4: Let It Rest in the Fridge
Pop your seasoned chicken in the refrigerator uncovered for at least 15 minutes, ideally up to 2 hours. This resting time dries out the skin and lets the flavors penetrate deeply. I never skip this if I want that perfectly crisp crust.
Step 5: Roast on a Bed of Aromatics
Preheat your oven to 425ºF (220ºC) and line a baking sheet with foil. Scatter chopped onion, smashed garlic cloves, sprigs of fresh thyme, a splash of dry white wine, some broth, and a pinch of salt directly on the foil. Place a metal rack on top, then lay your spatchcocked chicken breast-side up on the rack. Rub the remaining olive oil all over the skin—you want to massage it in well so it crisps up golden.
Step 6: Bake Until Crispy and Juicy
Pop the chicken in your hot oven for 35-45 minutes. Use a meat thermometer to check the thickest parts—the thighs and breasts should reach at least 160ºF internally. The residual heat will bring it to 165ºF while resting. The skin will be beautifully crispy, and the meat gloriously tender.
Step 7: Rest and Sauce It Up
Once out of the oven, let the chicken rest for 15 minutes. Meanwhile, transfer the fragrant veggies, herbs, and juices from the pan into a small saucepan. Add the rest of your broth and lemon juice, bring it to a boil, then simmer. Whisk in cornstarch gradually to thicken the sauce. Don’t forget to fish out the thyme stems before serving!
Top Tip
From countless cooks in my kitchen to you, these tips will really elevate your Perfect Spatchcock Chicken with Crispy Skin Recipe experience and prevent those little hiccups that can throw off your roast.
- Dry Your Skin Thoroughly: Pat your chicken skin as dry as possible before seasoning to achieve that coveted crispiness.
- Use a Wire Rack: Don’t skip the rack in your pan — it allows air to circulate under the bird, keeping the skin dry and crunchy.
- Patience on Resting: Let the chicken rest fully after roasting. This keeps juices locked in and makes carving neat and easy.
- Temperature Matters: A reliable meat thermometer is your best friend for ensuring juicy meat without overcooking.
How to Serve Perfect Spatchcock Chicken with Crispy Skin Recipe
Garnishes
I love sprinkling fresh thyme leaves or chopped parsley right before serving to add a pop of color and freshness. A lemon wedge on the side is a nice touch too—just a quick squeeze gives a bright finish to each bite.
Side Dishes
My absolute favorite sides with this chicken are garlic roasted potatoes, a simple mixed green salad with vinaigrette, and some buttery steamed green beans. The combination keeps the meal balanced and wholesome.
Creative Ways to Present
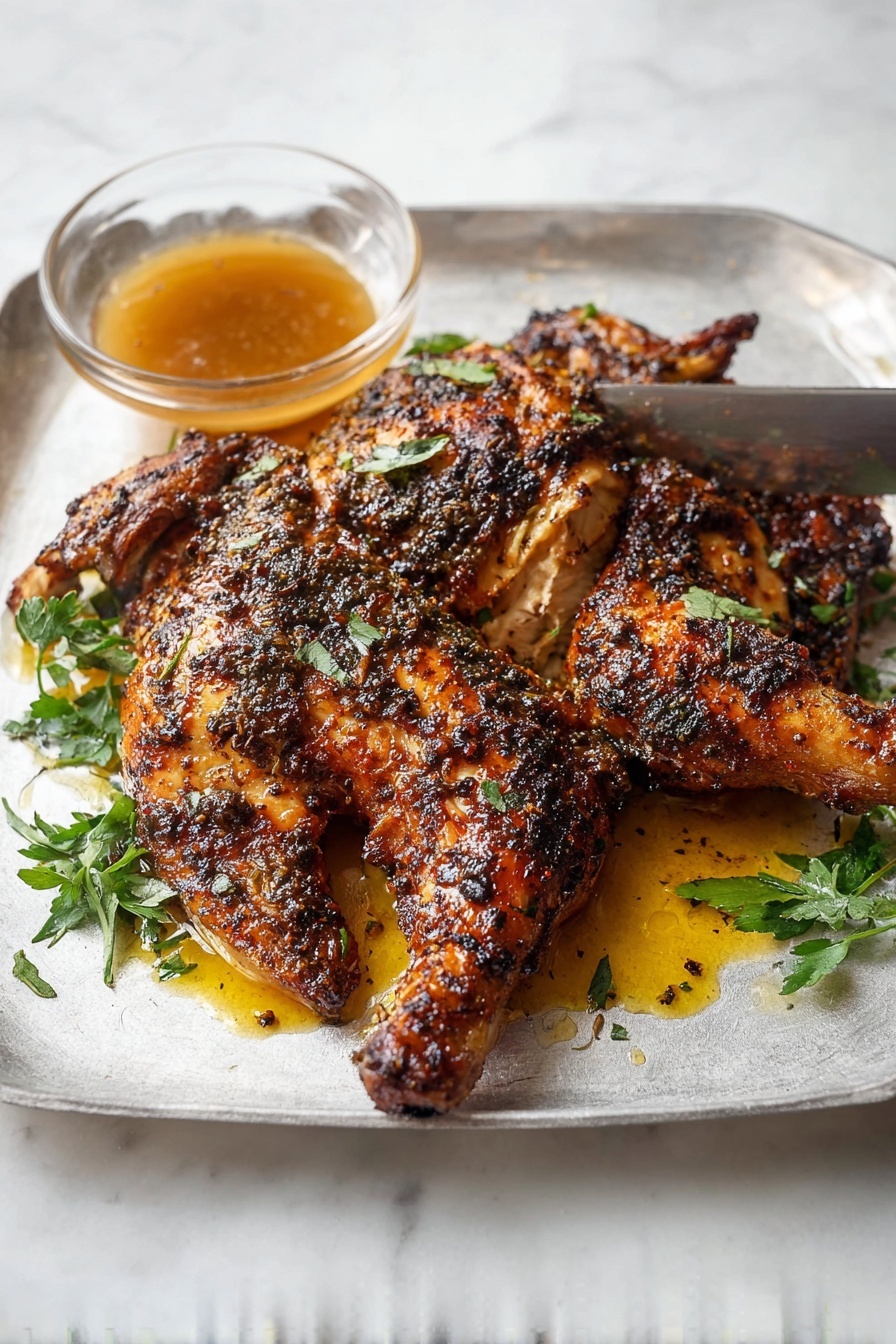
For special dinners, I carve the chicken into quarters and serve it on a large wooden board with the pan sauce drizzled over. Adding colorful roasted veggies around the edges makes it look rustic yet elegant—guests always compliment this presentation!
Make Ahead and Storage
Storing Leftovers
I recommend storing leftover chicken in an airtight container in the fridge for up to 3 days. Keeping it separated from the sauce keeps the skin a bit firmer if you want to re-crisp it later.
Freezing
I’ve frozen spatchcock chicken once or twice; wrap it tightly in foil and then place in a freezer bag. It thaws nicely in the fridge overnight and retains good flavor, though the skin is best when fresh.
Reheating
To reheat while keeping the skin crispy, I pop the chicken in a 375ºF oven for about 10-15 minutes. You can add a splash of the leftover sauce to warm alongside. Microwaving the chicken makes the skin soggy, so avoid that if you can.
Frequently Asked Questions:
Spatchcocking means removing the backbone of the chicken so it can lay flat. This technique lets the chicken cook faster and more evenly, which results in juicier meat and crispier skin.
Yes! You can season and spatchcock the chicken up to 2 hours ahead and refrigerate it uncovered. This resting time helps the seasoning set and the skin dry, which improves crispiness when cooked.
The key is seasoning under the skin and roasting on a wire rack so air can circulate, drying the skin. Also, letting the chicken rest after cooking allows the juices to redistribute, keeping the meat juicy.
Absolutely! This method works great for smaller birds like Cornish hens or even turkey breast. Adjust the cooking time based on the size and thickness of the bird.
Final Thoughts
This Perfect Spatchcock Chicken with Crispy Skin Recipe has been a real winner in my kitchen — simple techniques combined with thoughtful seasoning create that much-sought-after crispy skin and juicy meat combo. I hope you enjoy making it yourself as much as I have. Once you nail spatchcocking, you’ll make it over and over again, trust me!
Print
Perfect Spatchcock Chicken with Crispy Skin Recipe
- Prep Time: 25 minutes
- Cook Time: 45 minutes
- Total Time: 1 hour 10 minutes
- Yield: 4 servings
- Category: Main Course
- Method: Baking
- Cuisine: American
Description
This Spatchcock Chicken recipe offers a flavorful, juicy roasted chicken with perfectly crispy skin. The chicken is flattened by removing the spine, seasoned with a blend of spices, and roasted on a wire rack over herbs and aromatics. Finished with a delicious pan sauce, this dish is a perfect main course for family dinners or special occasions.
Ingredients
Main Ingredients
- 3 to 4 lb. whole chicken
- 1.5 teaspoon salt, separated
- 3 tablespoons olive oil, separated
- ½ white onion, chopped
- 4 cloves garlic, peeled and smashed
- 10 sprigs fresh thyme
- ¼ cup dry white wine
- 1.5 cups broth, any kind (separated)
- 2 teaspoons lemon juice
- 2 teaspoons cornstarch
Chicken Seasoning
- 2 teaspoons garlic powder
- 1 teaspoon chili powder
- 1 teaspoon cumin
- 1 teaspoon dried thyme
- 1 teaspoon ground mustard
- 1 teaspoon dried basil
- ½ teaspoon ground pepper
- ½ teaspoon red pepper flakes
- ½ teaspoon sea salt
- ½ teaspoon paprika
- 1 teaspoon brown sugar
Instructions
- Prepare seasoning: Mix together garlic powder, chili powder, cumin, dried thyme, ground mustard, dried basil, ground pepper, red pepper flakes, sea salt, paprika, and brown sugar in a bowl. Set aside.
- Prepare chicken: Remove the chicken from packaging and pat dry with paper towels to remove excess moisture.
- Spatchcock chicken: Place the chicken breast-side down on a cutting board. Use sharp kitchen shears to cut down one side of the spine through the ribs and repeat on the other side. Discard the spine.
- Flatten chicken: Flip the chicken breast-side up and press firmly on the middle to flatten the bird evenly.
- Season under skin: Carefully separate the skin from the meat with your hand. Rub 1 teaspoon salt under the skin, covering the meat evenly.
- Season chicken: Rub the entire chicken, including skin, legs, and thighs, with the prepared chicken seasoning. Refrigerate for at least 15 minutes or up to 2 hours to absorb flavors and dry the skin.
- Preheat oven: Preheat your oven to 425ºF and line a rimmed baking sheet with aluminum foil.
- Prepare roasting base: Place the chopped onion, smashed garlic, thyme sprigs, white wine, ½ cup broth, 1 tablespoon olive oil, and remaining ½ teaspoon salt on the foil in the baking sheet.
- Set up rack: Place a metal rack on top of the vegetables and herbs. Then place the chicken breast-side up on the rack.
- Oil chicken: Rub the remaining 2 tablespoons olive oil all over the chicken, massaging it into the skin thoroughly.
- Roast chicken: Bake in the preheated oven at 425ºF for 45 minutes or until the thickest parts of the chicken reach an internal temperature of 160ºF.
- Rest chicken: Remove the chicken from the oven and let rest for at least 15 minutes; temperature will rise to 165ºF while resting.
- Prepare sauce: Transfer cooked vegetables, herbs, and liquid from the baking sheet to a small saucepan. Add the remaining 1 cup broth and bring to a boil.
- Finish sauce: Reduce heat to medium-low, add lemon juice, then gradually whisk in cornstarch. Simmer until sauce thickens and discard herb stems.
- Serve: Carve the chicken and serve with the prepared sauce on the side.
Notes
- Refrigerating the seasoned chicken for 2 hours is recommended but a minimum of 15 minutes works.
- Using a wire rack on the baking sheet is essential for crispy skin by allowing airflow and preventing sogginess.
- Make sure to pat the chicken dry thoroughly before seasoning to help crisping.
- Check internal temperature with a meat thermometer at the thickest parts to ensure safe doneness.
- If you prefer spicier flavor, increase chili powder or red pepper flakes slightly.
Nutrition
- Serving Size: 1 serving
- Calories: 400 kcal
- Sugar: 2 g
- Sodium: 650 mg
- Fat: 25 g
- Saturated Fat: 5 g
- Unsaturated Fat: 18 g
- Trans Fat: 0 g
- Carbohydrates: 5 g
- Fiber: 1 g
- Protein: 40 g
- Cholesterol: 120 mg


Leave a Reply