There’s something truly irresistible about the balance of tart cherries and warm spices in this Cherry Pie with Spicy Cinnamon Recipe. If you love that perfect mix of sweet and spice with a flaky lattice crust, you’re going to want to make this pie your new go-to summer—and year-round—dessert.

Jump to:
Why You'll Love This Recipe
I remember the very first time I baked this cherry pie—it filled my kitchen with such a cozy, spicy aroma, and the tart cherries paired with cinnamon and ginger gave every slice a little extra magic. It’s a recipe that feels both classic and special, perfect for sharing with friends or savoring on a quiet night.
- Made Ahead: The pie dough and filling can be prepped ahead of time, which makes assembly a breeze when you’re ready to bake.
- Year-Round Use: Thanks to frozen tart cherries, you don’t have to wait for summer to enjoy this vibrant, juicy pie.
- Perfect Lattice Crust: The beautiful woven top isn’t just eye-catching—it crisps up perfectly to complement the juicy filling.
- Balanced Flavor: Cinnamon, ginger, and almond extract bring subtle warmth that elevates the tart cherry sweetness without overpowering it.
Ingredients & Why They Work
Before we dive in, here’s the lowdown on what makes this cherry pie sing. Shopping for high-quality frozen tart cherries is a must—they pack that distinctive tang you want in your filling. Also, don’t skip the spices; they make all the difference in giving this pie that cozy, spicy kick.
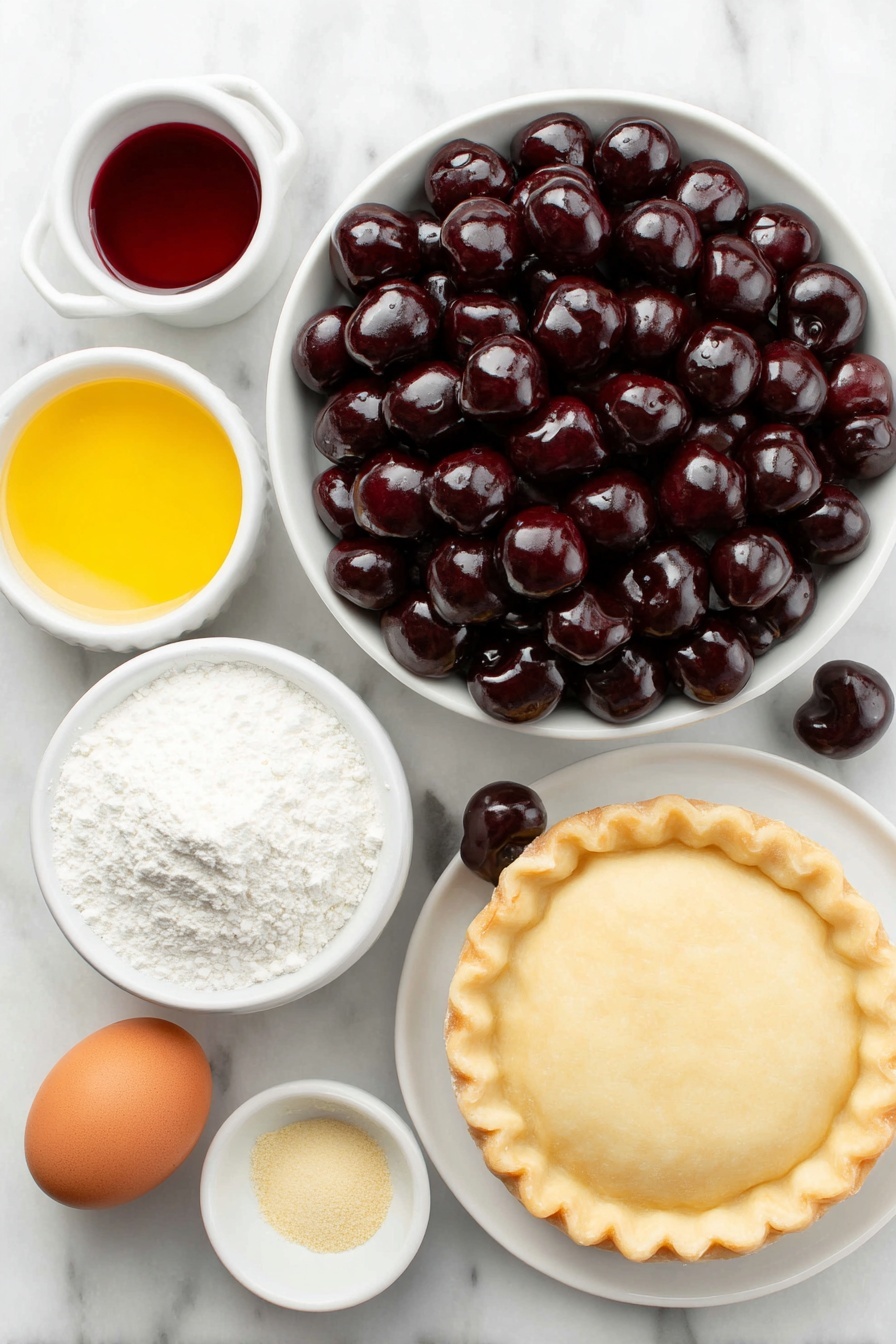
- Frozen pitted tart cherries: These have the perfect balance of bright tartness to cut through the sweetness and hold up well when cooked.
- Cherry juice: We use the juice from the thawed cherries to intensify the cherry flavor in the filling.
- Cornstarch: Helps thicken the filling to that luscious, glossy consistency without clouding the color.
- Cane sugar: Adds sweetness that complements the tart cherries and spices perfectly.
- Cinnamon: Brings warmth and spice that’s key to this recipe’s unique flavor profile.
- Ground ginger: Adds a subtle zing and depth that pairs beautifully with the cinnamon.
- Almond extract: A small but powerful addition that brightens and enhances the cherry notes.
- Pie crust dough: Chilled and ready to roll, it provides that buttery, flaky base and lattice top.
- Egg: Combined with water for an egg wash that helps the crust turn a gorgeous golden brown.
- Coarse sugar: Optional, but it adds a pretty sparkle and snap to the baked crust.
- Vanilla ice cream: A classic serving suggestion that cools and complements the warm, spicy cherry pie.
Make It Your Way
One of the best things about this Cherry Pie with Spicy Cinnamon Recipe is how adaptable it is to your kitchen creativity. Feel free to tweak the spices, crust style, or serving suggestions to make it truly yours!
- Spice it up: I love playing with the warm spices in this pie. Sometimes I add a dash more cinnamon or a pinch of ground cloves for extra depth. It gives the filling a cozy, aromatic lift that fills the kitchen with amazing smells.
- Crust variations: For a nutty twist, try adding some finely chopped almonds or hazelnuts to your pie crust dough. It adds a subtle crunch that pairs beautifully with the tart cherries and warm spices.
- Diet-friendly tweaks: To make this pie vegan, swap the egg wash for a mixture of almond milk and maple syrup, which still gives a lovely golden sheen on the lattice crust.
- Seasonal substitutions: If cherries aren’t available fresh or frozen, try substituting with fresh or frozen blueberries or raspberries for a similar tangy effect, adjusting the sugar slightly to balance the tartness.
Step-by-Step: How I Make Cherry Pie with Spicy Cinnamon Recipe
Step 1: Preparing the Cherries
Start by placing your thawed cherries in a strainer over a bowl to catch all those precious juices. This step is crucial—you’ll need exactly 1 cup of that juice for the filling. If you don’t get enough juice at first, just microwave the cherries for 15 seconds and press gently to coax out more. Once you have the juice set aside, transfer the cherries themselves to a large mixing bowl, ready to be sweetened and spiced.
Step 2: Making the Thickened Filling
In a small bowl, mix ¼ cup cornstarch with ¼ cup of water until it’s perfectly smooth—that’s your secret to a luscious pie filling that’s thick and glossy. Next, pour the reserved 1 cup cherry juice into a small saucepan and bring it to a boil. Add ¾ cup cane sugar and keep stirring until it dissolves completely. Once boiling again, whisk the cornstarch slurry in gradually, stirring constantly. You’ll see the mixture thicken and turn clear and shiny—that’s your cue to take it off the heat. Now, stir in cinnamon, ground ginger, almond extract, and a pinch of salt for that spicy warmth that really makes this cherry pie stand out. Pour this mixture over the cherries and gently combine. Let the filling cool completely—it’s worth the wait!
Step 3: Rolling and Chilling the Bottom Crust
Roll out your chilled pie crust dough on a lightly floured surface, leaving a generous ½-inch overhang to fit your 9 or 9.5-inch pie plate. Transfer the crust carefully to your pie plate—don’t worry if it’s a little delicate; you can always patch small tears. Loosely cover it with plastic wrap and pop it into the fridge for 30 minutes. This chilling step keeps your crust firm and helps it bake up beautifully crisp. While you wait, preheat your oven to 425°F, placing a baking sheet on the bottom rack to heat up—it’ll catch any bubbling filling drips and help with even baking.
Step 4: Preparing the Top Crust and Lattice
While the bottom crust chills, roll out the remaining dough for your lattice top. Place it on a baking sheet and loosely cover with plastic wrap—it’s easier to cut once it’s slightly firm from chilling. When you’re ready, whisk the egg with the remaining tablespoon of water to make an egg wash. This will give your crust that irresistible golden shine.
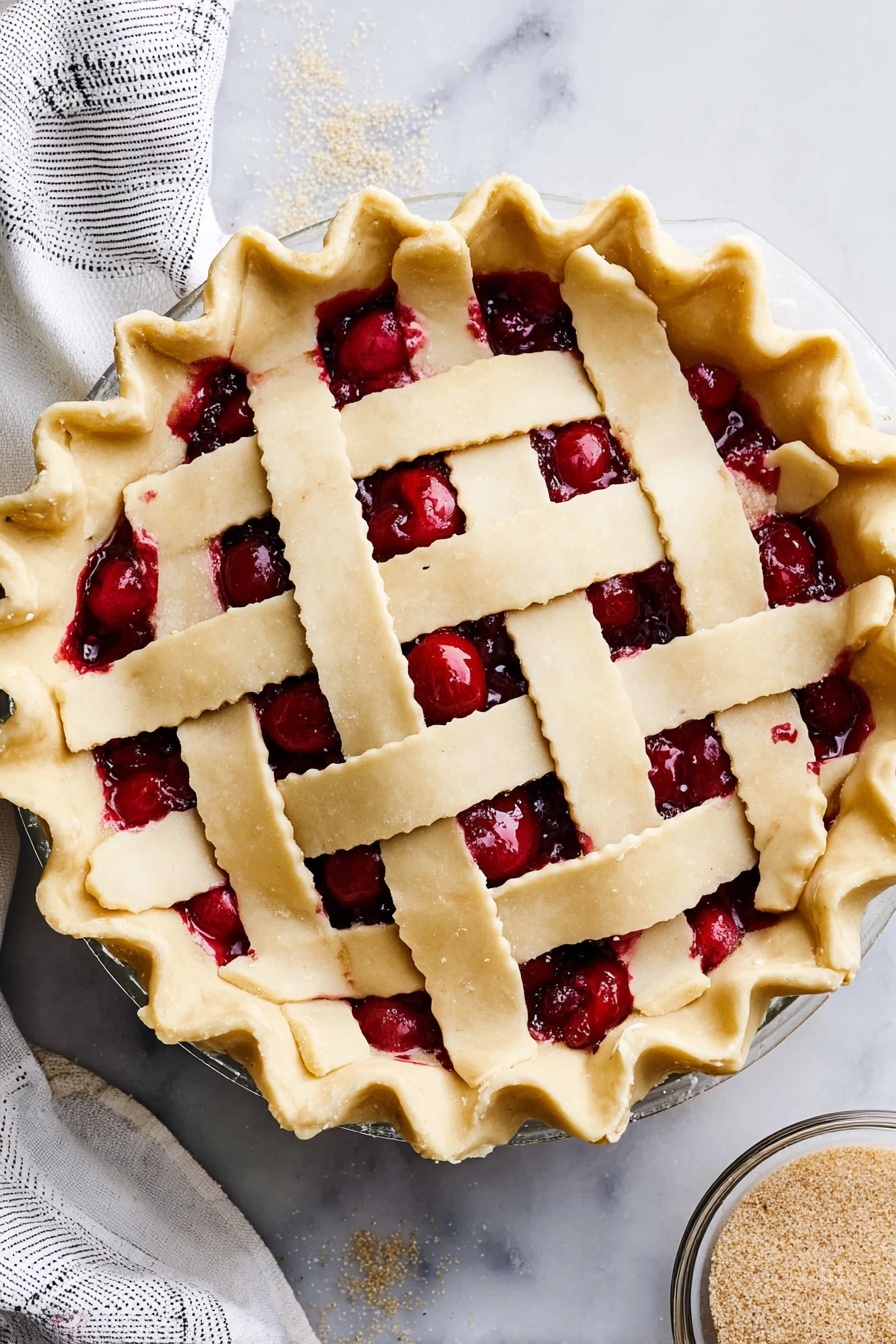
Step 5: Assembling the Pie
Remove the bottom crust from the fridge and pour in your cooled cherry filling, spreading gently to even out. Transfer the top crust to a cutting board and slice into 1-inch wide strips using a sharp knife or pizza cutter. Lay 4 to 5 strips evenly across the filling horizontally. Now for the fun weaving part: fold back every other horizontal strip and lay a new strip vertically. Repeat, alternating strips, until your lattice is complete. Trim any excess dough along the edges, then fold the bottom crust’s overhang up and over the lattice edges, crimping well to seal the crust neatly.
Step 6: Baking the Cherry Pie
Brush your lattice top with the egg wash, and if you like a bit of sparkle, sprinkle with coarse sugar. Place the pie on the hot baking sheet in the oven. Bake at 425°F for 20 minutes to jumpstart the crust's rise and color, then reduce the temperature to 375°F. Continue baking for 50 minutes more, until the crust is beautifully golden and the filling is bubbling enticingly. If the crust edges start to brown too fast, tent them gently with foil so everything finishes perfectly without burning.
Step 7: Cooling and Serving
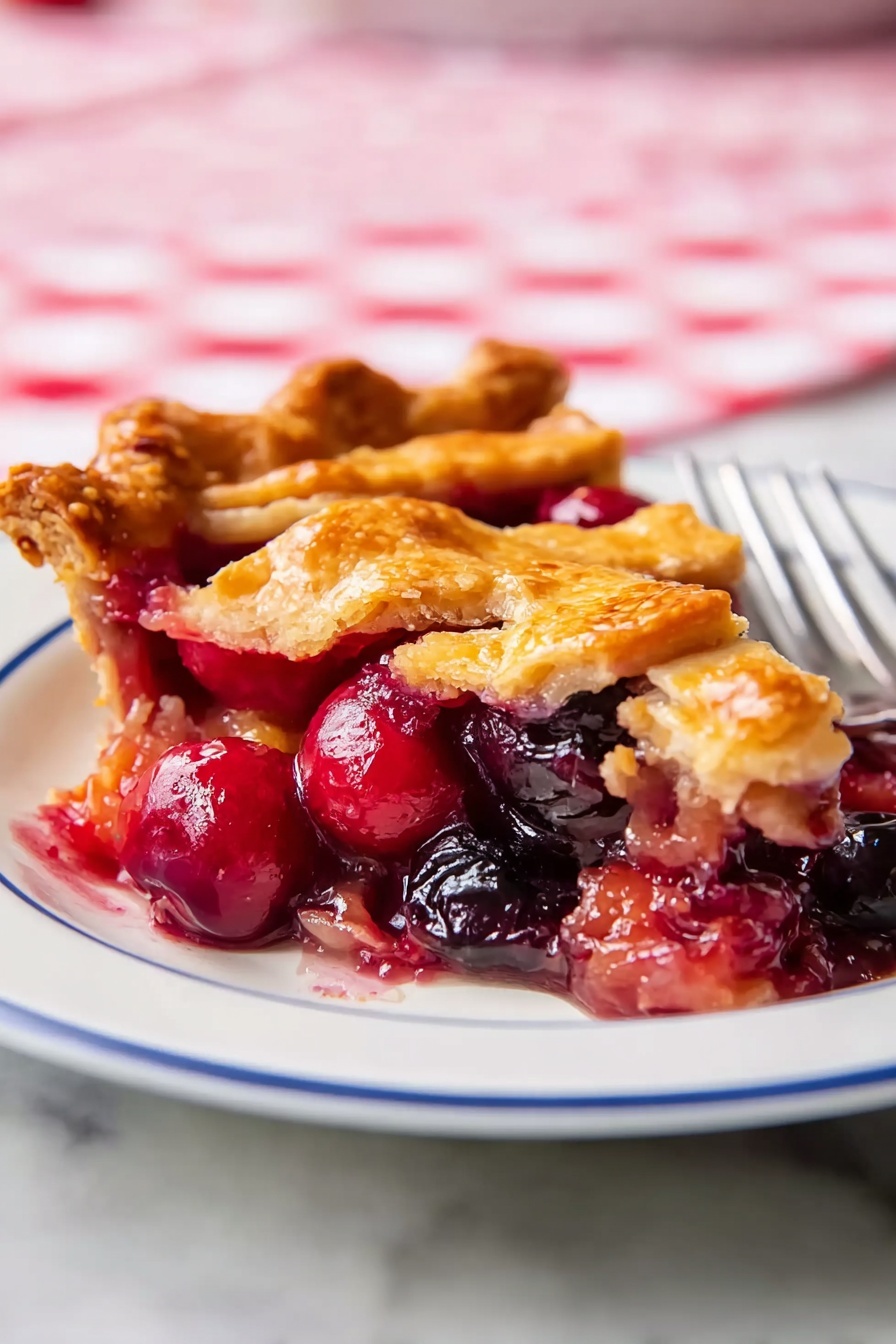
Patience pays off at this stage! Let your pie cool completely—about 4 hours—to allow the filling to set just right. When ready to serve, slice into generous pieces and top with a scoop of creamy vanilla ice cream. This classic pairing perfectly balances the spicy, tart cherry filling, making every bite a delightful experience.
Top Tip
Making a perfect Cherry Pie with Spicy Cinnamon Recipe is as much about technique as it is about ingredients. Here are some tips that have truly made a difference in my baking journey and can help you achieve a flawless pie every time.
- Reserve Cherry Juice: I always make sure to reserve and measure out exactly 1 cup of cherry juice from the thawed frozen cherries. If you find you don’t have quite enough, microwaving the cherries for 15 seconds helps release more juice quickly without losing flavor.
- Chill the Crust Properly: Chilling the bottom crust for at least 30 minutes after placing it in the pie plate really helps prevent shrinking during baking, and helps the lattice hold its shape beautifully. It also improves that lovely flaky texture.
- Master the Lattice Weave: For a neat lattice top, cut strips evenly at 1 inch wide and take your time weaving them. Pulling back one set of strips before adding the others helps create a pretty basket-weave effect that’s eye-catching and classic.
- Watch the Bake Time and Temperature: Starting the bake at 425°F and then lowering to 375°F lets the crust set quickly without burning, while giving the filling time to bubble and thicken perfectly. Don’t forget to tent the edges with foil if they brown too quickly!
How to Serve Cherry Pie with Spicy Cinnamon Recipe
Garnishes
This cherry pie is fantastic on its own, but if you want to elevate the presentation, a scoop of creamy vanilla ice cream is a must-have pairing, offering a cooling contrast to the warm, spiced cherry filling. For some extra flair, dust the top of the pie with a light sprinkle of powdered sugar just before serving. Fresh mint leaves can also add a pop of color and a refreshing hint of herbal aroma.
Side Dishes
Serve this pie alongside light, summery sides like a crisp green salad with a citrus vinaigrette to balance the sweetness. A dollop of whipped cream or a drizzle of warm caramel sauce can add richness if you’re indulging. For brunch or afternoon tea, pair it with a cup of freshly brewed coffee or a lightly spiced chai to complement the cinnamon and ginger notes in the filling.
Make Ahead and Storage
Storing Leftovers
Once your Cherry Pie with Spicy Cinnamon is completely cooled—after about 4 hours—cover it loosely with plastic wrap or foil and keep it in the refrigerator. It will stay fresh for up to 3 days. This pie is best enjoyed chilled or at room temperature, depending on your preference.
Freezing
You can freeze the assembled pie (before baking) by wrapping it tightly with plastic wrap and then aluminum foil. Freeze for up to 2 months. When ready to bake, thaw it overnight in the refrigerator and then proceed with the baking instructions. Alternatively, bake the pie fully, cool completely, and then freeze in airtight containers or wrapped tightly. Reheat slices as needed.
Reheating
To enjoy leftovers warm, place individual slices on an oven-safe dish and warm in a preheated oven at 350°F for about 15 minutes. This helps refresh the crust’s flakiness and brings out the spices beautifully. Avoid microwaving if possible, as it can make the crust soggy.
Frequently Asked Questions:
Absolutely! Fresh tart cherries can be used when they're in season; just pit and measure out your juice similarly. You might need to cook them slightly longer to release enough juice for the filling, but the flavor will be just as delicious.
If the filling looks too runny, it often improves as the pie cools during the 4-hour resting period. Make sure the cornstarch was well dissolved and fully cooked in the cherry juice before mixing with the cherries to help thickening properly.
Yes! The pie dough can be made up to two days in advance and kept chilled. This helps the dough relax and makes rolling out easier, resulting in a flakier crust.
During baking, if you notice the edges browning too quickly, loosely tent the pie edges with foil. This shields them from direct heat while the filling finishes baking and bubbling.
Final Thoughts
There’s something truly comforting about a slice of cherry pie with the warm kiss of cinnamon and ginger in every bite. Whether you’re making it for a summertime celebration or a cozy weekend treat, this Cherry Pie with Spicy Cinnamon Recipe offers a wonderful balance of tartness and spice wrapped in a buttery lattice crust. I hope these tips and serving ideas inspire you to bake it with joy and share it with loved ones. Happy baking and savor every delicious moment!
Print
Cherry Pie with Spicy Cinnamon Recipe
- Prep Time: 2 hours
- Cooling Time: 4 hours
- Cook Time: 1 hour
- Total Time: 3 hours
- Yield: 8 servings
- Category: Dessert
- Method: Baking
- Cuisine: American
- Diet: Vegetarian
Description
This classic sour cherry pie recipe features a deliciously tart filling made from frozen pitted tart cherries thickened with cornstarch and spiced with cinnamon, ginger, and almond extract. The pie boasts a beautiful lattice crust and is perfect served with vanilla ice cream. The pie dough and filling can be made ahead for convenience, and the finished dessert is an ideal summer treat that can be enjoyed year-round.
Ingredients
Filling
- 2 pounds frozen pitted tart cherries, thawed, juices reserved
- 1 cup cherry juice (reserved from cherries)
- ¼ cup cornstarch
- ¼ cup plus 1 tablespoon water, divided
- ¾ cup cane sugar
- ½ teaspoon cinnamon
- ½ teaspoon ground ginger
- ¼ teaspoon almond extract
- Pinch salt
Crust and Topping
- 1 recipe Pie Crust, chilled at least 2 hours (enough for bottom and top crust)
- 1 large egg
- Coarse sugar, optional for sprinkling
- Vanilla ice cream, for serving
Instructions
- Prepare the cherries: Place the thawed cherries in a strainer over a bowl to catch the juices. Measure out 1 cup of the reserved cherry juice and set aside. Transfer cherries to a large mixing bowl.
- Make the cornstarch slurry: In a small bowl, combine the cornstarch with ¼ cup water and stir until smooth. Set aside.
- Cook the filling: Pour the 1 cup reserved cherry juice into a small saucepan and bring to a boil. Add the cane sugar and stir until fully dissolved. Return mixture to a boil, then gradually whisk in the cornstarch slurry. Stir constantly until the juice thickens, becomes clear, and glossy. Remove from heat and stir in cinnamon, ground ginger, almond extract, and a pinch of salt. Pour the thickened mixture over the cherries in the bowl and stir to combine. Allow the filling to cool completely.
- Prepare bottom crust: Roll out the chilled pie crust for the bottom, leaving a ½-inch overhang on all sides to fit a 9- or 9.5-inch pie plate. Transfer to pie plate, cover loosely with plastic wrap, and chill in the refrigerator for 30 minutes. Meanwhile, preheat the oven to 425°F with a baking sheet placed on the bottom rack to heat.
- Prepare top crust: Roll out the remaining pie dough and place it on a baking sheet. Cover loosely with plastic wrap and chill in the fridge until the bottom crust is ready.
- Assemble the pie: Whisk together the egg and remaining 1 tablespoon water to make an egg wash. Remove the bottom crust from the fridge and pour the cooled cherry filling into it. Transfer the top crust to a cutting surface and cut into 1-inch strips. Lay 4 to 5 strips evenly across the filling horizontally. Weave another 4 to 5 strips vertically, pulling back the horizontal strips to create a lattice pattern. Trim excess dough from edges and fold the bottom crust’s overhang over the lattice edges. Crimp edges to seal.
- Finish and bake: Brush the lattice crust with the egg wash and sprinkle with coarse sugar if desired. Place the pie on the preheated baking sheet in the oven. Bake at 425°F for 20 minutes, then lower the temperature to 375°F and bake for an additional 50 minutes or until the crust is golden brown and the filling is bubbling. If the edges start to brown excessively, cover with foil to prevent burning.
- Cool and serve: Allow the pie to cool completely, about 4 hours, before slicing. Serve with vanilla ice cream for a classic presentation.
Notes
- If you do not have 1 cup of cherry juice after thawing, microwave the cherries for 15 seconds and press to release more juice. Repeat as needed until 1 cup is obtained. Save any extra juice for another use.
- Make pie dough up to two days in advance; keep chilled.
- Frozen tart cherries can be used year-round as a convenient alternative to fresh.
- For a crispier crust, brush the lattice with egg wash and sprinkle coarse sugar before baking.
- If filling bubbles over during baking, place a baking sheet on the lower rack to catch drips and simplify cleanup.
Nutrition
- Serving Size: 1 slice (⅛ of pie)
- Calories: 350 kcal
- Sugar: 32 g
- Sodium: 120 mg
- Fat: 15 g
- Saturated Fat: 3.5 g
- Unsaturated Fat: 9 g
- Trans Fat: 0 g
- Carbohydrates: 50 g
- Fiber: 3 g
- Protein: 3 g
- Cholesterol: 40 mg


Leave a Reply