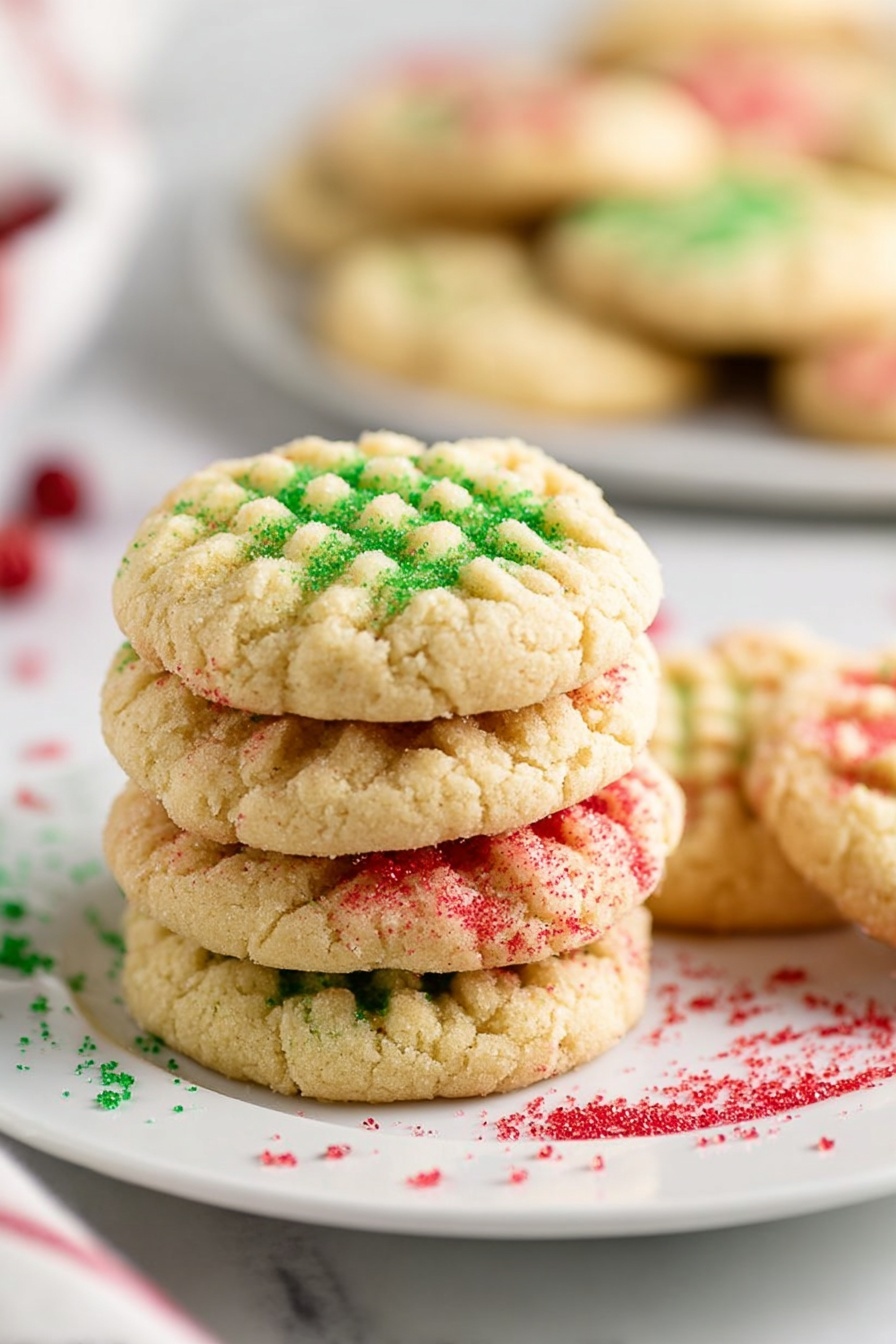
Nothing quite says holiday cheer like baking up a batch of my Classic Christmas Sugar Cookies Recipe. They deliver that perfect blend of soft, buttery sweetness with just the right hint of vanilla and almond—plus the festive crunch of red and green sanding sugar. Trust me, these cookies bring the whole kitchen to life and make gift-giving or snacking extra special.

Jump to:
Why You'll Love This Recipe
This Classic Christmas Sugar Cookies Recipe holds a special place in my heart—not just for its taste but for how easy and forgiving it is. It’s the kind of recipe that makes holiday baking fun instead of stressful, even if you’re juggling a million things.
- Easy to make: The dough comes together quickly and chills well, making prep flexible for any holiday schedule.
- Perfect texture: Soft, tender cookies that don’t dry out and stay delightful for days.
- Delightful flavors: The combo of butter, cream cheese, vanilla, and almond extracts adds a subtle depth that’s irresistible.
- Festive presentation: Red and green sanding sugar give your cookies that classic Christmas sparkle and crunch.
Ingredients & Why They Work
Every ingredient in this Classic Christmas Sugar Cookies Recipe plays a crucial role in creating those tender, flavorful cookies you’ll want to bake again and again. Let me walk you through why these ingredients fit so well together and a few tips for choosing quality items.
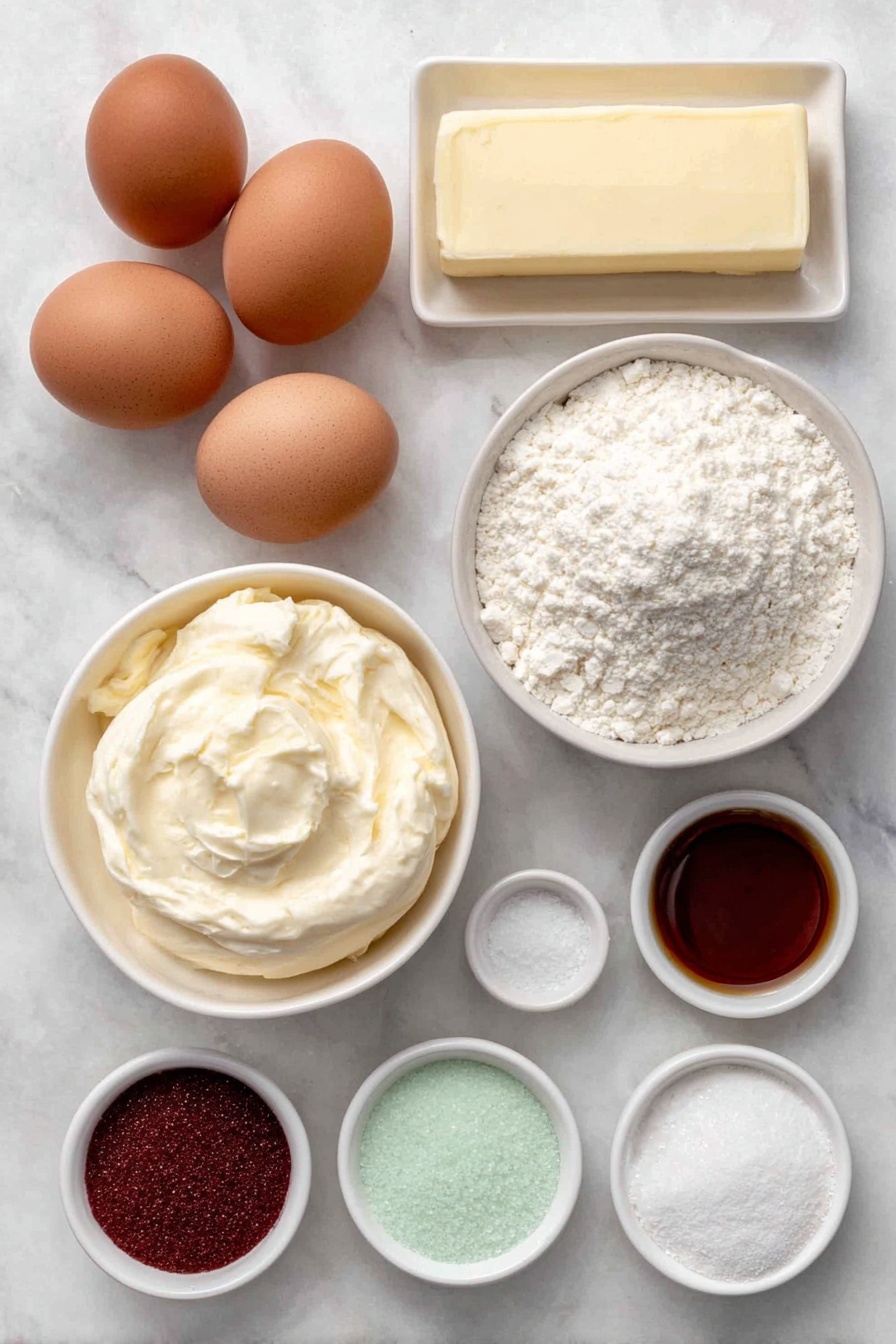
- Salted butter: Using salted butter adds a slight savory balance, so there’s no need to add extra salt beyond what’s listed.
- Cream cheese: This keeps the cookies super soft and adds subtle richness; just make sure it’s fully softened to avoid lumps.
- Sugar: Granulated sugar helps give a nice structure while also delivering just the right sweetness.
- Eggs: Provide moisture and binding to hold the cookies together without drying them out.
- Vanilla extract: Essential for that warm, familiar aroma and flavor that feels like Christmas in every bite.
- Almond extract: Just a touch here adds a lovely nutty nuance without overpowering the vanilla.
- All-purpose flour: The backbone of the dough, giving it structure and a tender crumb.
- Cornstarch: This small addition makes the texture softer and more delicate—trust me, it’s a game changer!
- Baking soda: Helps the cookies rise just enough for a soft bite without spreading too thin.
- Salt: Enhances all the sweet flavors and balances the richness.
- Red & Green Sanding Sugar: Not just for looks—these add a crunchy pop of texture and festive color.
Make It Your Way
I love how versatile this Classic Christmas Sugar Cookies Recipe is. You can keep it classic with red and green sugar, or jazz it up with fun flavors and decorations. Here’s how I usually tweak it to make it more “me” or fit my mood.
- Variation: Sometimes I swap out almond extract for a little peppermint extract for an extra holiday zing—it pairs wonderfully with the vanilla and adds a minty freshness.
- Dietary swap: I’ve also tried subbing half the butter for coconut oil for a dairy-free twist—just keep an eye on the texture since it can make the dough a bit softer.
- Decorating idea: Instead of sanding sugar, try dipping the edges in melted white chocolate and sprinkling crushed candy canes. It adds both crunch and charm.
Step-by-Step: How I Make Classic Christmas Sugar Cookies Recipe
Step 1: Cream the Butter, Cream Cheese & Sugar
Start by putting your softened butter, cream cheese, and sugar into a large mixing bowl. Using a hand mixer, beat these together until the mixture is light and fluffy—usually about 4 to 5 minutes. This step is crucial because it traps air, making the cookies tender. Be patient and don’t rush it! I like to scrape down the bowl once to make sure everything gets mixed evenly.
Step 2: Add Eggs and Extracts
Next, add your eggs one at a time, mixing well after each addition. Then pour in the vanilla and almond extracts. The aroma at this stage alone makes me smile—it's that classic holiday scent you want wafting through your kitchen.
Step 3: Combine Dry Ingredients and Form Dough
In a separate bowl, whisk your flour, cornstarch, baking soda, and salt together. Then, on low speed, slowly add these dry ingredients into the wet mixture. Keep it gentle and just mix until the dough forms—overmixing will make your cookies tough. Once combined, cover the bowl with plastic wrap and pop it into the fridge for 2 hours. This chilling step is key to prevent spreading and to develop better flavor.
Step 4: Shape and Decorate
When you’re ready, preheat your oven to 350°F (175°C) and line a baking sheet with parchment paper. Scoop out small balls of dough (I use a cookie scoop for even sizes) and place them about an inch apart on your pan. Then, press down lightly with a fork in a crisscross pattern. Finally, sprinkle generously with red and green sanding sugar. It’s such a simple touch but instantly festive and fun.
Step 5: Bake and Cool
Bake for 9 to 11 minutes. Here’s a pro tip: don’t overbake! You want these cookies to remain soft—they’ll look a little underdone when you pull them out but will firm up perfectly as they cool. Let them rest on the baking sheet for 5 minutes, then transfer to a wire rack to cool completely before enjoying or decorating further.
Top Tip
I’ve baked these cookies dozens of times, and a few little tricks make all the difference between good and unforgettable. Here are the top tips I swear by:
- Fully soften your butter and cream cheese: I once rushed this step and ended up with lumpy dough that was a pain to work with—lesson learned!
- Don’t overmix dry ingredients: Folding them in gently keeps the cookies tender, not tough.
- Use a cookie scoop: This makes for even, uniform cookies that bake consistently every time.
- Watch baking time closely: Cookies continue cooking on the hot pan after removal, so pulling them out slightly underbaked ensures that soft, melt-in-your-mouth texture.
How to Serve Classic Christmas Sugar Cookies Recipe

Garnishes
For me, those classic red and green sanding sugars are unbeatable—they add just enough sparkle and crunch without overwhelming the cookie’s delicate tenderness. Sometimes, I get playful and use colored nonpareils or edible glitter for a kiddos’ party. If you want to get fancy, a thin royal icing outline can turn these into edible works of art.
Side Dishes
These cookies pair beautifully with a warm cup of cocoa or spiced eggnog. I often bring them alongside cheese and charcuterie boards during holiday gatherings—it’s a surprising but delightful sweet contrast to salty snacks. And if you’re gifting them, packaging with a little tin of homemade hot chocolate mix is always a hit.
Creative Ways to Present
For parties or gifts, I love stacking these cookies in clear cellophane bags tied with a festive ribbon. Another fun idea is arranging them on decorative platters lined with freshly picked pine or holly sprigs to add that Christmas-y vibe. And you can never go wrong with letting the kids decorate cookies with various toppings as a family activity—that always brings extra joy.
Make Ahead and Storage
Storing Leftovers
Once your Classic Christmas Sugar Cookies are baked and cooled, store them in an airtight container at room temperature. I usually stack them with parchment paper between layers so they don’t stick together. They stay fresh and soft for up to a week—perfect for nibbling through busy holiday days.
Freezing
I’ve frozen both the dough and the baked cookies with great results. For dough, shape it into a log, wrap it tightly in plastic wrap, and freeze for up to 3 months—just slice and bake when you’re ready. Baked cookies freeze well in a freezer-safe container too. Thaw them at room temperature and they taste just like fresh.
Reheating
To bring back that fresh-baked softness, I zap cookies in the microwave for 5 to 10 seconds. This little trick revives their tender texture without making them tough. Just don’t overdo it or they can become chewy!
Frequently Asked Questions:
The cream cheese adds a special softness and slight tang that makes these cookies unique. Leaving it out will change the texture and richness, so if you must omit it, expect a firmer, less tender cookie. If you’re dairy-free, try substituting with a vegan cream cheese alternative, but keep in mind the flavor and texture will be slightly different.
Chilling the dough for at least 2 hours is key to controlling spread. The cold dough firms up the fats, helping cookies hold their shape better in the oven. Also, don’t over-cream the butter and sugar — too much air can cause excessive spreading. Baking at the right temperature (350°F) and using parchment-lined sheets also helps with even, minimal spreading.
Absolutely! These cookies have a sturdy yet tender base that holds up well to royal icing decorations. Just make sure the cookies are fully cooled before decorating. You can use your favorite royal icing recipe to make festive designs and add that extra Christmas flair.
Storing cookies in an airtight container at room temperature with a slice of bread inside can help maintain moisture and keep them soft longer. Avoid refrigerating as it can dry cookies out. Instead, freeze extra cookies if you won’t eat them within a week, and thaw at room temperature before serving.
Final Thoughts
This Classic Christmas Sugar Cookies Recipe isn’t just a cookie; it’s a tradition, a sweet way to fill your home with warmth, memories, and love. Whether you’re baking solo, with kids, or gifting to friends, these cookies are guaranteed to bring smiles. I genuinely hope they become a holiday staple in your kitchen just like they are in mine.
Print
Classic Christmas Sugar Cookies Recipe
- Prep Time: 10 minutes
- Cook Time: 11 minutes
- Total Time: 2 hours 21 minutes
- Yield: 36 servings
- Category: Dessert
- Method: Baking
- Cuisine: American
Description
Classic Christmas Cookies with a soft, fluffy texture and festive red and green sanding sugar decoration. These cookies are easy to make, chilled for perfect dough consistency, and baked to soft perfection without browning, making them ideal for holiday celebrations.
Ingredients
Wet Ingredients
- 1 stick salted butter softened
- 2 ounces cream cheese softened
- 1½ cups sugar
- 2 large eggs
- 1½ teaspoons vanilla extract
- ¼ teaspoon almond extract
Dry Ingredients
- 2½ cups all-purpose flour
- 1 tablespoon cornstarch
- 1 teaspoon baking soda
- ¼ teaspoon salt
Topping
- Red & Green Sanding Sugar
Instructions
- Mix Wet Ingredients: In a large bowl, add the softened butter, cream cheese, sugar, eggs, vanilla extract, and almond extract. Using a hand mixer, beat on medium speed until the mixture is light and fluffy, about 4-5 minutes.
- Add Dry Ingredients: Using a rubber spatula, scrape down the sides of the bowl. Add the all-purpose flour, cornstarch, baking soda, and salt to the wet mixture. Turn the hand mixer to a low speed and combine the ingredients until a soft dough forms.
- Chill the Dough: Cover the bowl with plastic wrap and refrigerate the dough for 2 hours to allow it to firm up, making it easier to handle and enhancing the texture of the cookies.
- Preheat Oven and Prepare Baking Sheet: After chilling, remove the dough from the refrigerator. Preheat your oven to 350 degrees Fahrenheit (175 degrees Celsius). Line a baking sheet with parchment paper and set aside.
- Shape and Decorate Cookies: Using your hands or a cookie scoop, form dough balls and place them on the prepared baking sheet, spacing them at least 1 inch apart. Using a fork, gently press each dough ball to create a crisscross pattern on top. Sprinkle generously with red and green sanding sugar.
- Bake Cookies: Bake in the preheated oven for 11 minutes. Make sure not to overbake; the cookies should remain soft and look slightly undercooked when you remove them from the oven—avoid any browning on the edges.
- Cool Cookies: Let the cookies cool on the baking sheet for 5 minutes before transferring them to a wire rack to cool completely. This will help them set and maintain their soft texture.
Notes
- Soften butter and cream cheese fully before mixing to avoid lumps and ensure a smooth dough.
- Remove cookies slightly underbaked; they will firm up as they cool, resulting in a soft texture.
- Use a cookie scoop for evenly sized and shaped cookies for consistent baking.
- Line baking sheets with parchment paper or silicone mats for easy cleanup and to prevent sticking.
- Store cookies in an airtight container at room temperature for 5-7 days to maintain freshness.
- Reheat cookies in the microwave for 5-10 seconds if you prefer them warm and soft.
- Freeze baked cookies in a freezer-safe container for up to 3 months. Thaw at room temperature before serving.
- Dough can be prepared 2-3 days in advance and kept refrigerated or frozen for up to 3 months for convenience.
Nutrition
- Serving Size: 1 cookie
- Calories: 120 kcal
- Sugar: 8 g
- Sodium: 80 mg
- Fat: 6 g
- Saturated Fat: 3.5 g
- Unsaturated Fat: 2 g
- Trans Fat: 0 g
- Carbohydrates: 15 g
- Fiber: 0.5 g
- Protein: 1.5 g
- Cholesterol: 25 mg


Leave a Reply