If you’re craving something comforting with a satisfying crunch, you’re in the right place. This Crispy Chicken Katsu Curry Recipe combines tender chicken breast with a crispy panko and parmesan crust, all smothered in a rich Japanese-style curry. Trust me, it’s an absolute crowd-pleaser!

Jump to:
Why You'll Love This Recipe
I’ve made this crispy chicken katsu curry more times than I can count because it just hits all the right notes—crispy, savory, slightly sweet, and so satisfying. It’s perfect for a cozy night in or meal prep for the busy week ahead.
- Crispy & Juicy Chicken: The combination of panko and parmesan cheese creates an irresistible crust that locks in moisture.
- Authentic Japanese Curry: Rich flavor with potatoes, carrots, and a perfectly thick gravy that warms you up from the inside out.
- Make-Ahead Friendly: Prepare the curry in advance for quick weeknight dinners, with the katsu fried fresh for maximum crunch.
- Customizable Heat: A pinch of chili powder lets you add a subtle spicy kick if you’re feeling adventurous.
Ingredients & Why They Work
Before you dive in, grabbing the right ingredients can really make a difference. Whether you opt for boneless chicken thigh for juiciness or chicken breast for a leaner option, each brings something unique to the dish. And don’t skip the parmesan—it’s the secret to that flavorful, crispy crust that takes this katsu to the next level.
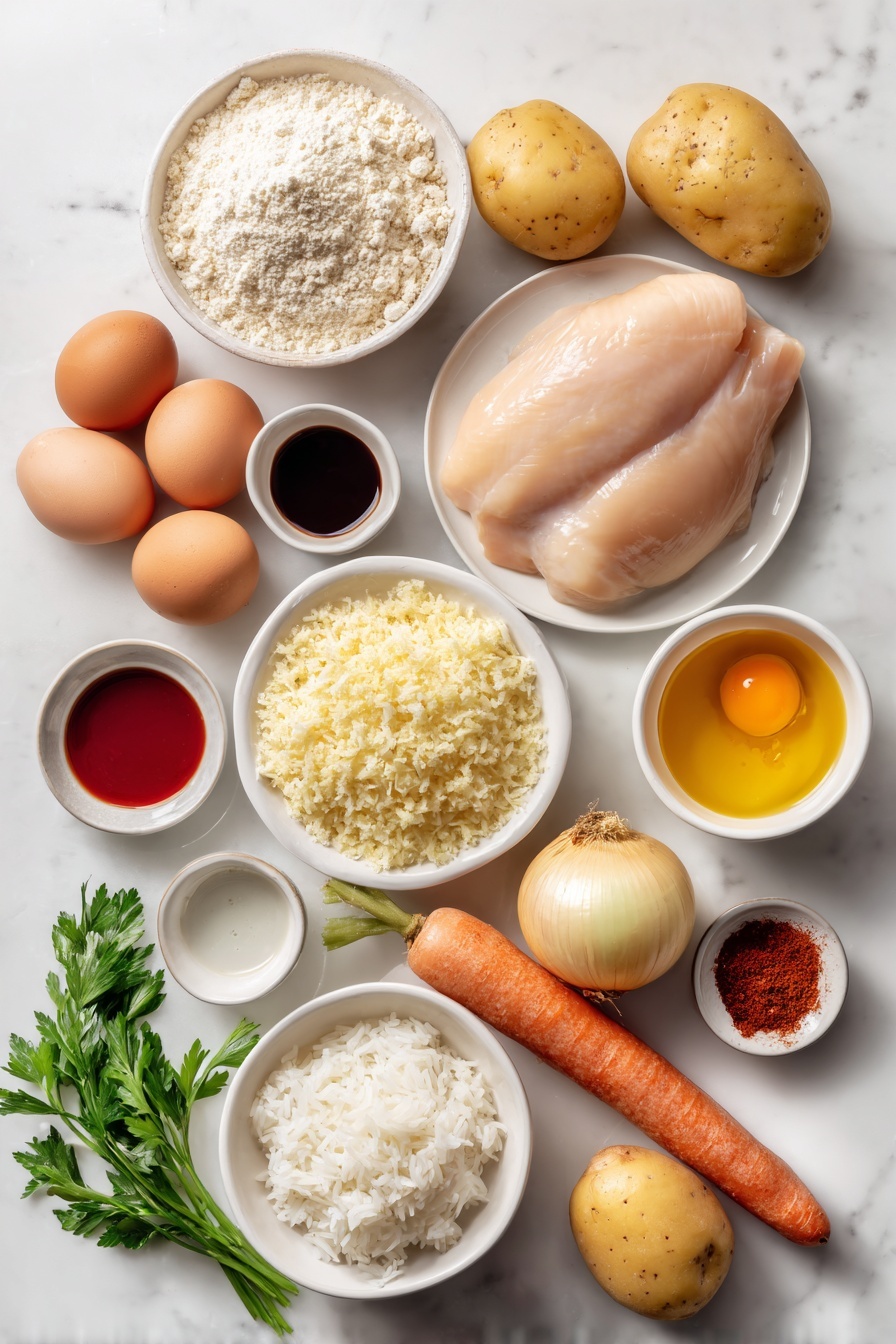
- Boneless Chicken Thigh or Breast: Choose thigh for more tenderness, or breast if you prefer a leaner cut.
- Butter: Adds richness to the curry base and helps develop a deep savory flavor.
- Onion: Builds sweetness and depth when softened into the curry.
- Potatoes and Carrots: Classic vegetables that soak up the curry flavor and add hearty texture.
- Japanese Curry Roux: Whether homemade or boxed, this is the heart of your curry’s thick, luscious sauce.
- Tsuyu Sauce: Enhances umami and complements the curry’s richness.
- Honey: Adds subtle sweetness to balance the savory spices.
- Sake: Brings depth and complexity to the curry flavor profile.
- Chili Powder (Optional): For a gentle spicy touch if you want a little heat.
- Fenugreek Powder: A key spice for authentic flavor; skip if unavailable but highly recommended.
- Tomato Ketchup: Adds tang and rounds out the curry taste.
- Cooking Oil for Deep Frying: Use a neutral oil that handles high heat well for that perfect katsu fry.
- All-Purpose Flour: For dusting the chicken and making the batter—essential for crispiness.
- Eggs: Bind the batter for the chicken coating.
- Panko Breadcrumbs: The crispy Japanese-style breadcrumbs that give this katsu its signature crunch.
- Grated Parmesan Cheese: Mixed with panko for extra flavor and a golden crispy texture.
- Cooked Japanese Short-Grain Rice: Fluffy and sticky, it’s the perfect base to soak up all that curry goodness.
- Fukujinzuke Pickles (Optional): Adds a bright, crunchy contrast that complements the rich curry.
- Fresh Parsley (Optional): For a fresh hint of color and herbaceous brightness when serving.
Make It Your Way
One of the best things about this Crispy Chicken Katsu Curry Recipe is how adaptable it is. Whether you want to tweak flavors, try different proteins, or adjust it for dietary needs, you can easily make it your own and keep that crispy, comforting goodness intact.
- Variation: For a juicier option, I love using boneless chicken thighs instead of breasts. They stay tender and add richness to the katsu that’s simply irresistible.
- Gluten-Free Twist: Swap the all-purpose flour and panko breadcrumbs for gluten-free alternatives. The key is to still get that light, crunchy texture on your katsu, and gluten-free panko works wonderfully.
- Make It Vegetarian: Try swapping chicken for thick slices of eggplant or firm tofu. Coat and fry them just like the chicken for a satisfying vegetarian katsu curry.
- Spice it Up: If you're a fan of heat, add an extra pinch of chili powder or even a dash of cayenne pepper to the curry for a fiery kick without overpowering the dish.
- Seasonal Veggies: Feel free to add other vegetables like bell peppers or peas to the curry to ramp up the freshness and color, making it a little more vibrant on the plate.
Step-by-Step: How I Make Crispy Chicken Katsu Curry Recipe
Step 1: Prep the Chicken Curry Ingredients
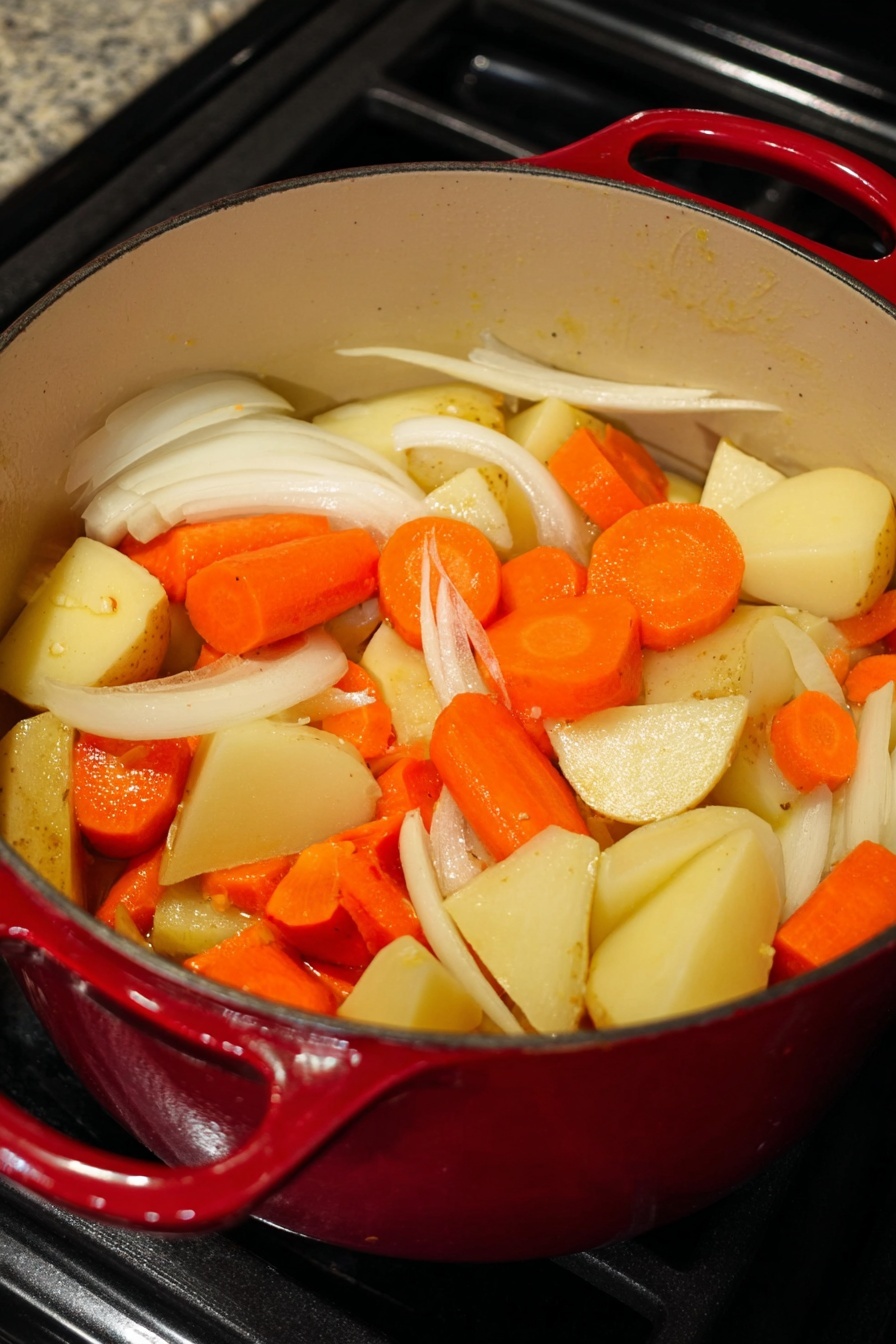
Start by cutting 300 grams of boneless chicken thigh into bite-sized pieces and seasoning with a pinch of salt and pepper. Thinly slice 1 onion, then peel and roughly chop 2 potatoes and 1 carrot into pieces about the size of the chicken. This mix of tender chicken and hearty vegetables forms the flavorful base of your curry.
Step 2: Build the Curry Base
Heat a large pot over medium heat and melt 1 tablespoon of butter. Toss in the chicken pieces and cook just until the outside seals—this locks in the juices. Add the sliced onion and cook until it’s softened and fragrant. Then stir in your potatoes, carrot, and 1 tablespoon of tsuyu sauce. Let everything mingle for about a minute—this step really amps up the flavor foundation.
Step 3: Simmer Your Curry to Perfection
Pour in 600 ml of water and bring it all to a boil. Afterward, lower the heat to a gentle simmer and add 4 servings of Japanese curry roux. Stir carefully until the roux dissolves completely, creating that silky, rich sauce. Now, mix in ½ tablespoon honey, 1 tablespoon sake, ½ teaspoon fenugreek powder, 1 teaspoon tomato ketchup, and an optional pinch of chili powder. Let the curry simmer, uncovered, for about 20 minutes until it thickens beautifully. Stir occasionally and keep it covered when done to stay warm while you prepare the katsu.
Step 4: Prep and Pound Your Chicken for Katsu
Heat about 1 liter of cooking oil to 170°C (338°F) for frying. Meanwhile, slice 2 chicken breasts in half horizontally and season both sides with two pinches of salt and pepper. Wrap each piece in plastic wrap and gently pound with a meat tenderizer or rolling pin until about 1 cm thick. This step ensures the chicken cooks evenly and stays tender inside the crispy coating.
Step 5: Mix Up the Batter and Crust
In a bowl, combine 100 ml water, 2 eggs, and 100 grams flour to form a thick batter. On a separate plate, blend 50 grams panko breadcrumbs with 4 tablespoons grated parmesan cheese—this combo delivers that crave-worthy crunch with a subtle savory twist. Finally, put 6 tablespoons of flour on another plate for dusting your chicken pieces before dipping.
Step 6: Coat Your Chicken Katsu
First, dust each chicken piece lightly with the flour, shaking off any excess so the batter will stick nicely. Next, dip them fully into the thick batter, then coat generously with the panko-parmesan mixture. Make sure every nook and cranny is covered for that perfect golden crust after frying.
Step 7: Fry to Crispy Perfection
Carefully lower each coated chicken piece into the hot oil. Fry for 6 minutes, turning halfway through to ensure an even golden-brown color and fully cooked interior. When done, transfer the katsu to a wire rack to drain the excess oil. The result? Crunchy on the outside, juicy on the inside chicken katsu that’s utterly irresistible.
Step 8: Plate and Enjoy Your Crispy Chicken Katsu Curry
Serve 4 portions of freshly cooked Japanese short-grain rice on plates. Ladle the rich curry on one side, then cut your crispy chicken katsu into 1 cm strips and lay them beautifully over the rice and curry. Garnish with optional fukujinzuke pickles and fresh parsley for that authentic final touch. Now, dive in and savor every warm, comforting bite!
Top Tip
Mastering the Crispy Chicken Katsu Curry Recipe is all about balancing texture and flavor. These tips come from my own kitchen trials and will help you get that perfect crispy crust and a rich, comforting curry every single time!
- Consistent Oil Temperature: Keeping your oil steady at 170°C (338°F) ensures the chicken cooks evenly and gets that golden crisp without burning or soaking up excess oil.
- Chicken Thickness Matters: Pounding the chicken breast to exactly 1 cm thick helps it cook through quickly while staying juicy and tender inside the crispy coating.
- Parmesan in the Panko: Mixing grated parmesan cheese with panko breadcrumbs adds a wonderful savory depth and crunch that really elevates the katsu crust.
- Simmer the Curry Slowly: Don’t rush the curry simmering step. Giving it a good 20 minutes lets the potatoes, carrots, and spices fully meld for that rich, comforting flavor.
How to Serve Crispy Chicken Katsu Curry Recipe
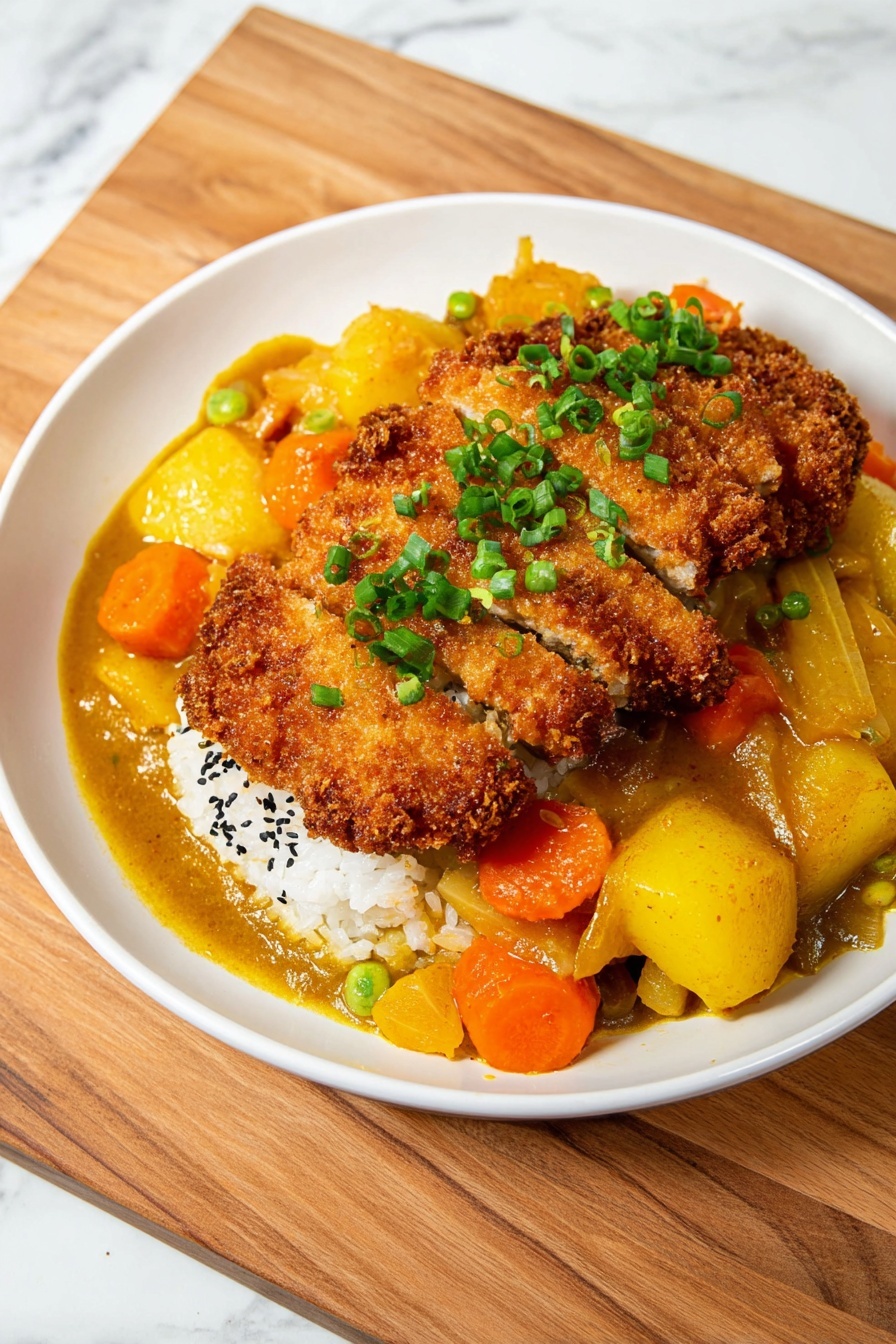
Garnishes
Classic fukujinzuke pickles are a must—they cut through the richness with a sweet tang. Fresh parsley sprinkled on top adds a bright, herbal note and a pop of color. For an extra touch, a drizzle of Japanese mayonnaise or a sprinkle of toasted sesame seeds works beautifully too.
Side Dishes
Keep it simple with a side of steamed Japanese short-grain rice to soak up that luscious curry sauce. A crisp green salad or lightly dressed cucumber sunomono salad offers a refreshing contrast. Miso soup on the side also complements the meal perfectly for a well-rounded Japanese comfort-food experience.
Make Ahead and Storage
Storing Leftovers
Store leftover chicken katsu and curry separately in airtight containers in the fridge. The curry will keep deliciously for up to 3 days. Keep it covered to retain moisture and flavor.
Freezing
You can freeze the curry sauce (without the chicken) for up to 1 month. Store it in a freezer-safe container, thaw overnight in the fridge before reheating. For the katsu, freezing is not recommended as it can lose its crispness and texture.
Reheating
Reheat curry gently on the stove over low heat until warmed through. To keep the chicken katsu crispy, reheat it separately in a toaster oven or air fryer at 170°C (338°F) for about 5 minutes. Microwave reheating tends to make the crust soggy, so avoid that if you can!
Frequently Asked Questions:
Yes! Boneless chicken thighs are actually juicier and more forgiving when frying, making for a tender and flavorful katsu. Follow the same preparation and cooking instructions.
Fenugreek adds a subtle aromatic note typical in Japanese curry, but it’s optional. If you don’t have it, you can simply omit it without drastically changing the flavor.
You can test by dropping a small bit of batter into the oil. If it bubbles steadily and rises to the surface quickly, the oil is ready. Too fast bubbling means it’s too hot, too slow means it’s cooler than desired.
Absolutely! The flavor of the Japanese curry often deepens after resting overnight. Simply reheat gently on the stove before serving, and prepare the katsu fresh for best texture.
Final Thoughts
I hope this Crispy Chicken Katsu Curry Recipe brings a warm, comforting smile to your table. There's something truly special about the crispy golden chicken paired with that rich, hearty curry that feels like a hug in a bowl. Whether you’re cooking for loved ones or treating yourself, this recipe is sure to satisfy your cravings for Japanese comfort food. Happy cooking—and don’t forget to savor every bite!
Print
Crispy Chicken Katsu Curry Recipe
- Prep Time: 20 minutes
- Cook Time: 40 minutes
- Total Time: 1 hour
- Yield: 4 servings 1x
- Category: Main Course
- Method: Frying
- Cuisine: Japanese
- Diet: Halal
Description
Japanese Chicken Katsu Curry is a comforting dish featuring tender chicken breast coated in a crispy panko and parmesan crust, served over a flavorful, thick Japanese-style curry with potatoes, carrots, and onions. This recipe is perfect for a satisfying lunch or dinner and can be prepared in advance for easy meals during the week.
Ingredients
Japanese Style Curry
- 300 g boneless chicken thigh or chicken breast
- 1 pinch salt and pepper
- 1 tbsp butter
- 1 onion
- 2 potato
- 1 carrot
- 4 servings Japanese curry roux (homemade or boxed)
- 600 ml water
- 1 tbsp tsuyu sauce (noodle soup base)
- ½ tbsp honey
- 1 tbsp sake
- 1 pinch chili powder (optional)
- ½ tsp fenugreek powder
- 1 tsp tomato ketchup
Chicken Katsu
- cooking oil for deep frying (about 1 liter)
- 2 chicken breasts
- 2 pinches salt and pepper
- 6 tbsp all-purpose flour (for dusting)
- 100 ml water
- 2 egg
- 100 g all-purpose flour (for batter)
- 50 g panko breadcrumbs
- 4 tbsp grated parmesan cheese
To Serve
- 4 portions cooked Japanese short-grain rice
- fukujinzuke pickles (optional)
- fresh parsley (optional)
Instructions
- Prepare the Chicken Curry: Cut 300 g boneless chicken thigh into bite-size pieces and season with 1 pinch salt and pepper. Thinly slice 1 onion, peel and cut 2 potatoes and 1 carrot into rough bite-size pieces.
- Cook Curry Base: Heat a large pot over medium heat and melt 1 tablespoon butter. Add chicken pieces and fry until sealed on the outside. Add sliced onion and cook until slightly softened. Add potato, carrot, and 1 tablespoon tsuyu sauce, stirring for about 1 minute.
- Simmer the Curry: Pour in 600 ml water and bring to a boil. Reduce heat to a simmer and add 4 servings of Japanese curry roux. Stir until dissolved. Add ½ tablespoon honey, 1 tablespoon sake, ½ teaspoon fenugreek powder, 1 teaspoon tomato ketchup, and 1 pinch chili powder. Simmer for 20 minutes until thickened, stirring occasionally. Keep covered to keep warm.
- Prepare Chicken for Katsu: Heat cooking oil to 170°C (338°F). Cut 2 chicken breasts in half horizontally. Season both sides with 2 pinches salt and pepper. Wrap chicken pieces in plastic wrap and pound with a meat tenderizer or rolling pin until 1 cm thick.
- Make the Batter and Coating: In a bowl, mix 100 ml water, 2 eggs, and 100 g all-purpose flour to create a thick batter. Mix 50 g panko breadcrumbs and 4 tablespoon grated parmesan cheese together on a plate. Place 6 tablespoon all-purpose flour on another plate for dusting the chicken.
- Bread the Chicken: Lightly coat each chicken piece in flour first, shaking off excess. Dip into the batter, then coat completely with the panko and parmesan mixture.
- Fry the Katsu: Carefully place coated chicken in hot oil. Fry for 6 minutes, turning halfway, until golden and cooked through. Remove and drain excess oil on a wire rack.
- Serve: Place 4 portions of cooked Japanese rice on plates. Spoon curry alongside rice. Cut chicken katsu into 1 cm strips and arrange over rice and curry. Garnish with fukujinzuke pickles and fresh parsley if desired. Enjoy!
Notes
- Ensure oil temperature is maintained around 170°C for crispy and evenly cooked katsu.
- Use boneless thigh for juicier chicken; breast can be used for leaner option.
- Fenugreek powder adds authentic flavor but can be omitted if unavailable.
- Boxed Japanese curry roux cubes are a convenient shortcut; adjust water quantity per package instructions.
- For gluten-free version, substitute flour and panko with gluten-free alternatives.
- You can make curry in advance and reheat; katsu is best served fresh but can be reheated in a toaster oven to maintain crispness.
- Adding parmesan cheese to panko enhances the crust’s flavor and texture.
Nutrition
- Serving Size: 1 serving
- Calories: 650 kcal
- Sugar: 8 g
- Sodium: 700 mg
- Fat: 30 g
- Saturated Fat: 7 g
- Unsaturated Fat: 18 g
- Trans Fat: 0 g
- Carbohydrates: 65 g
- Fiber: 6 g
- Protein: 40 g
- Cholesterol: 120 mg


Leave a Reply