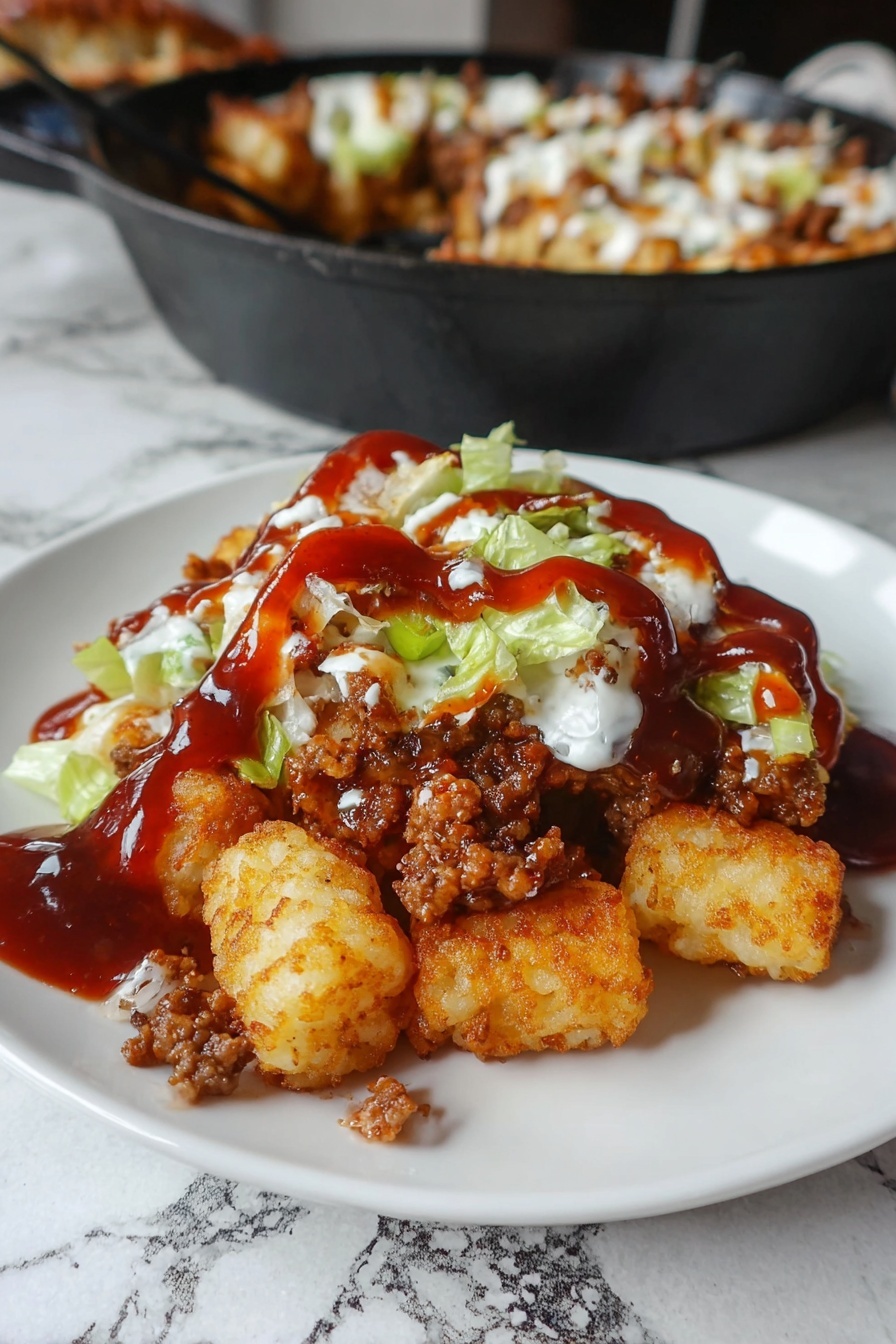
This might be one of the most fun and satisfying ways to feed a crowd or treat yourself to ultimate comfort food. The **Crispy Loaded Tater Tot Nachos Recipe** combines everything you love about nachos, but swaps out chips for crispy, golden tater tots—trust me, you’re going to want this on your regular rotation.

Jump to:
Why You'll Love This Recipe
From my first bite of this Crispy Loaded Tater Tot Nachos Recipe, I was hooked—not just because it’s easy to throw together, but because of that satisfyingly crunchy, cheesy, and savory combo. Plus, it’s great for casual get-togethers or a cozy night in.
- Crispy Texture: Baking the tater tots twice creates the perfect crunch you want in nachos without sogginess.
- Layered Flavors: The combo of seasoned beef, peppers, onions, and crispy bacon makes every bite burst with flavor.
- Customizable: You can easily tweak toppings or swap ingredients to suit your taste or dietary needs.
- One-Skillet Wonder: Everything bakes together to meld the cheeses and flavors perfectly, while staying fuss-free.
Ingredients & Why They Work
Each ingredient in this Crispy Loaded Tater Tot Nachos Recipe plays its part to create that classic nacho vibe with a creative twist. Using both cheddar and mozzarella cheese balances sharpness with melty gooeyness, while bacon amps up the smoky, salty goodness.
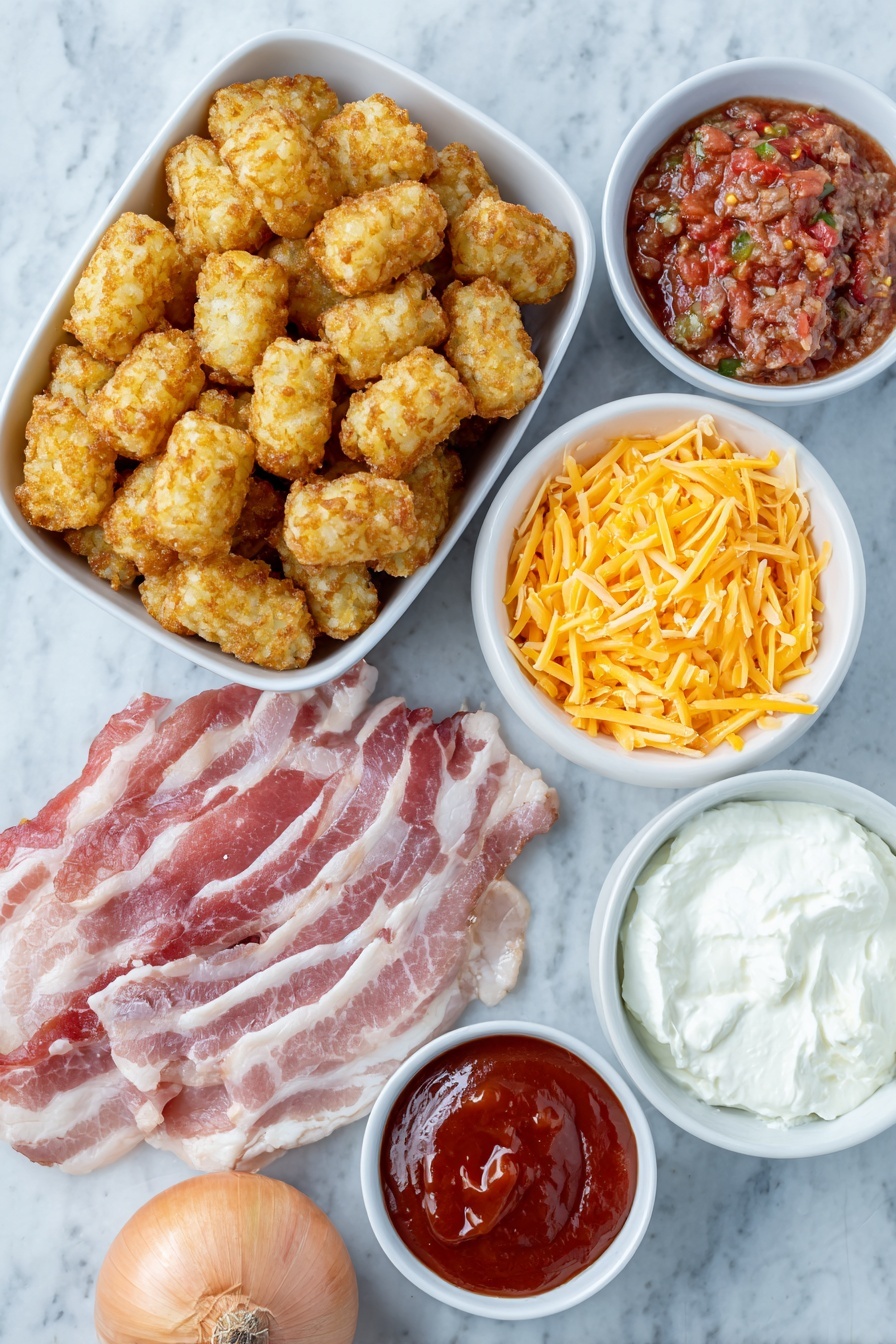
- Frozen Tater Tots: The foundation—crispy outside, soft inside, and so much sturdier than tortilla chips for holding toppings.
- Ground Beef: The savory bite that carries the taco seasoning, providing hearty, meaty richness.
- Sweet Onion: Adds a mild sharpness and sweetness that complements the spicier elements.
- Mini Sweet Peppers or Bell Pepper: I love the pops of color and their subtle sweetness against the salty bacon.
- Center Cut Bacon: Crispy, smoky, and absolutely essential for that extra savory punch.
- Salsa: Adds moisture and tang to the beef, keeping the flavors vibrant.
- Taco Seasoning: The flavor star that gives this dish its Tex-Mex personality.
- Cheddar Cheese: Sharp and flavorful—perfect for sprinkling between layers.
- Mozzarella Cheese: Melty and mild, balances the cheddar perfectly.
- Hot Sauce & Sour Cream (or Greek Yogurt): A tangy finish and cooling contrast that rounds off the heat.
Make It Your Way
One thing I love about this Crispy Loaded Tater Tot Nachos Recipe is how easy it is to customize. I often swap out the ground beef for shredded chicken or even a black bean mix, especially when feeding a mixed crowd. And don’t be shy with the toppings—you could add jalapeños, olives, or even a dash of pickled red onions for extra zing.
- Vegetarian Variation: I've tried this with crumbled seasoned tofu or black beans, and it works wonderfully to keep it hearty without the beef.
- Spice Level: Feel free to add extra hot sauce or diced jalapeños if you like it fiery—this recipe is a solid base for customizing heat.
- Cheese Swap: Monterey Jack or pepper jack bring a different dimension if cheddar and mozzarella aren't what you have on hand.
Step-by-Step: How I Make Crispy Loaded Tater Tot Nachos Recipe
Step 1: Bake the Tater Tots to a Golden Crisp
Start by spreading your frozen tater tots evenly on a baking sheet. Pop them in a 425°F oven for about 30 minutes. The key here is to give them enough time to get crispy outside while staying fluffy inside. Don’t overcrowd your pan—giving tots some breathing room helps with even browning. I like to toss them halfway through to brown all sides.
Step 2: Crispen Up Bacon and Sauté Veggies
While the tots are baking, slice your bacon into smaller pieces. This helps it cook faster and get extra crispy in the pan. Once it’s done, transfer the bacon to a paper towel-lined plate to soak up grease. Wipe out the pan gently, leaving just a bit of fat for sautéing your diced sweet onion and peppers—about a minute or so is enough to soften and awaken their flavors.
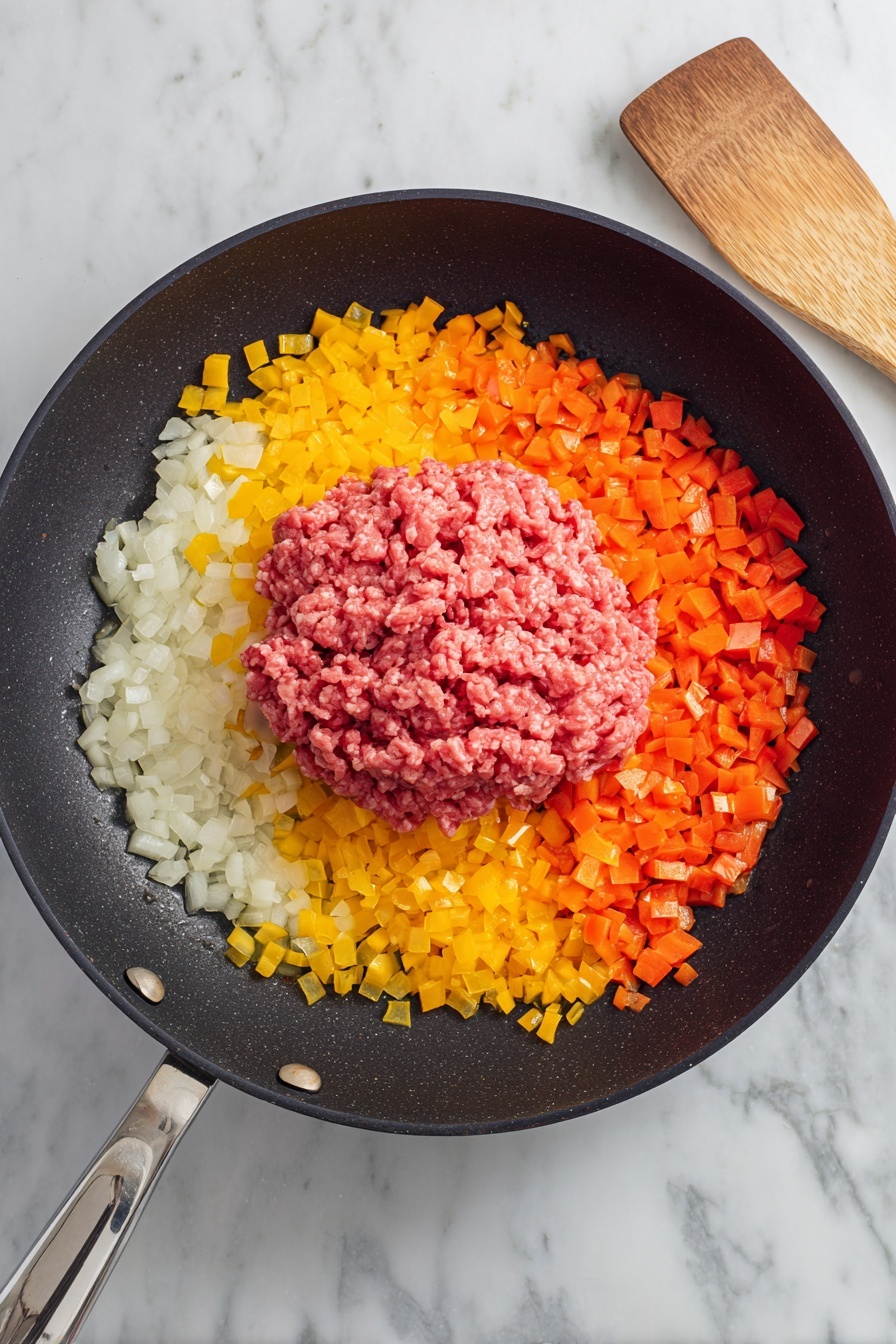
Step 3: Brown the Beef and Layer in Flavor
In the same pan, add your ground beef, breaking it into chunks with a spatula. Cook until it’s nicely browned but still has a hint of pink. Add your taco seasoning and salsa to infuse those classic nacho flavors, then let it simmer down for about 5 minutes until fully cooked. Remove from heat and set aside.
Step 4: Assemble the Nachos Layers in Your Skillet
Using a 10.5-inch cast iron skillet (my favorite for even heating and layering), spray with nonstick spray. Start with a layer of tater tots, then spread half your beef mixture on top. Sprinkle a mix of shredded cheddar and mozzarella over it—this combo brings out the best melt and flavor. Repeat with another layer of tots and beef, then add the crispy bacon and remaining cheese. The layering helps keep the texture nice and balanced, and the cheese melts into every nook.
Step 5: Bake and Let It Rest
Bake your assembled nachos in the still-hot oven for about 10 minutes, just enough to get the cheese bubbling and everything melded together. When you pull it out, give it 5-10 minutes to cool slightly—it helps everything set and makes it easier to serve.
Top Tip
In all my times making this Crispy Loaded Tater Tot Nachos Recipe, I’ve learned a few tricks that saved me from soggy tots or bland beef. These tips can really change the game when you want perfect results every time.
- Double Bake Tots: Baking the tater tots before and after layering keeps them crispy and prevents sogginess.
- Bacon Crispy Is a Must: Make sure your bacon is extra crispy, so it doesn't lose texture once baked in the skillet.
- Don’t Skip the Rest: Let the nachos cool briefly out of the oven; this helps the cheesy layers firm up and makes serving neater and tastier.
- Even Layers: Distribute your ingredients in fairly even layers to get a good balance of crunch, meat, and cheese in every bite.
How to Serve Crispy Loaded Tater Tot Nachos Recipe
Garnishes
I always top mine with dollops of sour cream or Greek yogurt for tang and creaminess. Fresh diced tomatoes, chopped cilantro, and sliced green onions add brightness and freshness that cut through the richness. And if I’m feeling adventurous, a little avocado or guacamole on the side is heavenly.
Side Dishes
This is such a filling dish that I keep sides light and fresh—think a crisp green salad or a simple slaw with lime and cilantro. Sometimes I serve with a side of black beans or corn salsa to keep that Tex-Mex vibe going strong.
Creative Ways to Present
For parties, I’ve arranged these nachos in individual ramekins or mini skillets so everyone has their own portion. It looks festive and helps with portion control. Another fun idea is layering in a big casserole dish for casual family dinners, then letting everyone scoop their own perfect loading.
Make Ahead and Storage
Storing Leftovers
I store any leftovers in an airtight container in the fridge for up to three days. Because the layers have already baked together, the tots can soften a bit overnight but still taste great reheated—just expect a more casserole-not-nachos texture the next day.
Freezing
If I want to save a portion for later, I freeze it before baking. I assemble everything in a freezer-safe dish, cover tightly, and freeze for up to a month. To reheat, I thaw overnight in the fridge then bake as usual to crisp everything up.
Reheating
Reheating in the oven at 350°F for 10-15 minutes works best to restore crispness and melt the cheese again. Microwaving is quicker but can make the tots soggy, so I only do that in a pinch.
Frequently Asked Questions:
Absolutely! You can prep the layers a day ahead and keep them covered in the fridge. When you’re ready to eat, just bake it until bubbly and hot. This actually helps the flavors meld beautifully.
The trick is to bake the tater tots before layering, then bake the assembled dish again for a short time. Avoid covering with foil during baking to maintain a crispy exterior.
Definitely! Ground turkey, chicken, or even plant-based crumbles work well here. Just adjust cooking times accordingly and make sure to season everything properly so it stays flavorful.
This Crispy Loaded Tater Tot Nachos Recipe can be gluten-free if you carefully check your taco seasoning and salsa ingredients. Most frozen tater tots are naturally gluten-free, but always verify the packaging to be sure.
Final Thoughts
Honestly, this Crispy Loaded Tater Tot Nachos Recipe is one of those guilty pleasures that doesn’t get old. It’s a bit indulgent but totally worth it for those moments when you want cozy, flavorful, and fun food on your table. If you love nachos but want to switch things up, this is your new go-to—I promise you’ll be making it again and again!
Print
Delicious Recipe
- Prep Time: 15 minutes
- Cooling Time: 5 minutes
- Cook Time: 40 minutes
- Total Time: 1 hour
- Yield: 8 servings
- Category: Main Course
- Method: Baking
- Cuisine: American
Description
This Loaded Tater Tot Nacho Casserole is a deliciously layered dish combining crispy baked tater tots, seasoned ground beef, sautéed vegetables, crispy bacon, and melted cheese. Perfect for casual dinners or game day snacks, this casserole is easy to prepare and full of comforting flavors.
Ingredients
Main Ingredients
- 1 bag (2 lbs) frozen tater tots
- 1 pound lean 90/10 ground beef
- 1 medium sweet onion, diced
- 6 mini sweet peppers or 1 large bell pepper, diced
- 6 strips center cut bacon, sliced
- ¼ cup salsa
- 4 teaspoon taco seasoning
- 56 g (½ cup) shredded cheddar cheese
- 28 g (¼ cup) shredded mozzarella cheese
- Hot sauce for topping, to taste
- Sour cream or Greek yogurt for topping, to taste
Instructions
- Bake Tater Tots: Spread the frozen tater tots evenly on a baking sheet and bake in a preheated oven at 425 degrees Fahrenheit for 30 minutes until golden and crispy.
- Cook Bacon: While the tater tots bake, slice the bacon strips and cook them over medium heat in a pan until crispy. Remove and drain on paper towels.
- Sauté Vegetables: Using the same pan, carefully wipe out excess bacon grease, leaving a small amount behind. Add diced peppers and onions, season lightly with salt and pepper, and cook for about 1 minute until slightly softened.
- Cook Ground Beef: Add ground beef to the pan with the vegetables. Break up the meat with a spatula and cook until browned with some pink remaining.
- Season Beef Mixture: Stir in taco seasoning and salsa, mixing well. Continue to cook until the beef is fully cooked through, about 5 minutes. Remove from heat.
- Assemble Casserole: Spray a 10.5-inch cast-iron skillet with nonstick spray. Arrange a layer of tater tots on the bottom, then spread half of the beef mixture evenly on top. Sprinkle ¼ cup cheddar and mozzarella cheeses over the beef. Add the remaining tater tots in a puzzle-like formation, then top with the remaining beef, bacon pieces, and the final ¼ cup cheddar cheese.
- Bake Casserole: Place the assembled skillet back in the oven and bake for an additional 10 minutes to melt the cheeses and blend flavors.
- Cool and Serve: Carefully remove the skillet from the oven and let it cool for 5 to 10 minutes. Add additional toppings like hot sauce and sour cream or Greek yogurt before serving. Scoop out portions and enjoy!
Notes
- A deep cast iron skillet makes layering easier, but you can use a baking sheet, cake pan, or small baking dish as alternatives.
- This recipe is forgiving — feel free to add other favorite nacho toppings like jalapeños, olives, or diced tomatoes.
- Everything is pre-cooked except the final melting step, so you can assemble in bowls and serve immediately without baking if desired.
- For a healthier or quicker option, try making the tater tots in an air fryer following quality air fryer tater tot recipes.
- Leftover casserole can be refrigerated and reheated in the oven or microwave.
Nutrition
- Serving Size: 1 serving
- Calories: 450 kcal
- Sugar: 3 g
- Sodium: 600 mg
- Fat: 25 g
- Saturated Fat: 9 g
- Unsaturated Fat: 14 g
- Trans Fat: 0.5 g
- Carbohydrates: 35 g
- Fiber: 3 g
- Protein: 24 g
- Cholesterol: 80 mg


Leave a Reply