There’s something undeniably magical about sweet, melty chocolate paired with fluffy marshmallows this time of year. That’s why I’m excited to share my Festive Chocolate Marshmallow Pops Recipe—it’s a simple, joyful treat that’s perfect for holiday parties or cozy nights by the fire. Trust me, these pops will quickly become your go-to festive indulgence!

Jump to:
- Why You'll Love This Recipe
- Ingredients & Why They Work
- Make It Your Way
- Step-by-Step: How I Make Festive Chocolate Marshmallow Pops Recipe
- Top Tip
- How to Serve Festive Chocolate Marshmallow Pops Recipe
- Make Ahead and Storage
- Frequently Asked Questions:
- Final Thoughts
- Festive Chocolate Marshmallow Pops Recipe
Why You'll Love This Recipe
I can’t get enough of these marshmallow pops. They’re festive, fun to make, and honestly, who doesn’t love a treat on a stick? Plus, they bring together the crunch of candy canes with smooth chocolate and airy marshmallows, creating a delightful bite every single time.
- Easy to Make: Minimal ingredients and straightforward steps so you can whip these up quickly, even with kids helping out.
- Customizable: You can switch up the colors and sprinkles depending on your holiday vibe or party theme.
- Kid-Approved: My nieces and nephews couldn’t stop reaching for seconds, and that’s a true testament in my book!
- Perfect Party Treat: They look gorgeous displayed in a jar or on a platter, adding instant festive charm to any gathering.

Ingredients & Why They Work
Each ingredient in this Festive Chocolate Marshmallow Pops Recipe plays a role in making these treats irresistible. The candy canes bring a peppermint crunch and hold the marshmallows perfectly. The melting chocolates coat the marshmallows smoothly, and the colorful melts and sprinkles add that magical holiday touch. I always look for good-quality melting chocolates—they melt better and harden with a lovely shine.
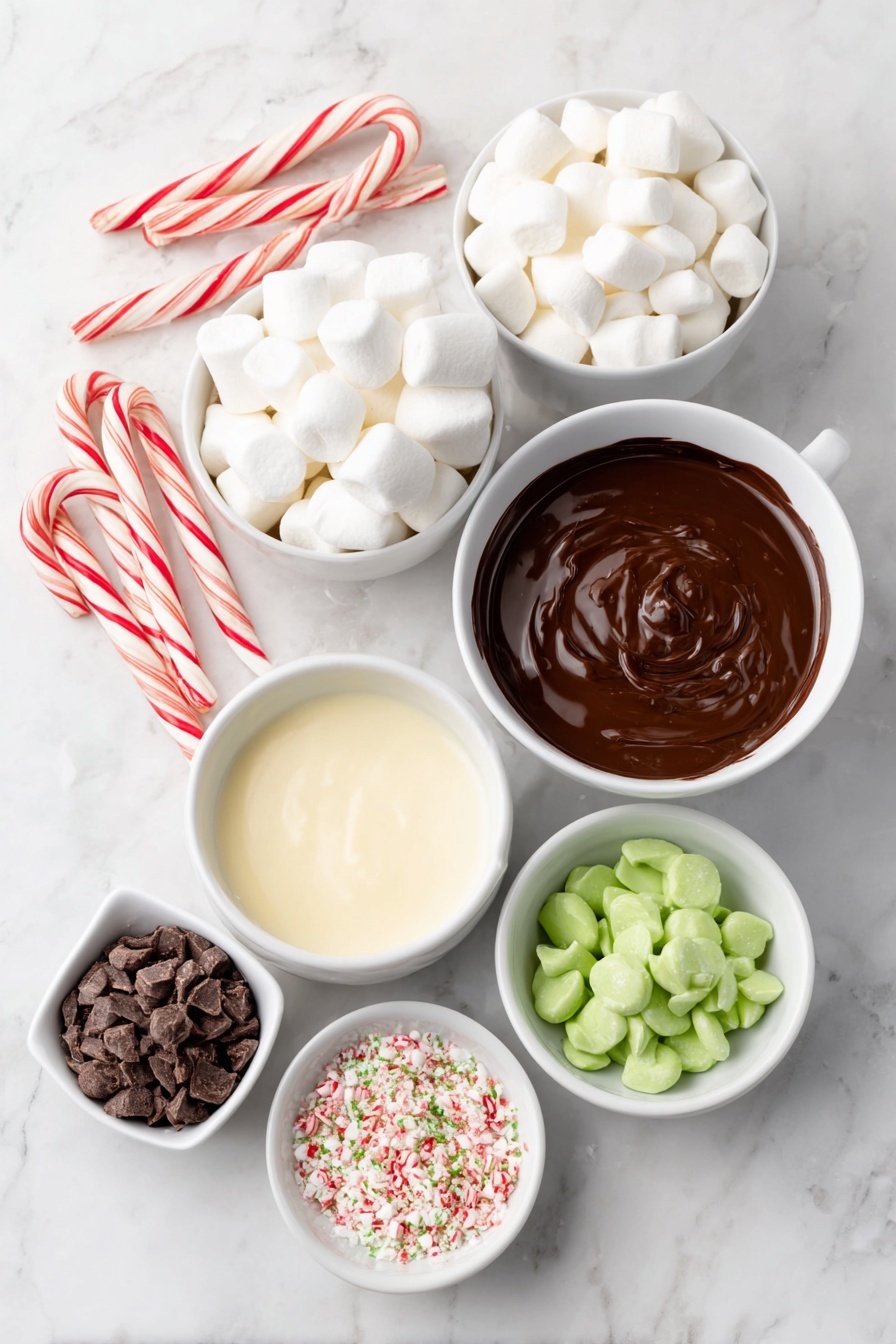
- Candy canes: These act as both a flavorful peppermint stick and the “handle” for your pops; leaving their wrapper on until assembly helps keep them intact.
- Large marshmallows: Soft, airy, and perfect for dipping—choose jumbo ones for better coverage and bite size.
- Melting chocolate: Smooths out beautifully when microwaved gently; regular chocolate chips don’t always melt as well.
- White melting chocolate: Adds a lovely contrast and allows for creative decorating options.
- Green and red melts: These candy melts brighten up the pops with festive colors; you can find them seasonally or use colored chocolate.
- Crushed candy canes: Adds a crunch layer and extra peppermint zing, crushed finely or coarsely based on preference.
- Holiday sprinkles: I love using a mix of shapes and colors to enhance the festive vibe and add texture.
Make It Your Way
One of the best parts about the Festive Chocolate Marshmallow Pops Recipe is how easy it is to tweak. I love trying different sprinkles and drizzle designs depending on my mood or the event. Don’t be afraid to personalize it with your favorite flavors or colors.
- Variation: One holiday season, I swapped out peppermint candy canes for cinnamon ones—adding a warm twist that everyone adored. You can even try peanut butter or caramel drizzles for extra decadence.
- Dietary options: Using dairy-free melting chocolates and vegan marshmallows works well if you have guests with allergies or preferences.
- Seasonal changes: When Valentine’s Day rolls around, I switch the red and green melts to pink and white for an instant themed treat.
Step-by-Step: How I Make Festive Chocolate Marshmallow Pops Recipe
Step 1: Threading the Marshmallows with Care
First, gently thread three marshmallows onto each candy cane. Since candy canes can break easily when unwrapped, I usually leave them wrapped right up until this step—quickly rinsing them if needed to remove any wrapper residue. Handling them carefully means no cracks and perfect “handles” for your pops.
Step 2: Melting Chocolate Magic
Pop the regular melting chocolate into a microwave-safe bowl and heat it in 20-second bursts, stirring well after each, until smooth and luscious. Repeat with white melting chocolate, and separately melt your green and red candy melts following package directions. Taking your time here ensures silky coatings that harden beautifully.
Step 3: Coating the Pops
Quickly but gently coat half the pops in melted brown chocolate and the other half in white. Use a spoon to drip the chocolate all over each marshmallow, leaving the candy cane loop uncovered—it just adds to the charm and makes holding easier. Set them down on parchment paper to prepare for decorating.
Step 4: Decorating Fiesta
While the chocolate is still wet, sprinkle your crushed candy canes and festive sprinkles generously. For a playful finishing touch, drizzle your colored melts over some pops using a piping bag or just a spoon. Let them rest for about 5 minutes so the decorations can harden into place.
Step 5: Serving Up Smiles
Once set, these pops are ready to dazzle at holiday gatherings, gift bags, or simply as a treat to indulge in at home. They pair beautifully with a cozy mug of hot cocoa or a festive punch.
Top Tip
From making these pops countless times, I’ve learned that a few simple tips make all the difference between good and great. These help you get flawless coating and avoid frustration with broken candy canes.
- Gentle Handling: Keep candy canes wrapped until just before threading to prevent snapping.
- Chocolate Melting: Use short microwave bursts and stir in between to avoid burning or seizing.
- Coating Evenness: Tilt the spoon to drip chocolate slowly and cover every marshmallow surface.
- Cool Setting: Let the coated pops rest at room temperature or in a cool spot briefly before moving to storage to lock the decorations.
How to Serve Festive Chocolate Marshmallow Pops Recipe

Garnishes
I tend to use crushed candy canes combined with a mix of red, green, and white holiday sprinkles—stars, tiny balls, and snowflakes if I can find them. They’re fun for the kids and give a beautiful texture contrast. Plus, it just looks super festive and festive marshmallow pops wouldn’t be the same without a little sparkle!
Side Dishes
When serving, I love pairing these marshmallow pops with a warm batch of homemade hot chocolate, maybe even with a splash of peppermint syrup. They also go great beside a platter of holiday cookies or spiced nuts, creating a perfect sweet table spread.
Creative Ways to Present
One festive idea I tried was standing the pops upright in a styrofoam block wrapped in decorative foil inside a pretty container—it looks like a bouquet and makes for a charming gift or centerpiece. Another time, I wrapped individual pops in cellophane with ribbons for easy grab-and-go treats at a holiday party.
Make Ahead and Storage
Storing Leftovers
Once the chocolate has fully hardened, store your marshmallow pops in an airtight container at room temperature. If your kitchen is warm, I’ve found keeping them in the fridge works better—they hold their shape without sweating. Stored properly, they keep well up to a week.
Freezing
I don’t usually freeze these because the marshmallows can get a little sticky or lose texture when thawed. They’re best enjoyed fresh within a few days, but if you do freeze them, wrap tightly and thaw slowly in the fridge to minimize moisture build-up.
Reheating
Reheating isn’t really necessary with these pops, but if your chocolate looks dull or soft, a few minutes in a cool spot should firm them back up. Avoid microwaving since it melts the chocolate and softens the marshmallows too much.
Frequently Asked Questions:
Regular chocolate chips can be used, but they don’t always melt as smoothly as melting chocolates and might seize or become grainy. If you want a silky coating, I recommend ingredients labeled as "melting chocolate" or candy melts for best results.
Leaving the candy canes wrapped until just before threading the marshmallows helps a lot. Also, handle them gently, especially when sliding marshmallows on. If you need to unwrap early, wash them lightly and dry thoroughly to reduce stickiness.
Absolutely! You can make the pops a day or two in advance, store them in an airtight container, and keep at room temperature or in the fridge if it’s warm. Just allow any chilled pops to come to room temperature before serving for best flavor and texture.
You can easily crush candy canes by placing them in a ziplock bag and gently pounding with a rolling pin or by pulsing briefly in a food processor. Just go easy so you don’t pulverize them into powder unless that’s your preference for sprinkling.
Final Thoughts
This Festive Chocolate Marshmallow Pops Recipe holds a special place in my holiday repertoire. It’s easy, fun, and brings people together with smiles and sticky fingers. I truly hope you try it out and discover the joy of making sweet memories one dip and drizzle at a time. Let me know how your pops turn out—I bet they’ll be a hit!
Print
Festive Chocolate Marshmallow Pops Recipe
- Prep Time: 20 minutes
- Cook Time: 0 minutes
- Total Time: 25 minutes
- Yield: 6 servings
- Category: Dessert
- Method: No-Cook
- Cuisine: American
- Diet: Vegetarian
Description
Festive Christmas Marshmallow Pops made by coating marshmallows on candy canes with melted chocolate and decorating with colorful sprinkles and crushed candy canes. A fun and easy holiday treat perfect for gifting or serving at holiday parties.
Ingredients
Base
- 6 candy canes unwrapped
- 18 large marshmallows
Chocolate Coatings
- 1 cup melting chocolate
- 1 cup white melting chocolate
- ¼ cup green melts
- ¼ cup red melts
Decorations
- 2 tablespoons crushed candy canes
- 2 tablespoons holiday sprinkles
Instructions
- Assemble Marshmallows: Thread 3 large marshmallows onto each candy cane carefully. If leaving candy canes wrapped, wash gently to avoid breaking.
- Melt Chocolates: Place each type of chocolate and candy melts in microwave-safe bowls and microwave in 20-second intervals, stirring between each, until smooth and fully melted. Follow package instructions if they differ.
- Coat Marshmallows: Using a spoon, quickly dip or drip melted brown chocolate over half the marshmallow pops and white chocolate over the other half, covering the marshmallows fully but leaving the candy cane loop free.
- Decorate Pops: While the chocolate coating is still wet, sprinkle crushed candy canes and holiday sprinkles over the pops. Use melted green and red candy melts to drizzle designs over some pops with a piping bag or spoon.
- Set and Serve: Place the pops on parchment paper and let the chocolate harden for about 5 minutes before serving or storing.
Notes
- Store marshmallow pops in an airtight container at room temperature for up to 7 days. Refrigerate if your environment is warm.
- Freezing the marshmallow pops is not recommended as it may affect texture.
- Crush candy canes easily using a food processor or by placing them in a ziplock bag and rolling with a rolling pin.
- Allow candy coating to fully harden before storing to prevent sticking.
Nutrition
- Serving Size: 1 pop
- Calories: 180 kcal
- Sugar: 25 g
- Sodium: 50 mg
- Fat: 7 g
- Saturated Fat: 5 g
- Unsaturated Fat: 1 g
- Trans Fat: 0 g
- Carbohydrates: 30 g
- Fiber: 0 g
- Protein: 1 g
- Cholesterol: 0 mg


Leave a Reply