Nothing quite beats the comforting, nostalgic charm of homemade desserts, and this Homemade Banana Pudding with Vanilla and Wafers Recipe is one of my absolute favorites to share. It’s creamy, layered with sweet bananas and crispy wafers, and has that perfect hint of vanilla that just sings through every bite—trust me, it’s worth every minute spent making it.

Jump to:
- Why You'll Love This Recipe
- Ingredients & Why They Work
- Make It Your Way
- Step-by-Step: How I Make Homemade Banana Pudding with Vanilla and Wafers Recipe
- Top Tip
- How to Serve Homemade Banana Pudding with Vanilla and Wafers Recipe
- Make Ahead and Storage
- Frequently Asked Questions:
- Final Thoughts
- Homemade Banana Pudding with Vanilla and Wafers Recipe
Why You'll Love This Recipe
This recipe hits all the right notes: creamy, fragrant, and beautifully balanced between textures. I've tried simpler versions before, but this one—with its homemade pudding and the touch of bourbon—always elevates the whole experience, making it perfect for family dinners or special gatherings.
- Homemade Pudding: Crafting the pudding from scratch means richer flavor and silky texture you just don’t get from store-bought mixes.
- Vanilla Bean Paste: Using vanilla bean paste over extract gives this pudding a deep, comforting aroma and those tiny vanilla flecks are so pretty!
- Layering with Wafers and Bananas: The combination creates a wonderful textural contrast, making every spoonful exciting.
- Make-Ahead Friendly: The pudding improves with time, making it perfect to prep a day before your event.

Ingredients & Why They Work
Every ingredient in this Homemade Banana Pudding with Vanilla and Wafers Recipe plays a special role in delivering that nostalgic, luscious taste. Choosing quality dairy and ripe bananas will really amplify the flavors. Here’s a quick breakdown so you know why each piece matters.

- Whole milk: Adds creaminess and a gentle dairy base for the pudding without overpowering other flavors.
- Heavy whipping cream: Gives that rich, velvety texture that makes the pudding feel indulgent.
- Bourbon (optional): Just a splash enhances the flavor complexity—trust me, it’s subtle but magical.
- Egg yolks: The magic behind that smooth, custard-like thickness—don’t skip or overcook!
- Vanilla bean paste: Intensifies vanilla flavor with visible flecks that make the pudding extra inviting.
- Cornstarch: Thickens the pudding perfectly without a gummy feel.
- Caster sugar (or granulated sugar): Sweetens without graininess, dissolving fully into the custard.
- Salted butter: Adds richness and a slight savory balance that elevates sweetness.
- Banana/banana cream extract: Boosts the banana flavor in case your bananas aren’t super ripe.
- Cream cheese (full-fat): For that luscious creamy topping that pairs beautifully with pudding layers.
- Cool Whip: Lightens the cream cheese mixture and adds fluffy texture.
- Sweetened condensed milk: Brings extra sweetness and creaminess to the topping.
- Nilla Wafers: The classic choice for layering—crispy, sweet, and sturdy enough to soak just right.
- Bananas: Go for ripe but firm so they stay fresh and flavorful in the layers.
- Fresh mint leaves (optional): Adds a pop of color and a refreshing tiny zing when garnished on top.
Make It Your Way
One of the things I love about this Homemade Banana Pudding with Vanilla and Wafers Recipe is how easy it is to tailor. I often switch up the toppings or add a little twist, so feel free to make it your own!
- Variation: I sometimes mix in chopped toasted pecans or walnuts between the layers for a surprise crunch that pairs beautifully with the creamy pudding. It’s a little texture upgrade that keeps this recipe exciting.
- Dairy-free option: Swap the milk and cream for full-fat coconut milk, and use coconut whipped topping instead of Cool Whip for a coconutty twist everyone will love.
- Extra boozy: If you like more kick, a splash of rum instead of bourbon or both works wonders.
- Individual servings: This recipe is perfect for layering in small mason jars or parfait glasses, making it easy and elegant for parties.
Step-by-Step: How I Make Homemade Banana Pudding with Vanilla and Wafers Recipe
Step 1: Warm Up Your Dairy
Start by heating your milk, heavy cream, and a splash of bourbon in a saucepan over medium-high heat. You want it hot and steamy but not boiling, which usually takes about 5-7 minutes. This warm base is key to slowly coax flavor into the pudding and prevents the eggs from scrambling later on—trust me, patience here pays off.
Step 2: Whisk the Egg Yolk Mixture
While the dairy heats, whisk together your egg yolks, vanilla bean paste, cornstarch, and sugar in a separate bowl until it looks smooth and somewhat paste-like. This mix is what will thicken your pudding beautifully. Keep whisking steady and make sure there’s no lumps—it’ll make the difference between silky pudding and a frustrating mess!
Step 3: Temper Your Eggs
Now, here’s a crucial step: gradually stir in a tablespoon of the warm milk mixture into your egg yolks, whisking constantly. Do this 2-3 times. This “tempering” gently brings the eggs up to temperature so they don’t scramble when you add them back into the hot dairy. It always freaked me out at first, but steady whisking is your friend!
Step 4: Cook Your Pudding Until Thick
Pour your tempered egg mixture back into the saucepan and turn your heat to medium. Keep whisking without pause for 4-5 minutes as it thickens. Don’t rush or stop whisking, or you’ll get lumps or curdling. When it’s thick enough to coat the back of a spoon, take it off the heat and stir in your butter cubes and banana extract until melted and smooth.
Step 5: Chill the Pudding
Pour the pudding into a container and press plastic wrap directly onto the surface to keep a skin from forming. Chill it for at least 4 hours, though overnight is better—it will firm up nicely and make the assembly easier.
Step 6: Prepare the Creamy Topping
While your pudding cools, whip together the softened cream cheese, Cool Whip, sweetened condensed milk, and vanilla bean paste until light and fluffy. This topping adds the perfect creamy contrast to the dense pudding and crisp wafers.
Step 7: Assemble Your Layers
Time for the fun part! In your chosen serving dish (I love a big trifle bowl or individual glasses), start with a layer of pudding, then Nilla wafers, the creamy topping, and a generous sprinkle of banana slices. Repeat until you reach the top, finishing with creamy topping and some wafer crumbs for texture. Chill it for at least an hour before serving to let everything meld.
Top Tip
I’ve made this pudding countless times, and a few do’s-and-don’ts always stand out that can really make or break your success. These are golden in my kitchen and will help you nail it on your first try.
- Temper slowly: Don’t rush adding the hot milk to your egg yolks—too fast and you’ll scramble the eggs. A slow drizzle and constant whisking are key.
- Stir constantly: While cooking the pudding, keep that whisk moving! It prevents lumps and ensures smooth custard.
- Plastic wrap magic: Press the wrap directly onto the pudding’s surface before chilling to avoid a crusty top that nobody wants.
- Choose your bananas wisely: Use bananas that are ripe but firm so they don’t turn mushy in the pudding layers.
How to Serve Homemade Banana Pudding with Vanilla and Wafers Recipe

Garnishes
I like to keep it simple and classic with a few fresh mint leaves on top—they add a lovely burst of green and subtle freshness. Sometimes I crumble extra Nilla wafers over the top for a bit of extra crunch right before serving.
Side Dishes
This pudding is pretty much a showstopper dessert on its own, but if you want to pair it, try a refreshing fruit salad or a light citrus sorbet to balance the creamy richness. It also goes surprisingly well with a fresh brewed coffee or slightly chilled iced tea.
Creative Ways to Present
I once made individual banana pudding parfaits layered in stemless wine glasses for a brunch event. They looked beautiful topped with edible flowers and a dusting of cinnamon. It’s a fantastic way to dress it up for special occasions and let your guests see all those luscious layers.
Make Ahead and Storage
Storing Leftovers
I usually cover any leftovers tightly with plastic wrap or transfer to an airtight container. It keeps well in the fridge for 3-4 days, and the flavors actually continue to blend, making each bite better than the last.
Freezing
Freezing banana pudding isn’t my favorite because the texture of the bananas and wafers can change, getting a bit soggy or mushy when thawed. But if you must, freeze only the pudding portion separately for best results.
Reheating
This recipe is best enjoyed cold, so reheating isn’t really necessary. If you want to warm the pudding part alone, gently heat it on the stovetop over low heat, stirring constantly until warmed through—just don’t add the wafers or bananas.
Frequently Asked Questions:
Yes, you can substitute regular vanilla extract if you don’t have vanilla bean paste. The flavor will still be delicious, but you won’t get those pretty vanilla bean flecks that add visual appeal and a deeper flavor.
Constant whisking is key during cooking, especially when you add the egg mixture back in. Also, temper the eggs slowly by adding warm milk bit by bit to avoid scrambling. Finally, ensure the heat isn’t too high to keep a smooth texture.
Absolutely! I recommend making the pudding the day before and chilling it overnight to let it set perfectly. You can also assemble the pudding layers a few hours ahead and refrigerate until serving for ease and better flavor melding.
To keep banana slices from browning, try tossing them with a little lemon juice before layering, or add them just before serving. Also, chilling the assembled pudding promptly helps slow oxidation.
Final Thoughts
Honestly, this Homemade Banana Pudding with Vanilla and Wafers Recipe holds a special spot in my kitchen and heart. It’s one of those timeless desserts that comforts everyone around the table and sparks happy memories. I hope giving it a try brings you joy and a few compliments, too—because it really is that good when you make it yourself!
Print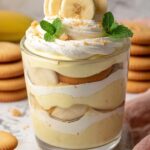
Homemade Banana Pudding with Vanilla and Wafers Recipe
- Prep Time: 25 minutes
- Cook Time: 10 minutes
- Total Time: 4 hours 35 minutes
- Yield: 6 servings
- Category: Dessert
- Method: Stovetop
- Cuisine: Southern American
Description
This best homemade banana pudding recipe features a rich, creamy pudding layered with classic Nilla wafers and fresh bananas, topped with a luscious cream cheese and Cool Whip topping. Perfectly balanced with vanilla and banana extract, this dessert is a comforting Southern classic ideal for family gatherings or special occasions.
Ingredients
For the banana pudding:
- 2 cups whole milk
- 1 cup heavy whipping cream
- 1 tablespoon bourbon, optional
- 5 large egg yolks
- 1 tablespoon vanilla bean paste
- ¼ cup cornstarch
- ½ cup caster sugar (or granulated sugar)
- ¼ cup salted butter, cut into cubes
- 1 tablespoon banana/banana cream extract
For the creamy topping:
- 8 ounces full-fat brick cream cheese, room temperature
- 8 ounces Cool Whip container, room temperature
- ½ cup sweetened condensed milk
- 1 tablespoon vanilla bean paste
For banana pudding assembly:
- 1 (11-ounce) box Nilla wafers
- 4 medium bananas, sliced into ½-inch thick slices/coins
- Fresh mint leaves, for garnish - optional
Instructions
- Heat the cream mixture: In a saucepan over medium-high heat, combine the whole milk, heavy whipping cream, and bourbon (if using). Let it simmer until the mixture is barely hot but not bubbling, about 7 minutes.
- Prepare egg yolk mixture: In a medium bowl, whisk together the egg yolks, vanilla bean paste, cornstarch, and sugar until fully combined and smooth, resembling a paste-like consistency.
- Temper the egg yolks: Gradually add about a tablespoon of the hot cream mixture into the egg yolk mixture, stirring immediately to combine. Repeat this tempering process 3 more times to prevent the eggs from cooking.
- Combine mixtures and thicken pudding: Remove the pan from heat but keep the heat on. Pour the tempered egg yolk mixture into the pan with the hot cream. Whisk constantly for about 2 minutes to blend without cooking the eggs too quickly. Return the pan to medium heat and continue whisking until the pudding thickens, approximately 5 minutes.
- Finish pudding base: Turn off the heat and add the cubed salted butter and banana extract. Stir until the butter melts and the pudding is smooth. Transfer to an airtight container, cover the surface with plastic wrap to prevent skin formation, and refrigerate for at least 4 hours or overnight for best results.
- Make creamy topping: In a large bowl, mix the softened cream cheese, Cool Whip, sweetened condensed milk, and vanilla bean paste. Whisk with an electric mixer or by hand until smooth and well combined.
- Assemble the banana pudding: In a trifle dish or individual glasses, start layering with pudding, followed by Nilla wafers, creamy topping, and banana slices. Repeat the layering until you finish with creamy topping and a few wafers or crumbs on top.
- Chill and garnish: Refrigerate the assembled banana pudding for at least 1 hour before serving. Garnish with fresh mint leaves if desired and enjoy.
Notes
- Use a good quality vanilla bean paste for enhanced flavor.
- Tempering the egg yolks carefully prevents scrambling and achieves smooth pudding.
- Cover the pudding surface with plastic wrap to avoid skin formation as it cools.
- The bourbon is optional but adds a subtle depth to the pudding.
- For a dairy-free option, substitute milk and cream accordingly but note texture differences.
- Chilling the pudding overnight improves firmness and flavor absorption.
- Feel free to use ripe but firm bananas to avoid mushy layers.
Nutrition
- Serving Size: 1 serving
- Calories: 420 kcal
- Sugar: 35 g
- Sodium: 210 mg
- Fat: 25 g
- Saturated Fat: 15 g
- Unsaturated Fat: 8 g
- Trans Fat: 0 g
- Carbohydrates: 38 g
- Fiber: 2 g
- Protein: 5 g
- Cholesterol: 135 mg


Leave a Reply