There’s something wonderfully nostalgic about homemade candies, and this Homemade Hard Tack Candy Recipe brings that charm right back to your kitchen. Crisp, glassy, and bursting with flavor, it’s the kind of treat that’s both fun to make and impossible to resist once you taste it.

Jump to:
Why You'll Love This Recipe
I’ve made this Homemade Hard Tack Candy Recipe for holidays, gifts, and simple sweet cravings, always with lots of smiles around the kitchen table. It’s deceptively simple but with a satisfying crunch and endless flavor possibilities, which keeps me coming back for more.
- Classic Texture: This hard candy snaps perfectly, giving you that traditional crunch I love about old-fashioned sweets.
- Customizable Flavors: You can experiment with different oil flavorings to create your own signature candies every time.
- Simple Ingredients: No fancy pantry required, just sugar, corn syrup, water, and flavor – easy to find and easy to love.
- Fun and Therapeutic: Watching the sugar melt and transform is oddly satisfying, making candy-making a relaxing kitchen moment.

Ingredients & Why They Work
The magic of this recipe is in its simple, straightforward ingredients that work harmoniously to deliver that iconic hard tack candy crunch. Each component plays a key role, so choosing quality basics really makes a difference here.

- Sugar: The backbone of your candy; using pure granulated sugar ensures a clean, sweet crunch.
- Light Corn Syrup: Helps prevent crystallization so your candy stays smooth and clear.
- Water: Dissolves the sugar and corn syrup, creating the right consistency when heated.
- Food Coloring: Adds vibrant visual appeal—choose your favorite shades or mix for a festive look.
- Oil Flavorings: The soul of your candy, offering a burst of aroma and taste—peppermint, lemon, or cinnamon are personal favorites.
- Powdered Sugar: Used to coat the finished candy so pieces don’t stick together and are easy to handle.
Make It Your Way
One of the best things about this Homemade Hard Tack Candy Recipe is how easy it is to make your own. I love to switch up flavor oils depending on seasons or my mood—sometimes a fresh mint for winter, other times a bright lemon or spicy cinnamon. You can definitely make it your own!
- Variation: I once tried a combination of peppermint and vanilla oil which was a hit—refreshing yet smooth, adding depth beyond a single flavor.
Step-by-Step: How I Make Homemade Hard Tack Candy Recipe
Step 1: Melt the Sugar Mix
Start by mixing sugar, corn syrup, and water in a non-stick pan—trust me, a non-stick surface saves you a sticky mess later. Heat it on medium, stirring gently until the sugar dissolves completely. This step is critical; no one wants gritty candy! Once that’s done, put your spoon down and let the magic happen. Resist stirring after this point because you want the sugar to boil undisturbed for proper texture.
Step 2: Watch for the Perfect Temperature
Once the syrup reaches a rolling boil, attach your candy thermometer and keep a close eye. When it hits 260°F, it’s time to add your food coloring. Don’t stir here; just let the bubbling work its way through. The real sweet spot is 300°F—at this stage, the candy is ready to come off the heat. That precise temperature is key to getting that classic hard crack consistency—go too low and it’ll be sticky; too high and it might burn.
Step 3: Add Flavor and Pour
Once off the heat, wait for the bubbles to slow, then stir in your chosen oil flavoring using a wooden spoon. I recommend wooden spoons because metal can sometimes introduce unwanted reactions or tastes. Next, pour your golden liquid onto a large cookie sheet prepped either with a light greasing or a dusting of powdered sugar—either works well to prevent sticking.
Step 4: Cool and Break
Allow the candy to cool at room temperature—don’t rush by chilling it in the fridge; that can cause cloudiness or cracking in uneven ways. Once fully set, take a knife or a sturdy object and tap to break the candy into bite-sized chunks. Coat these pieces in powdered sugar in a ziploc bag, shaking gently so they don’t stick together. This final step always brings smiles—those precious little shards of flavor-packed candy.
Top Tip
Over my years making this Homemade Hard Tack Candy Recipe, I’ve learned a few nuggets of wisdom that really saved me time and frustration—so much of candy-making is about timing and temperature control.
- Patience Is Everything: Don’t stir once the sugar is boiling; it can cause crystallization, ruining the texture.
- Use a Reliable Thermometer: An accurate candy thermometer is your best friend; I learned this the hard way when a cooked batch didn’t set.
- Wooden Spoon for Flavorings: It avoids any metallic aftertaste and mixes the oil flavorings better with the hot syrup.
- Room Temperature Cooling: Avoid fridge or freezer to cool candy—it can cause cracking or haziness.
How to Serve Homemade Hard Tack Candy Recipe

Garnishes
Personally, I keep it simple with a light dusting of powdered sugar, but for special gatherings, a sprinkle of edible glitter or crushed peppermint candy on top adds a festive sparkle. Plus, those little touches make homemade candy feel extra special when gifting.
Side Dishes
This candy pairs wonderfully with a warm cup of tea or a creamy hot chocolate—something to offset the intense sweetness and crunch. I often serve mine alongside baked treats like soft cookies or buttery shortbread to balance textures.
Creative Ways to Present
For holidays, I like to package my homemade hard tack candy in colorful cellophane bags tied with festive ribbons. Sometimes I nestle the chunks in mini mason jars layered with more powdered sugar for a rustic, charming look—perfect for thoughtful gifts that wow without much fuss.
Make Ahead and Storage
Storing Leftovers
Once coated with powdered sugar and stored in an airtight container or sealed ziploc, your candy can last for several weeks at room temperature. I learned to avoid humidity because moisture can make these candies sticky or cause clumping.
Freezing
I haven’t frozen hard tack candy before since it stores well on the counter, but if you do try to freeze, make sure the pieces are well-coated and completely dry to avoid condensation when thawing, which could affect texture.
Reheating
This candy isn’t meant to be reheated once set, but if you wanted to remelt for a fresh batch, just start over with the original recipe to ensure that perfect crunch. Leftover pieces are best enjoyed as-is for that classic crispiness.
Frequently Asked Questions:
Absolutely! Oil-based flavorings are best because they mix well and withstand the high cooking temperatures. Avoid water-based extracts as they might cause the sugar to seize up.
The most common cause is not cooking the sugar mixture to the full 300°F hard crack stage. Using a candy thermometer helps prevent this. Also, make sure to coat the cooled candy pieces in powdered sugar to avoid stickiness.
Yes, when stored in an airtight container in a cool, dry place, the candy can last for several weeks. Avoid humidity and heat to maintain its crisp texture.
While experienced candy makers might gauge temperature by eye, I highly recommend a candy thermometer for accuracy and success—especially if you’re new to candy-making. It’s key to achieving that perfect hard crack consistency.
Final Thoughts
This Homemade Hard Tack Candy Recipe holds a special place in my heart because it’s more than just a sweet treat—it’s a little moment of kitchen magic. If you’ve never tried making candy from scratch, this is the perfect starter because it’s straightforward and rewarding. I hope you enjoy this crunchy, colorful candy as much as I do, whether you share it with friends or keep it all to yourself!
Print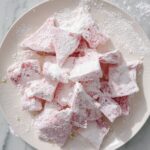
Homemade Hard Tack Candy Recipe
- Prep Time: 5 minutes
- Cook Time: 20 minutes
- Total Time: 1 hour 25 minutes
- Yield: 40 pieces
- Category: Dessert
- Method: Stovetop
- Cuisine: American
Description
This Hard Tack Candy recipe produces classic, crunchy homemade candy with customizable flavors and colors. It involves boiling sugar, corn syrup, and water to the hard crack stage, then cooling and breaking the candy into chunks coated with powdered sugar for a sweet, nostalgic treat.
Ingredients
Basic Candy Ingredients
- 3¾ cup sugar
- 1½ cup light corn syrup
- 1 cup water
- 1 teaspoon food coloring
Flavor and Finishing
- 1 bottle oil flavorings (a variety)
- 1 tablespoon powdered sugar
Instructions
- Combine Ingredients: Mix the light corn syrup, sugar, and water in a non-stick pan set on the stove.
- Dissolve Sugar: Turn the heat to medium and stir continuously until the sugar is completely dissolved, then stop stirring.
- Boil Candy Mixture: Allow the mixture to come to a rolling boil. When the candy thermometer reaches 260 degrees Fahrenheit, add the food coloring without stirring, letting the boiling motion mix it in.
- Reach Hard Crack Stage: Continue boiling until the temperature reaches 300 degrees Fahrenheit, then remove the pan from heat and allow the boiling to stop naturally.
- Add Flavorings: Stir in your choice of oil flavorings using a wooden spoon.
- Pour Candy: Pour the hot mixture onto a large cookie sheet that has been either greased well or coated with powdered sugar to prevent sticking.
- Cool Candy: Let the candy cool completely at room temperature. Do not place it in the refrigerator as this can affect texture.
- Break into Chunks: Once set, use a knife or other object to smash the candy into chunks.
- Coat Candy: Place the candy chunks in a ziplock bag with 1 tablespoon of powdered sugar and shake well to coat each piece, preventing them from sticking together.
Notes
- Use a candy thermometer to monitor temperature accurately for the perfect hard crack stage.
- Make sure the pan is non-stick or well greased to prevent the candy from hardening on the surface.
- Do not stir after the sugar is dissolved to avoid crystallization that can ruin the texture.
- Cool the candy at room temperature; refrigeration can cause cloudiness or sticky texture.
- Wear protective gloves if breaking the candy to avoid cuts from sharp edges.
- Flavorings can be customized with various oil extracts like peppermint, lemon, or cinnamon for variety.
Nutrition
- Serving Size: 1 piece
- Calories: 60 kcal
- Sugar: 15 g
- Sodium: 0 mg
- Fat: 0 g
- Saturated Fat: 0 g
- Unsaturated Fat: 0 g
- Trans Fat: 0 g
- Carbohydrates: 15 g
- Fiber: 0 g
- Protein: 0 g
- Cholesterol: 0 mg


Leave a Reply