There’s something magical about the crisp, minty chocolate bite of a Thin Mint cookie that just hits the spot every time. That’s why I’m excited to share my Homemade Thin Mint Cookies Recipe with you — it’s a fresh, homemade twist on the classic Girl Scout favorite, deeply chocolatey, with just the right hint of peppermint to keep you coming back for more.

Jump to:
Why You'll Love This Recipe
This Homemade Thin Mint Cookies Recipe isn’t just another cookie — it brings that nostalgic flavor straight to your kitchen with fresh ingredients and a method that’s simpler than you might think. I love how these cookies balance rich cocoa with a cool peppermint finish. Plus, making them yourself means no preservatives and the ability to tweak the mint intensity just how you like it.
- Real Peppermint Flavor: Using pure peppermint extract gives the cookies a refreshing and authentic coolness that really stands out.
- Perfect Crisp Texture: Rolling the dough thin and chilling it ensures the cookies bake up light and crisp, just like the originals we all adore.
- Rich Chocolate Coating: Dipping these cookies in quality semi-sweet chocolate with a little oil creates that glossy, professional finish.
- Customizable and Fun to Make: The recipe is forgiving and flexible, perfect if you want to experiment with thickness, chocolate types, or even try a slice-and-bake approach.
Ingredients & Why They Work
Every ingredient in this Homemade Thin Mint Cookies Recipe plays a special role — from creating that tender, crumbly cookie base to nailing the signature mint-chocolate combo you love. Let me walk you through some key players and why they shine.
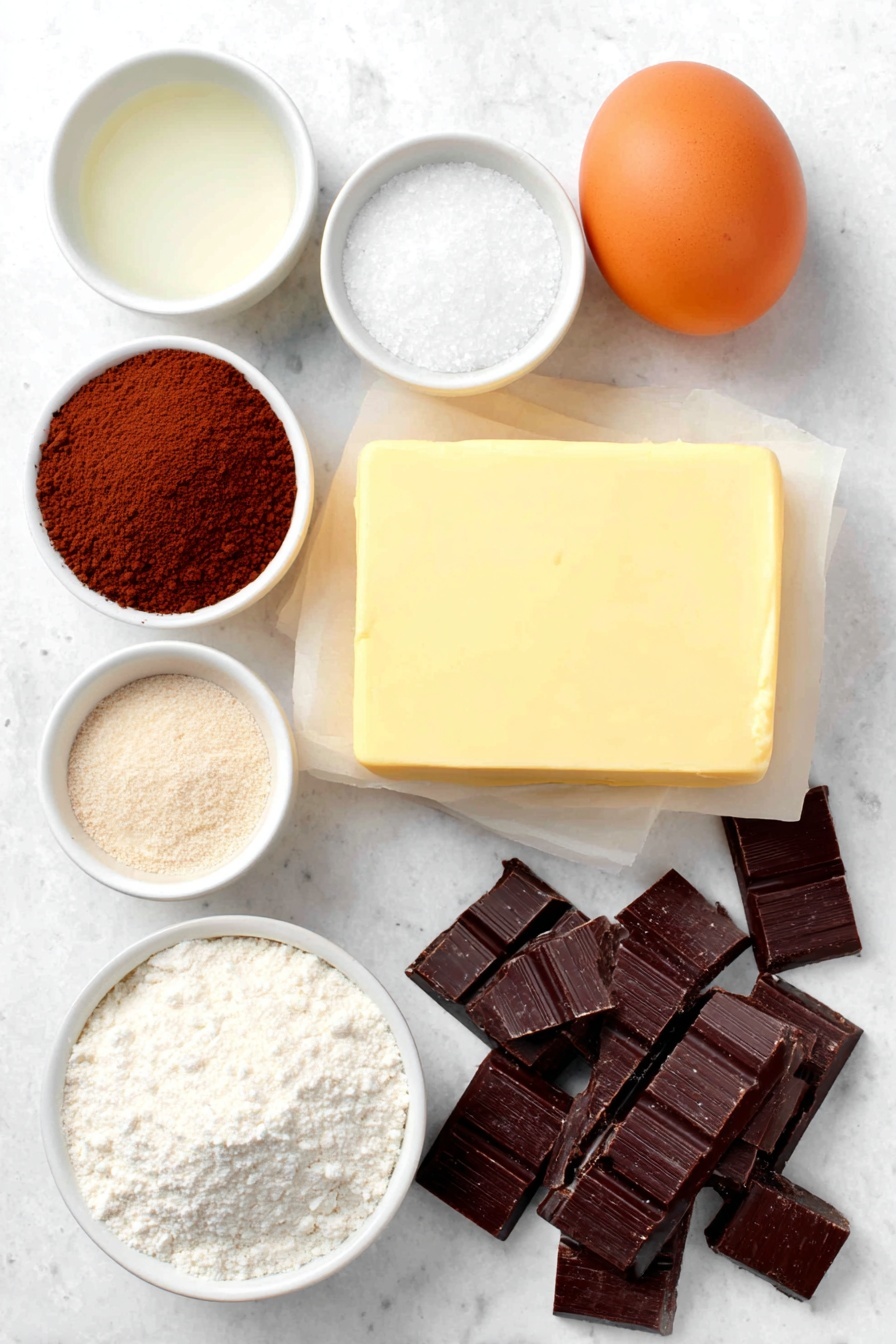
- Unsalted Butter: Softened to room temperature, it’s essential for that smooth, creamy dough which helps the cookies stay tender yet crisp.
- Granulated Sugar: It adds sweetness and helps create the perfect texture once softened and beaten with butter.
- Vanilla Extract: Gives a warm, mellow backdrop that enhances both chocolate and mint flavors without overpowering.
- Peppermint Extract: This is the star! Pure peppermint extract delivers that cool, refreshing taste — avoid mint extract as it can taste like toothpaste.
- All-Purpose Flour: The structure builder, spooned and leveled for accuracy to keep the cookies from turning out too dense.
- Unsweetened Cocoa Powder: I use natural cocoa for bright chocolate flavor, but Dutch-process works if you prefer a deeper, mellow taste.
- Baking Powder: Just a touch to give the cookies a slight lift without changing their crispness.
- Salt: A pinch to balance the sweetness and enhance all the flavors.
- Semi-Sweet Chocolate: For dipping — choosing a good-quality brand makes a huge difference in taste and texture.
- Canola or Vegetable Oil: Mixed with chocolate for a silky coating that hardens with a nice sheen.
Make It Your Way
I love playing around with this Homemade Thin Mint Cookies Recipe to suit different moods or occasions. Sometimes, I amp up the peppermint if I’m really craving that cool zing, or swap in dark chocolate for dipping if I want something richer. You should totally make it your own — that’s part of the fun!
- Slice ‘n’ Bake Variation: If rolling out dough sounds like a bother, try shaping the dough into logs, chilling, then slicing into rounds before baking. Just know the dough’s sticky, so chill well before slicing.
- Chocolate Variations: Dark chocolate or even white chocolate with a few drops of peppermint oil can switch things up beautifully.
- Texture Tweaks: For a softer cookie, reduce the baking time by a minute or two — I like mine crisp, but sometimes a chewy middle is nice!
- Dairy-Free Option: Substitute butter with a whole-milk coconut oil stick and use dairy-free chocolate — I’ve had success with this for friends with sensitivities.
Step-by-Step: How I Make Homemade Thin Mint Cookies Recipe
Step 1: Cream the Butter and Sugar
Start by beating the softened butter on medium speed until it's completely smooth and creamy — about a minute or so. This step matters because it helps incorporate air, leading to a lighter cookie. Then add the sugar and beat on medium-high speed until the mixture is fluffy and pale. Take your time here; this is one of those small steps that pays off big in the texture.
Step 2: Add Eggs and Extracts
Next, beat in the egg, vanilla extract, and peppermint extract at high speed. The high speed helps everything emulsify nicely, resulting in a glossy dough. Don’t skip scraping down the sides and bottom of your bowl so every bit of flavor gets incorporated.
Step 3: Combine Dry Ingredients and Mix
Whisk together your sifted flour, cocoa powder, baking powder, and salt in a separate bowl. Slowly add this mixture on low speed to your wet ingredients. Mixing gently and gradually keeps the dough tender and prevents overworking the gluten, which can make the cookies tough.
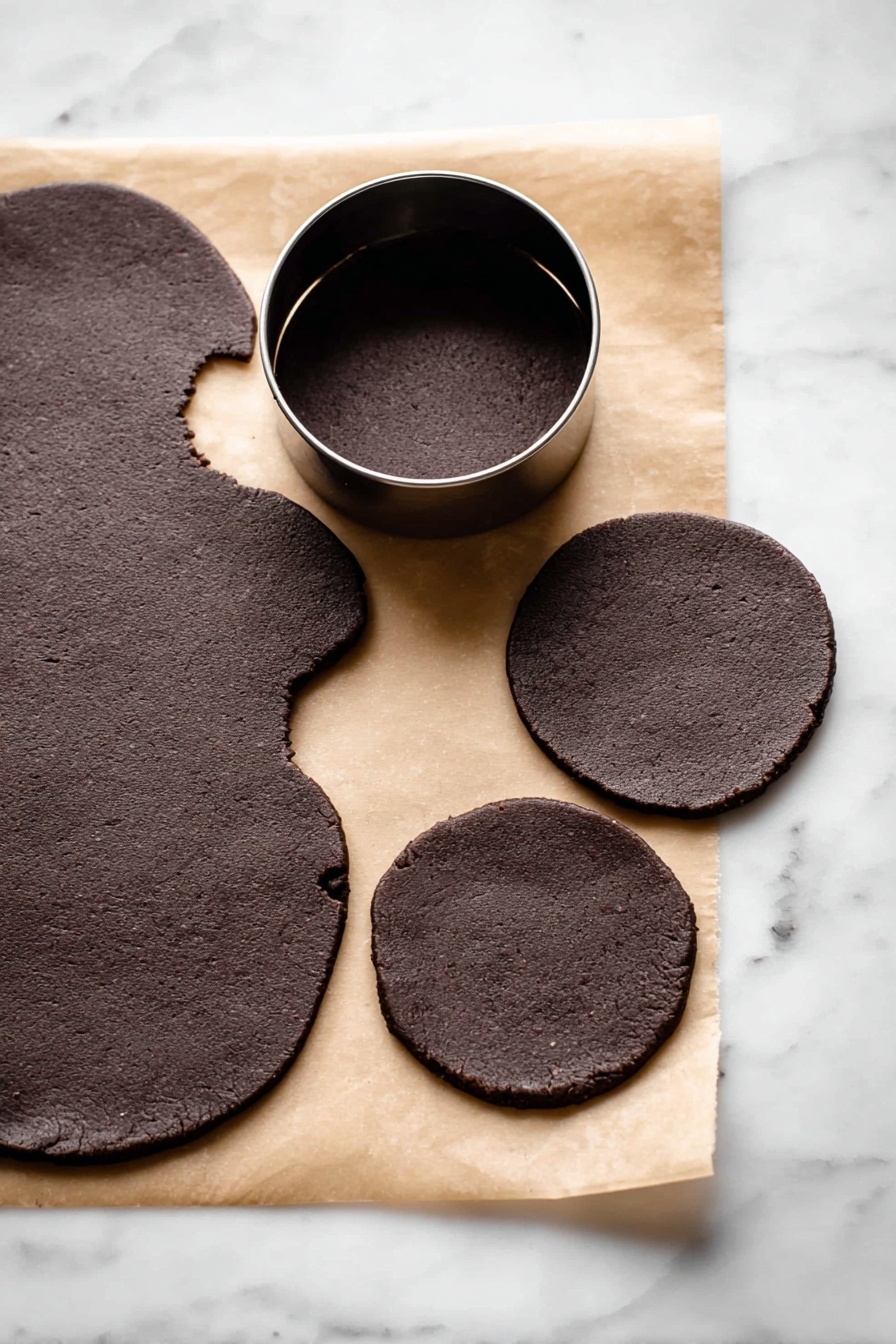
Step 4: Roll, Chill, and Cut
Divide dough into two equal parts, then roll each out on parchment paper to about ¼ inch thickness. Stack them with parchment in between and chill for at least an hour — this is mandatory to prevent spreading and to enhance texture. When ready, use a 2-inch round cookie cutter to cut shapes, re-rolling scraps until all dough is used.
Step 5: Bake and Cool
Bake at 350°F for 8-10 minutes, watching for edges to set while centers stay soft. Rotate trays halfway through for even baking. Let the cookies rest on the baking sheet for 5 minutes before transferring to a cooling rack — patience here helps them firm up without breaking.
Step 6: Dip in Chocolate and Set
Melt your chopped chocolate with a bit of oil, stirring until smooth, then blend in the peppermint extract. Dip cooled cookies fully into the chocolate, use a fork to lift and let excess drip off, then place on parchment. Pop them in the fridge for chocolate to harden — this is the step that transforms them into those perfect mint-chocolate gems we all crave.
Top Tip
From my years experimenting with minty cookies, I’ve learned that the chilling process and quality of peppermint extract absolutely make or break this recipe. It’s worth the wait and the little splurge on good chocolate — it really elevates the whole cookie.
- Chill the Dough Well: I can’t stress this enough — skipping or shortening the chill time leads to dough that spreads too much and loses the crispness.
- Use Pure Peppermint Extract: It’s a game-changer. Some extracts labeled 'mint' taste weird or too herbal; stick to peppermint for the cool, fresh flavor.
- Temper Your Chocolate: If you want a glossy, firm coating, add a touch of oil to your melted chocolate. It thins out the chocolate just enough for smooth dipping.
- Don’t Overbake: The cookies may seem soft when you take them out, but they firm up as they cool — pull them out just when the edges look set.
How to Serve Homemade Thin Mint Cookies Recipe

Garnishes
I usually keep it classic here — the chocolate coating with that sleek finish says it all. But if I’m feeling fancy, I sprinkle a tiny pinch of crushed peppermint candy or a few mini mint leaves on top right after dipping for a festive touch. It adds crunch and a beautiful look!
Side Dishes
These cookies are best with a cold glass of milk or a cup of hot mint tea — the warmth of the tea balances the cool mint flavor wonderfully. I’ve even served them alongside a scoop of vanilla ice cream for a decadent dessert experience.
Creative Ways to Present
For holiday gatherings, I like arranging these cookies in a circle around a small bowl of peppermint dipping sauce or even packaging them in decorative tins with festive ribbons. They also make darling edible gifts when wrapped in parchment and tied with twine.
Make Ahead and Storage
Storing Leftovers
I store leftovers in an airtight container at room temperature for up to 2-3 days. Beyond that, I move them to the fridge, where they’ll last about a week. I honestly love enjoying these chilled straight from the fridge — the chocolate snaps beautifully and the mint flavor feels even more refreshing.
Freezing
These cookies freeze exceptionally well — I put them in a sealed container with parchment layers between. They freeze up to 3 months and thaw beautifully in the fridge overnight. Chocolate may lose a bit of its sheen but the flavor always stays fantastic.
Reheating
Reheating these cookies? I usually skip it and enjoy them cold. But if you want to warm them slightly, a quick 5-second zap in the microwave brings out softness without melting the chocolate too much.
Frequently Asked Questions:
Mint extract often tastes more like spearmint or even toothpaste, which can overpower or clash with the chocolate. Peppermint extract gives that classic refreshing Thin Mint flavor we all love, so I recommend sticking with peppermint extract for best results.
Chilling the dough thoroughly for at least one hour (or even overnight) before baking is the key. It firms up the fat and reduces spreading during baking. Also, rolling the dough to the right thickness, about ¼ inch, helps the cookies maintain their shape.
Yes! You can substitute the butter with a solid coconut oil stick or a high-quality dairy-free butter alternative. For dipping, choose dairy-free chocolate and make sure your peppermint extract doesn’t contain any dairy ingredients.
Store baked cookies in an airtight container at room temperature for 2-3 days, or refrigerate for up to one week. For longer storage, freeze them layered with parchment paper between, in a sealed container, up to 3 months. Thaw in the refrigerator overnight before serving.
Final Thoughts
This Homemade Thin Mint Cookies Recipe is one I come back to again and again to satisfy that mint-chocolate craving with the pride of homemade goodness. It’s the kind of recipe you’ll be excited to share with family and friends — just like I did when I first made them in my kitchen. I really hope you enjoy making and eating these as much as I do!
Print
Homemade Thin Mint Cookies Recipe
- Prep Time: 2 hours 15 minutes
- Cook Time: 10 minutes
- Total Time: 3 hours 15 minutes
- Yield: 36 2-inch cookies
- Category: Dessert
- Method: Baking
- Cuisine: American
- Diet: Vegetarian
Description
Homemade Thin Mint Cookies are a delightful treat featuring a rich chocolate and peppermint flavored cookie base, coated in smooth semi-sweet chocolate. These crisp and refreshing cookies are perfect for holiday baking or anytime you want a classic combination of chocolate and mint.
Ingredients
Cookie Dough
- ¾ cup unsalted butter, softened to room temperature (12 Tbsp; 170g)
- 1 cup granulated sugar (200g)
- 1 large egg, at room temperature
- 1 teaspoon pure vanilla extract
- ¼ teaspoon peppermint extract
- 1 and ½ cups all-purpose flour (spooned & leveled; 188g)
- ¾ cup unsweetened natural cocoa powder (or dutch process; 62g)
- 1 teaspoon baking powder
- ⅛ teaspoon salt
Topping
- 14 ounces quality semi-sweet chocolate, coarsely chopped (395g)
- ½ teaspoon canola or vegetable oil
- ¼ teaspoon peppermint extract
Instructions
- Prepare the cookie dough: In a large bowl, use a handheld mixer or stand mixer with a paddle attachment to beat the softened butter on medium speed for 1 minute until smooth and creamy. Add the sugar and beat on medium-high speed until light and fluffy. Beat in the egg, vanilla extract, and peppermint extract on high speed. Scrape down sides as needed.
- Combine dry ingredients: Sift the flour and cocoa powder into a medium bowl. Whisk in the baking powder and salt. Slowly add this mixture to the wet ingredients on low speed until fully incorporated.
- Chill the dough: Divide the dough into two equal parts. Roll each portion out between parchment paper sheets to about ¼ inch thickness. Stack with parchment between sheets on a baking tray and refrigerate for at least 1 hour (up to 2 days) to firm up the dough.
- Preheat oven: Once dough is chilled, preheat oven to 350°F (177°C) and line 2-3 large baking sheets with parchment or silicone mats.
- Cut and bake the cookies: Remove one dough piece from fridge and cut into 2-inch rounds using a cookie cutter. Transfer cookies to baking sheets, re-rolling scraps as needed. Bake for 10 minutes, rotating pans halfway through. Cookies will appear soft in the centers.
- Cool the cookies: Let cookies cool on the baking sheet for 5 minutes, then transfer to a wire rack to cool completely before coating.
- Prepare chocolate coating: Melt chopped chocolate and oil together in a double boiler or microwave in 15-second intervals, stirring until smooth. Stir in peppermint extract.
- Dip the cookies: Dip each cooled cookie fully into the melted chocolate using a fork. Allow excess chocolate to drip off, then place on a lined baking sheet. Refrigerate the cookies until chocolate has set.
- Store: Store cookies in an airtight container at room temperature for 2-3 days or in the refrigerator for up to 1 week. They also freeze well.
Notes
- Cookies freeze well for up to 3 months; thaw overnight in the refrigerator.
- Cookie dough can be chilled up to 2 days or frozen up to 3 months before rolling.
- Use peppermint extract instead of mint extract for a true cool mint flavor.
- For a slice and bake option, roll dough into 2-3 inch logs, chill for 1 hour, then slice and bake as usual.
- Use parchment paper or silicone mats to prevent sticking during baking.
Nutrition
- Serving Size: 1 cookie
- Calories: 120 kcal
- Sugar: 10 g
- Sodium: 35 mg
- Fat: 7 g
- Saturated Fat: 3.5 g
- Unsaturated Fat: 3 g
- Trans Fat: 0 g
- Carbohydrates: 15 g
- Fiber: 1.5 g
- Protein: 1 g
- Cholesterol: 20 mg


Leave a Reply