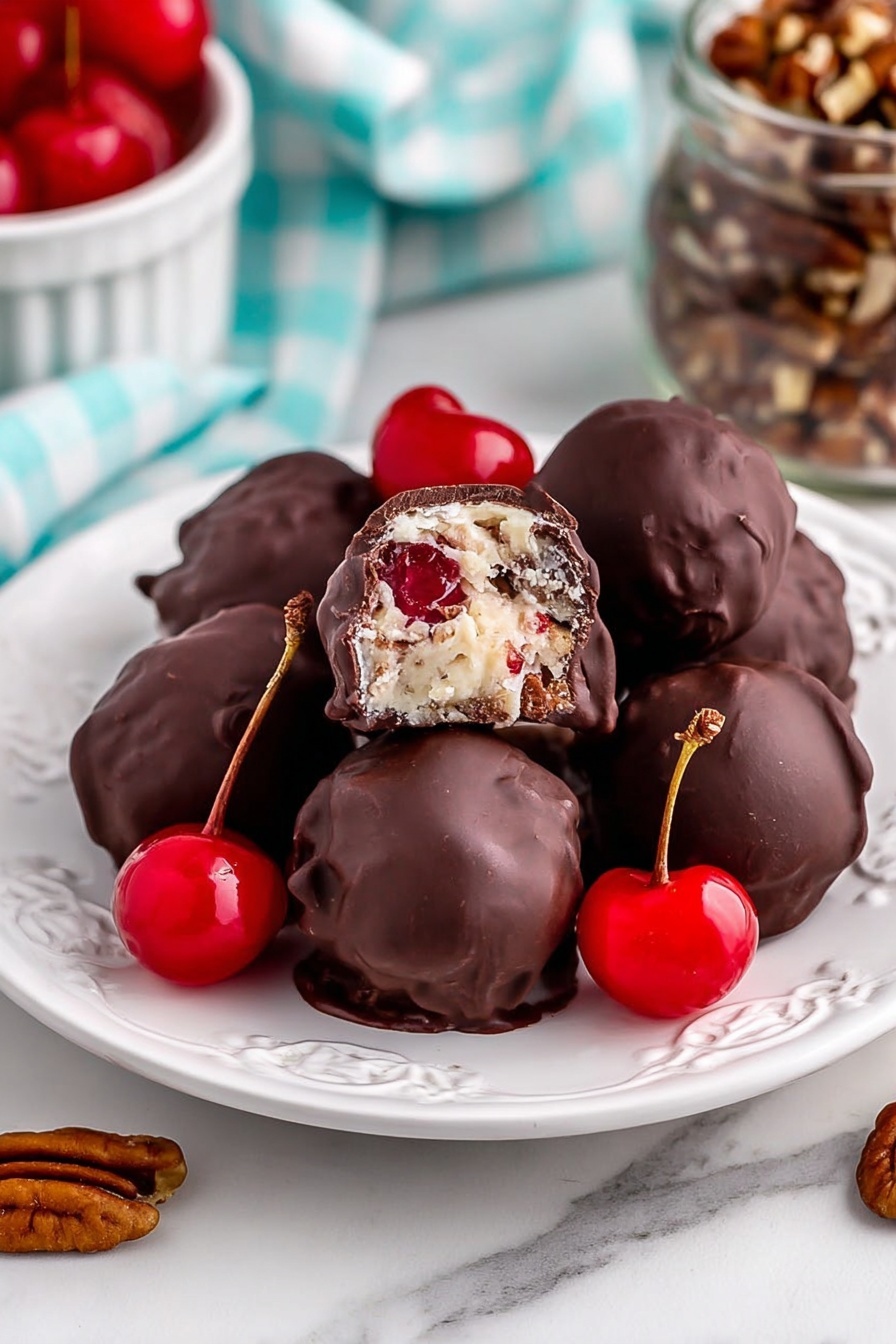
There's something truly nostalgic and irresistible about the **Martha Washington Candy Recipe**. With its rich chocolate coating and delightful mix of coconut, cherries, and pecans, it’s a treat that always sparks smiles and sweet memories. Trust me, once you make these candies, they’ll become a beloved classic on your dessert table.
Why You'll Love This Recipe
I remember the first time I tried making the Martha Washington Candy Recipe—it felt like unwrapping a piece of history. Every bite carries that perfect balance of creamy, chewy, and crunchy textures which is just so comforting. It’s simple enough to whip together but special enough to share as a gift.
- Classic combination: Coconut, cherries, pecans, and chocolate come together in that nostalgic mix you can’t get anywhere else.
- Easy to make: Despite the impressive flavor, this candy recipe is super approachable—even for beginner candy makers.
- Great for gift-giving: These candies hold up well, look beautiful, and feel handmade with love.
- Customizable: You can tweak the nuts, chocolate type, or even add your own flair to make it truly your own.
Ingredients & Why They Work
The magic of the Martha Washington Candy Recipe really starts with its thoughtful list of ingredients. Each element brings something unique, building layers of flavor and texture that blend perfectly—plus, you don’t need any fancy items.
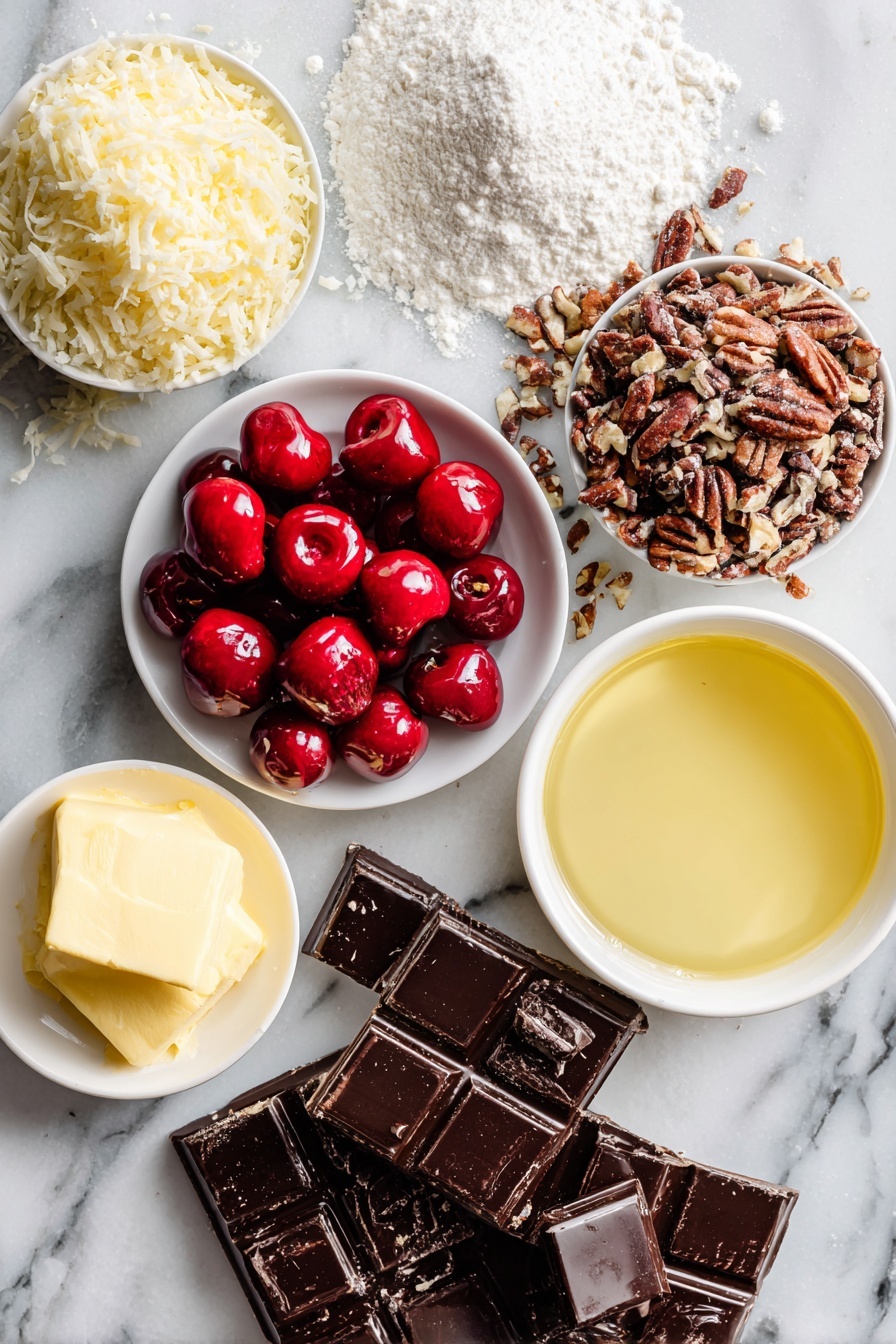
- Melted unsalted butter: Adds richness without overpowering the other flavors, and ensures your candy is smooth and creamy.
- Powdered sugar: Gives the candy sweetness and that melt-in-your-mouth texture.
- Vanilla extract: A small dash creates a warm, comforting aroma that elevates everything.
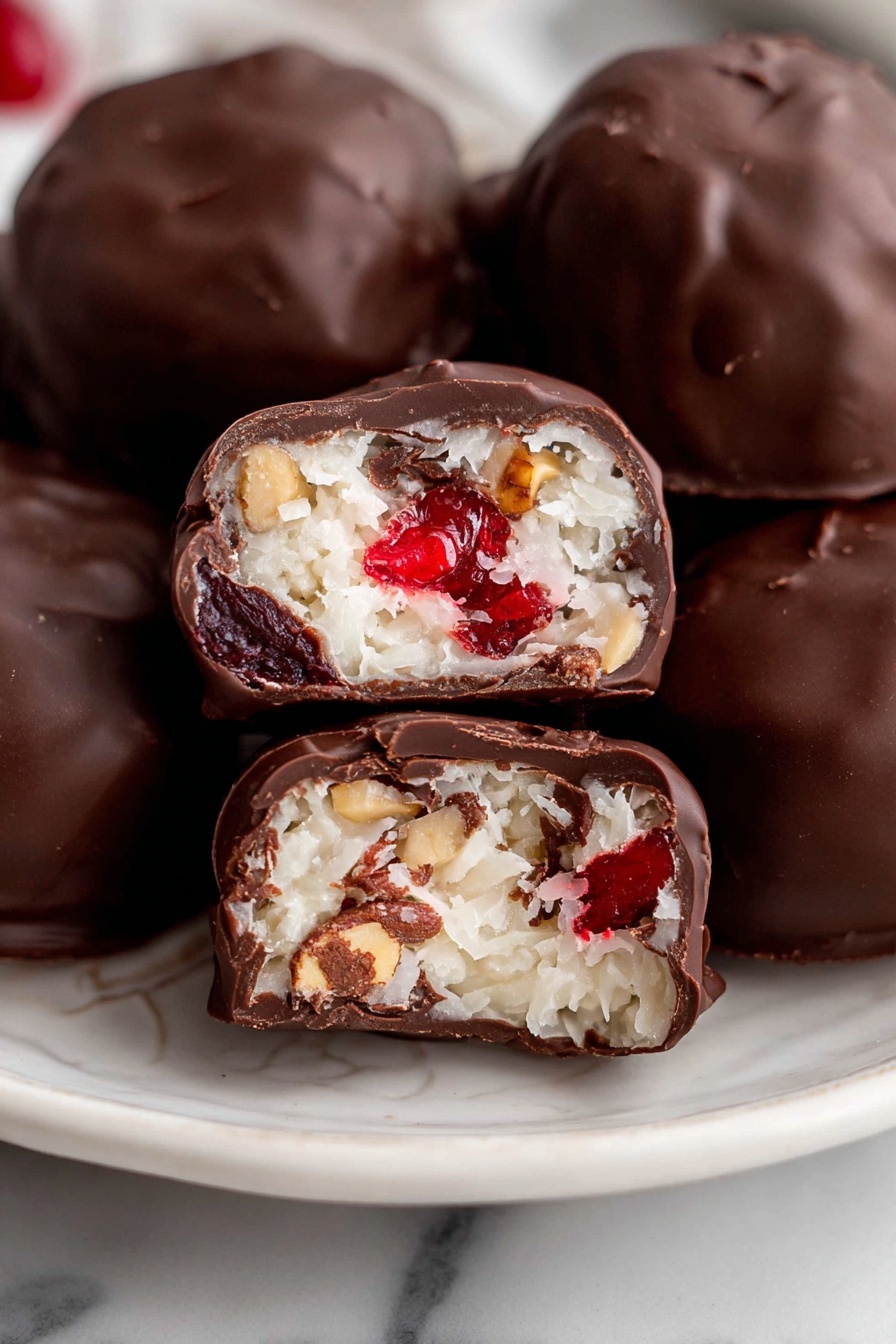
- Sweetened shredded coconut: Provides chewiness and a lovely tropical flavor that makes this candy stand out.
- Sweetened condensed milk: The binding superstar that also brings creamy sweetness without extra fuss.
- Chopped maraschino cherries: A burst of color and subtle fruity tang to brighten the candy's flavor and look.
- Chopped pecans: Adds crunch and a buttery depth that perfectly complements the sweetness.
- Chocolate melting wafers: The signature chocolate shell that seals in all those wonderful flavors and adds elegance.
Make It Your Way
While I stick to the classic Martha Washington Candy Recipe most of the time, I love experimenting with variations to suit the season or my mood. You should definitely feel free to put your own spin on it—candy making is about creativity as much as tradition!
- Nut swaps: I’ve swapped pecans for walnuts or almonds when I want a different crunch or flavor. It’s a nice way to tweak the candy for people who prefer or need different nuts.
- Cherry alternatives: If you’re not a fan of maraschino cherries, dried cranberries or chopped dried apricots work well and add a great chewiness.
- Chocolate types: Dark chocolate wafers add sophistication and balance out the sweetness, while white chocolate dramatically ups the sweetness factor for those with a sweet tooth.
Step-by-Step: How I Make Martha Washington Candy Recipe
Step 1: Mix the Base Sweetness
The first thing I do is combine the melted unsalted butter with powdered sugar until it’s silky smooth. It helps to sift your powdered sugar before adding to avoid lumps. Then, I stir in the vanilla extract. This base forms the foundation, so take your time to make sure it’s well blended.
Step 2: Add Coconut and Condensed Milk
Next, add the shredded coconut and pour in the sweetened condensed milk. I stir gently but thoroughly until everything is evenly combined. The mixture will be sticky and thick—that’s exactly what you want! It’s what holds your candies together.
Step 3: Fold in Cherries and Pecans
Now, gently fold in the chopped maraschino cherries and pecans. I always pat the cherries dry before chopping to prevent excess moisture, which can make the mixture too wet. Mixing these in last keeps the textures distinct and vibrant.
Step 4: Form and Chill
Using a small cookie scoop or your hands, roll the mixture into 1-inch balls. I find using a scoop helps keep sizes consistent, which makes dipping easier. Place the balls on parchment-lined trays and chill for at least 30 minutes—this firms them up perfectly.
Step 5: Dip in Melted Chocolate
While the candies chill, melt the chocolate wafers according to their package—usually a quick microwave or double boiler method. Once smooth and glossy, dip each candy ball using a fork or dipping tool to fully coat it, then let any extra chocolate drip off before placing them back on the parchment.
Step 6: Set the Chocolate
Pop the chocolate-coated candies back in the fridge for about 10-15 minutes until the chocolate hardens. After that, they’re ready to enjoy or package to gift. I always find the wait worth it when I bite into these silky, crunchy delights.
Top Tip
After making Martha Washington Candy a few times, I've picked up a few tips that make the process smoother and the candy even better. These tricks helped me avoid common pitfalls and get great results every time.
- Dry Cherries Thoroughly: Patting maraschino cherries dry before chopping prevents the candy from getting too sticky or soggy.
- Use a Cookie Scoop: Helps to create uniform candy balls that dip easily and look professional.
- Room Temperature Chocolate: Make sure your melted chocolate isn’t too hot or cold to ensure a smooth coating and shiny finish.
- Keep It Cool: When serving at room temperature, place candies in a cool spot to avoid melting and keep that perfect snap.
How to Serve Martha Washington Candy Recipe
Garnishes
I often like to finish off the candies with a delicate sprinkle of finely chopped pecans or a tiny pinch of flaky sea salt right after dipping while the chocolate is still soft. It adds a lovely contrast and a bit of visual appeal that guests appreciate.
Side Dishes
While Martha Washington Candy is a treat on its own, it pairs beautifully with a strong cup of coffee or a creamy hot chocolate. For holiday gatherings, I like to arrange it alongside a cheese board filled with nuts, fruits, and crackers to offer a sweet and savory balance.
Creative Ways to Present
For holiday gift-giving, I like to place the candies in miniature cupcake liners and arrange them in a pretty decorative box or jar tied with a festive ribbon. I’ve even used clear cellophane bags with a handmade label for an easy, charming presentation that friends and family love.
Make Ahead and Storage
Storing Leftovers
I store leftover Martha Washington candies in an airtight container in the refrigerator. This keeps them fresh and prevents the chocolate from melting, allowing me to enjoy them over the next couple weeks without any trouble.
Freezing
Freezing is a great option if you want to prep ahead or save some for later. I layer the candies between sheets of parchment paper in a freezer-safe container. They freeze beautifully for up to three months and thaw nicely in the fridge before serving.
Reheating
Since these candies are best enjoyed chilled or at room temp, I don’t recommend reheating. Instead, just let frozen candies thaw slowly in the fridge to maintain that perfect texture and chocolate coating.
Frequently Asked Questions:
Absolutely! Pecans are traditional, but walnuts, almonds, or even hazelnuts make great substitutes—you can personalize the texture and flavor to your liking.
Chilling the candy balls well before dipping is key—make sure they’re firm and cold. Using a fork to lift them gently and letting excess chocolate drip off helps maintain their shape too.
While traditional recipes use butter and sweetened condensed milk, you can experiment with dairy-free margarine and coconut condensed milk alternatives, though texture may vary slightly. Testing small batches first is best.
Stored in an airtight container in the refrigerator, these candies stay fresh for up to two weeks. They also freeze well for up to three months if you want to extend their shelf life.
Final Thoughts
Making the Martha Washington Candy Recipe is like creating a sweet love letter to the past that you can share with people you care about. The simple ingredients come together in harmonious layers of flavor that wow every time. I encourage you to try this recipe—it’s one of those homemade treats you’ll find yourself making again and again, whether for holidays, gifts, or a personal indulgence.
Print
Martha Washington Candy Recipe
- Prep Time: 45 minutes
- Cook Time: 45 minutes
- Total Time: 1 hour 30 minutes
- Yield: 36 servings
- Category: Dessert
- Method: No-Cook
- Cuisine: American
- Diet: Vegetarian
Description
Martha Washington Candy is a rich and delightful no-bake treat featuring a creamy blend of butter, powdered sugar, vanilla, shredded coconut, sweetened condensed milk, maraschino cherries, and pecans, all coated in smooth melted chocolate. Perfect for holiday gatherings and easy to prepare ahead, these bite-sized candies offer a nostalgic, sweet flavor with a crunchy nutty finish.
Ingredients
Base Mixture
- 1½ sticks unsalted butter melted
- 4 cups powdered sugar
- 1 teaspoon vanilla extract
- 3 cups shredded coconut sweetened
- 14 ounce (1 can) sweetened condensed milk
Add-ins
- 10 ounce (1 jar) maraschino cherries drained and chopped
- 1½ cups pecans chopped
Coating
- 16 ounces chocolate melting wafers
Instructions
- Combine Butter and Sugar: In a large mixing bowl, combine the melted butter and powdered sugar until smooth. Add in the vanilla extract and mix well to incorporate.
- Mix Coconut and Condensed Milk: Stir in the shredded coconut and sweetened condensed milk until evenly combined, forming a thick mixture.
- Add Cherries and Pecans: Gently fold in the chopped maraschino cherries and chopped pecans until everything is fully mixed and the mixture is sticky.
- Form Balls and Chill: Roll the mixture into 1-inch balls and place them on a baking sheet lined with parchment or wax paper. Chill the balls in the refrigerator for about 30 minutes or until firm.
- Melt Chocolate: While the balls are chilling, melt the chocolate wafers according to package instructions, using either a microwave or double boiler. Stir until smooth and completely melted.
- Dip Candies: Remove the chilled balls from the refrigerator. Using a fork or dipping tool, carefully dip each ball into the melted chocolate, ensuring it is fully coated. Allow excess chocolate to drip off.
- Set Chocolate Coating: Place the chocolate-coated candies back onto the parchment-lined baking sheet. Chill in the refrigerator for 10-15 minutes until the chocolate is firm.
- Serve and Store: Serve the candies once the chocolate coating is set. Store leftovers in an airtight container in the refrigerator.
Notes
- Pat the maraschino cherries completely dry before adding to prevent extra moisture that could affect texture.
- Use a small cookie scoop to create evenly sized candies for consistent cooking and presentation.
- Keep candies in a cool spot if serving at room temperature to prevent melting of the chocolate coating.
- Make ahead up to 2 weeks in advance; flavors improve after chilling for a day or two.
- Store candies in an airtight container in the refrigerator for up to 2 weeks.
- Freeze candies for up to 3 months in a freezer-safe container with parchment paper between layers to prevent sticking.
Nutrition
- Serving Size: 1 piece
- Calories: 210 kcal
- Sugar: 18 g
- Sodium: 50 mg
- Fat: 13 g
- Saturated Fat: 7 g
- Unsaturated Fat: 5 g
- Trans Fat: 0 g
- Carbohydrates: 22 g
- Fiber: 1 g
- Protein: 2 g
- Cholesterol: 30 mg


Leave a Reply