There’s something irresistibly cozy about a dessert that brings all the holiday flavors together without heating up your kitchen. This No Bake Egg Nog Pie Recipe is exactly that—a creamy, dreamy treat that tastes like Christmas in every bite and comes together in no time.

Jump to:
Why You'll Love This Recipe
I still remember the first time I whipped up this no bake egg nog pie—it was a holiday potluck, and the ease and flavor totally won over the crowd. This pie feels special because it’s rich and festive but super simple to make, perfect for those busy days when you want to impress without stress.
- Quick and fuss-free: You don’t even need the oven, making it perfect for warm kitchens or last-minute plans.
- Classic holiday flavors: The egg nog base mixed with cinnamon and nutmeg brings the cozy taste of the season straight to your plate.
- Light and fluffy texture: Thanks to the Cool Whip, this pie isn’t heavy but still satisfying.
- Versatile chilling options: Enjoy it refrigerated or frozen for a refreshing twist that everyone will rave about.

Ingredients & Why They Work
Each ingredient in this No Bake Egg Nog Pie Recipe plays a role in building that perfect balance of creamy, spiced, and light—ingredients that gel together effortlessly, creating a festive taste that’s both familiar and fun. Let me break down why these work wonders.

- Egg Nog: The star ingredient! Use a good quality, cold egg nog for the best rich, spiced flavor.
- Vanilla Instant Pudding Mix: This thickens the mixture quickly while adding a subtle vanilla sweetness that complements the egg nog.
- Cool Whip: Folded in gently to keep the pie fluffy and light—this is the secret to that melt-in-your-mouth texture.
- Ground Nutmeg and Ground Cinnamon: These warm spices elevate the egg nog notes beautifully, making every bite taste like holiday magic.
- Graham Cracker Pie Crust: Provides a buttery, crunchy base that contrasts perfectly with the creamy filling.
Make It Your Way
I love playing around with this No Bake Egg Nog Pie Recipe to suit the occasion or my mood. Sometimes I like to jazz it up with a bit of bourbon for adults or a sprinkle of crushed toffee on top for added crunch and sweetness.
- Variation: For a boozy twist, add 2 tablespoons of spiced rum or bourbon to the egg nog before mixing. It adds an extra festive kick that’s perfect for holiday parties I host.
- Dairy-Free Version: Try using dairy-free pudding and frozen coconut whipped topping for a vegan-friendly spin that still captures that creamy texture.
- Spice it up: Play with the spices by adding a touch of ground cloves or allspice if you want a more complex flavor.
Step-by-Step: How I Make No Bake Egg Nog Pie Recipe
Step 1: Whisk the pudding and egg nog until just thickened
Start by pouring your cold egg nog into a medium bowl. Sprinkle the vanilla instant pudding mix evenly on top—no clumps! Using a whisk, stir for about 2 to 3 minutes. You’ll see the mixture start to thicken, but don’t wait until it’s fully firm; the pudding sets more with chilling later.
Step 2: Gently fold in Cool Whip and spices
This is where you have to be gentle. Add in the thawed Cool Whip along with the nutmeg and cinnamon. Fold everything together using a spatula with smooth, slow movements to keep the Cool Whip light and fluffy—stirring too hard will deflate it and make the filling dense.
Step 3: Pour into crust and chill
Pour your luscious filling into the graham cracker pie crust and use a spatula or spoon to even out the surface. Cover it loosely with plastic wrap and pop it into the fridge for at least 4 hours. Trust me, it’s worth the wait for that perfectly set texture. For a chilly twist, try freezing it for 4 hours instead!
Top Tip
I learned early on that how you fold the Cool Whip makes all the difference in final texture for this pie. The first time I mixed it too vigorously, the filling turned heavy, almost like a mousse gone wrong. Since then, I’ve made it a point to fold gently, which keeps the airy feel I love.
- Use cold ingredients: Starting with cold egg nog and Cool Whip helps the pudding set faster and keeps the texture smooth.
- Whisk, don’t stir: When combining pudding mix with egg nog, whisk briskly to avoid lumps and promote even thickening.
- Chill well: Don’t rush the pie—chilling is key so the flavors meld and the filling firms up just right.
- Try the frozen version: Freezing the pie gives it a lovely firmer texture that feels almost like a frozen custard—perfect for warmer holiday climates.
How to Serve No Bake Egg Nog Pie Recipe

Garnishes
I like to keep garnishes simple but festive— a dollop of extra Cool Whip on each slice, a light dusting of fresh grated nutmeg, and if I’m feeling extra fancy, a few whole cinnamon sticks leaning in the pie plate for show. It adds that warm aroma and charm.
Side Dishes
This pie stands well on its own, but pairing it with some spiced pecans or a plate of buttery shortbread cookies elevates the experience. For a holiday dinner, it’s a lovely finish after a savory roast or ham.
Creative Ways to Present
For special occasions, I’ve served this pie in mini mason jars layered with crushed graham crackers at the bottom. It’s a fun individual dessert and looks super cute on a dessert table. You could also drizzle caramel sauce on top or sprinkle festive edible gold dust for that wow factor.
Make Ahead and Storage
Storing Leftovers
I always store leftover pie covered tightly in the fridge to keep it fresh and creamy. It holds up well for 3 to 4 days, though I never seem to have leftovers long! If you notice the crust getting soggy, just sprinkle a little extra graham cracker crumbs on top before serving—it perks it right up.
Freezing
Freezing this pie is a game changer. It freezes beautifully for up to a month. When I’ve wanted a cool treat in the middle of winter, I just pull it from the freezer and let it thaw for about 10-15 minutes before slicing to get that perfect “frozen custard” texture.
Reheating
This dessert is best served chilled or frozen, so reheating isn’t really needed. If you’re thawing from frozen, just patience is key—allow it to soften slightly at room temp so you get clean slices without melting or becoming watery.
Frequently Asked Questions:
Absolutely! Homemade egg nog will add even more rich, fresh flavor. Just make sure it’s fully chilled before you start the recipe for the best consistency.
You can use a store-bought or homemade cookie crust, such as vanilla wafers or ginger snap crusts, which complement the egg nog flavors nicely.
Yes! This recipe uses egg nog which often contains pasteurized eggs, but double-check your egg nog brand for safety. For kids or non-alcoholic needs, use an egg nog without alcohol.
Definitely! This pie actually tastes better after chilling a full day, making it a perfect make-ahead dessert for your holiday gatherings. Just cover and refrigerate until ready to serve.
Final Thoughts
This No Bake Egg Nog Pie Recipe is my go-to for holiday celebrations because it blends festive flavors with incredible ease—it’s truly a crowd-pleaser that anyone can make. I hope you enjoy making and sharing it as much as I do. It’s a sweet little tradition that feels like a warm holiday hug in every slice!
Print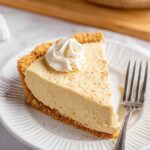
No Bake Egg Nog Pie Recipe
- Prep Time: 15 minutes
- Cook Time: 0 minutes
- Total Time: 4 hours 15 minutes
- Yield: 8 servings
- Category: Dessert
- Method: No-Cook
- Cuisine: American
Description
This No Bake Egg Nog Pie is a creamy, festive dessert perfect for the holiday season. Made with cold egg nog, vanilla instant pudding, and Cool Whip, it's flavored with warm spices like nutmeg and cinnamon, set in a graham cracker crust. This easy-to-make pie requires no baking and is delicious served chilled or frozen.
Ingredients
Filling
- 2 cups egg nog cold
- 1 (3.4 oz) package Vanilla Instant Pudding Mix
- 1 ¼ cup Cool Whip thawed
- ¼ teaspoon ground nutmeg
- ¼ teaspoon ground cinnamon
Crust
- 1 Graham Cracker Pie crust
Instructions
- Mix pudding and egg nog: Add the cold egg nog to a medium sized mixing bowl and sprinkle the vanilla pudding mix on top. Whisk the pudding into the egg nog until it starts to thicken, which takes about 2-3 minutes.
- Fold in Cool Whip and spices: Gently fold the Cool Whip, ground nutmeg, and ground cinnamon into the pudding mixture until just combined. Be careful not to stir too vigorously to maintain the fluffiness of the Cool Whip.
- Fill the crust: Scoop the combined mixture into the graham cracker pie crust and gently smooth it into an even layer for an attractive and uniform pie surface.
- Chill the pie: Refrigerate the pie for at least 4 hours to allow it to set properly before serving.
- Serve: Slice and serve the pie chilled with extra Cool Whip, whipped cream, or a sprinkle of nutmeg as desired.
Notes
- This pie is also fantastic served frozen. To enjoy as a frozen treat, place the pie in the freezer for 4 hours instead of the fridge.
- Use full-fat or low-fat egg nog depending on preference, but full-fat will enhance creaminess and flavor.
- The graham cracker crust can be store-bought for convenience or homemade for a more personalized touch.
- Make sure the Cool Whip is fully thawed before folding to ensure smooth incorporation.
- For extra festive garnish, consider adding a sprinkle of ground cinnamon or nutmeg on top before serving.
Nutrition
- Serving Size: 1 slice
- Calories: 280 kcal
- Sugar: 18 g
- Sodium: 210 mg
- Fat: 17 g
- Saturated Fat: 8 g
- Unsaturated Fat: 7 g
- Trans Fat: 0 g
- Carbohydrates: 25 g
- Fiber: 1 g
- Protein: 3 g
- Cholesterol: 30 mg


Leave a Reply