There’s something so magical about the crunch and melt-in-your-mouth feel of peppermint treats during the holidays. This Peppermint Meringue Cookies Recipe brings that perfect lightness with a refreshing minty twist that feels like Christmas in every bite. Trust me, once you try them, they’ll quickly become your go-to festive cookie to whip up.

Jump to:
Why You'll Love This Recipe
I can’t tell you how many times this Peppermint Meringue Cookies Recipe has been the star of my holiday cookie platter. They’re light as air, sweet with just the right hint of peppermint, and that delicate crisp texture keeps everyone coming back for more.
- Light and Airy Texture: The meringue base gives these cookies a crisp yet melt-in-your-mouth quality you won’t find in ordinary peppermint treats.
- Perfect Holiday Flavor: The peppermint extract adds such a refreshing zing without being overpowering.
- Colorful and Festive: Using gel food coloring brings beautiful red and green hues that make these cookies instantly gift-worthy or party-ready.
- Easy to Make Ahead: Since they keep well up to a week, you can bake them early and enjoy stress-free holiday hosting.

Ingredients & Why They Work
This recipe is wonderfully simple, and each ingredient plays a crucial role in creating those perfect peppermint meringue cookies. Using the right sugar and fresh egg whites really makes the difference, so here are some insights on each component.

- Egg Whites: Use room temperature egg whites to get the fluffiest, most stable meringue. Fresh eggs separated carefully from yolks ensure no fat breaks the foam.
- White Vinegar: This acid stabilizes the egg whites, helping them hold their shape and creating that perfect crisp exterior.
- Cornstarch: Adds tenderness to the cookies and helps them bake evenly without cracking.
- Caster Sugar: Its fine texture dissolves smoothly into the egg whites, making your meringue glossy and stable. If you don’t have caster sugar, just pulse some regular sugar in a food processor until fine.
- Peppermint Extract: This is the star flavor, so choose a good-quality extract to get that true festive kick.
- Gel Food Coloring: Unlike liquid dye, gel doesn’t change the consistency of your meringue and gives bright, vivid colors perfectly.
Make It Your Way
I love adding my playful twist to this Peppermint Meringue Cookies Recipe now and then. Whether it’s swapping in different food coloring or experimenting with shapes, these little cookies are perfect for showing off your personality.
- Variation: One year, I decided to swirl red and green colors right into the meringue before piping—totally fun and visually stunning! You might try adding crushed candy canes on top before baking for a crunchy surprise.
Step-by-Step: How I Make Peppermint Meringue Cookies Recipe
Step 1: Whip Up the Egg Whites to Perfection
Start by beating your room temperature egg whites on high speed until they’re just foamy, about 30 seconds. I always watch closely here because this "foamy" stage is when I add the vinegar and cornstarch—which helps the meringue get that irresistible light texture. Then, beat for about a minute more until soft peaks form; it should look airy but hold shape gently.
Step 2: Sweeten and Flavor Slowly
Next, with the mixer still running, slowly stream in the caster sugar—don’t rush this! Adding it too early or too fast can squash your fluffy texture. Once the sugar’s incorporated, mix in your peppermint extract. Then, beat for about 4 minutes more until you get those stiff, glossy peaks that hold their shape standing tall on the whisk.
Step 3: Get Creative with Piping
I like to pipe my meringue using a pastry bag with a star tip for that classic shape. Here’s a fun trick: use gel coloring to paint thin lines inside the bag before filling it. Pipe half the dough tinted red, then clean the bag and do the same with a green mix. This little extra effort adds serious holiday cheer with red and green stars on the baking sheet.
Step 4: Bake Low and Slow, Then Patience
Place your cookies in a 200°F (about 93°C) oven and bake for roughly 80 minutes. Then, here’s where patience pays off: turn off the oven but leave the cookies inside for 4 hours or even overnight to dry out perfectly. This slow drying process keeps them crisp and light without browning or cracking.
Top Tip
Over time, I’ve learned that the key to success with peppermint meringue cookies is all about patience and careful technique. These tips have saved me from many failed batches and made every cookie shine.
- Egg Separation: Be extra careful separating your yolks from whites; even a tiny bit of yolk will stop your whites from whipping up properly.
- Sugar Timing: Wait for the whites to get foamy before adding sugar, and add it slowly to keep your meringue fluffy and glossy.
- Oven Temperature: Use an oven thermometer to check your temperature; too hot will cook rather than dry the cookies, losing that delicate texture.
- Drying Time: Don’t rush the cooling/drying stage inside the turned-off oven—it’s what makes the cookies perfectly crisp and light.
How to Serve Peppermint Meringue Cookies Recipe

Garnishes
I usually sprinkle some crushed candy canes on top of freshly piped meringue before baking—it adds a little sparkle and extra peppermint crunch. Also, a light dusting of powdered sugar before serving can look like snowy magic!
Side Dishes
These cookies pair beautifully with a cozy cup of hot cocoa or peppermint tea for a comforting holiday treat. For parties, I like to serve them alongside rich chocolate truffles or a creamy eggnog—it balances the lightness of the meringue perfectly.
Creative Ways to Present
For a festive touch, arrange the cookies on a platter in the shape of a Christmas wreath, alternating red and green stars. Wrapping small batches in cellophane bags tied with a ribbon makes charming last-minute gifts that everyone will adore.
Make Ahead and Storage
Storing Leftovers
I always store leftover meringue cookies in an airtight container at room temperature. They keep well up to a week, though I’ve noticed their texture is crispiest within the first couple of days—so try to enjoy them fresh for the best experience.
Freezing
Freezing these cookies works surprisingly well! Just place them in a single layer on a baking sheet until frozen, then transfer to an airtight container or freezer bag. Thaw at room temperature before serving—they’ll remain light and crisp.
Reheating
I usually don’t reheat meringue cookies because they’re perfect as-is, but if you want to freshen them up, a quick 5-minute low-temp warm in the oven (around 200°F) helps revive their crispness without browning.
Frequently Asked Questions:
Using gel food coloring is best because it doesn’t change the consistency of your meringue. Liquid colors can add extra moisture that might prevent the cookies from whipping up correctly.
That slow drying period is crucial to completely dry out the meringues, making them crisp without browning or cracking. Rushing this step can leave them chewy or sticky instead of delicate and airy.
Make sure no yolk has accidentally mixed with your whites, and that your bowl and beaters are completely clean and free of grease. Also, using room temperature egg whites helps them whip better. If it still doesn’t work, try switching to a different mixer or whisking method.
You can use vanilla or almond extract for a different flavor twist, but for that classic wintery peppermint taste, I recommend sticking with peppermint extract to keep the signature flavor of the recipe.
Final Thoughts
This Peppermint Meringue Cookies Recipe holds a special place in my heart—it’s the cookie I always bring out when I want to delight guests with something light and festive. I hope you’ll give it a try and find yourself loving the process as much as the melt-in-your-mouth results. Baking these is like sharing a little holiday magic with those you care about.
Print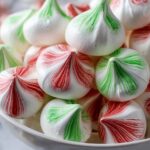
Peppermint Meringue Cookies Recipe
- Prep Time: 15 minutes
- Cook Time: 1 hour 20 minutes
- Total Time: 5 hours 35 minutes
- Yield: 60 cookies
- Category: Dessert
- Method: Baking
- Cuisine: American
- Diet: Vegetarian
Description
Delightfully light and crisp, these Christmas Meringue Cookies feature a subtle peppermint flavor and festive red and green colors, perfect for holiday celebrations or gifting.
Ingredients
Meringue Base
- 4 egg whites room temperature
- 1 tablespoon white vinegar
- 1 tablespoon cornstarch
- 1 cup caster sugar
- ¾ teaspoon peppermint extract
Decorations
- Red gel food coloring
- Green gel food coloring
Instructions
- Prepare Egg Whites: Beat the egg whites on high speed until foamy, about 30 seconds, ensuring a light start to the meringue.
- Add Stabilizers: Incorporate the white vinegar and cornstarch into the foamy egg whites and continue beating until soft peaks form, roughly one minute.
- Add Sugar and Flavor: Slowly add the caster sugar in a steady stream while beating, then blend in the peppermint extract. Beat for about 4 minutes until the mixture holds stiff peaks.
- Prepare Piping Bags: Using a pastry bag fitted with a star tip, draw lines inside the bag with red gel food coloring. Fill the bag with half of the meringue mixture and pipe one-inch star shapes onto a parchment-lined baking sheet.
- Repeat with Green: Repeat the previous step with the other half of the meringue mixture, using green gel food coloring for piping stars onto another baking sheet.
- Bake the Cookies: Place the cookie sheets into a preheated oven at 200 degrees Fahrenheit and bake for about 80 minutes.
- Drying Phase: After baking, turn off the oven but leave the cookies inside for 4 hours or overnight to dry completely and develop their crisp texture.
- Store Properly: Once cooled and dried, store the meringue cookies in an airtight container for up to one week to maintain freshness.
Notes
- Do not add sugar too early; wait until egg whites are foamy to help the meringue fluff properly.
- Separate egg yolks carefully to avoid any yolk contamination, which can prevent the egg whites from reaching stiff peaks.
- Check your oven temperature to ensure it doesn’t run hot, as these cookies require low heat to dry rather than bake thoroughly.
- Meringue cookies taste best when eaten within a few hours of baking despite being storable for a week.
- To substitute caster sugar, finely pulse regular granulated sugar in a food processor, but do not use powdered sugar as its finer texture adversely affects the meringue.
Nutrition
- Serving Size: 1 cookie
- Calories: 15 kcal
- Sugar: 2 g
- Sodium: 5 mg
- Fat: 0 g
- Saturated Fat: 0 g
- Unsaturated Fat: 0 g
- Trans Fat: 0 g
- Carbohydrates: 3 g
- Fiber: 0 g
- Protein: 0.3 g
- Cholesterol: 0 mg


Leave a Reply