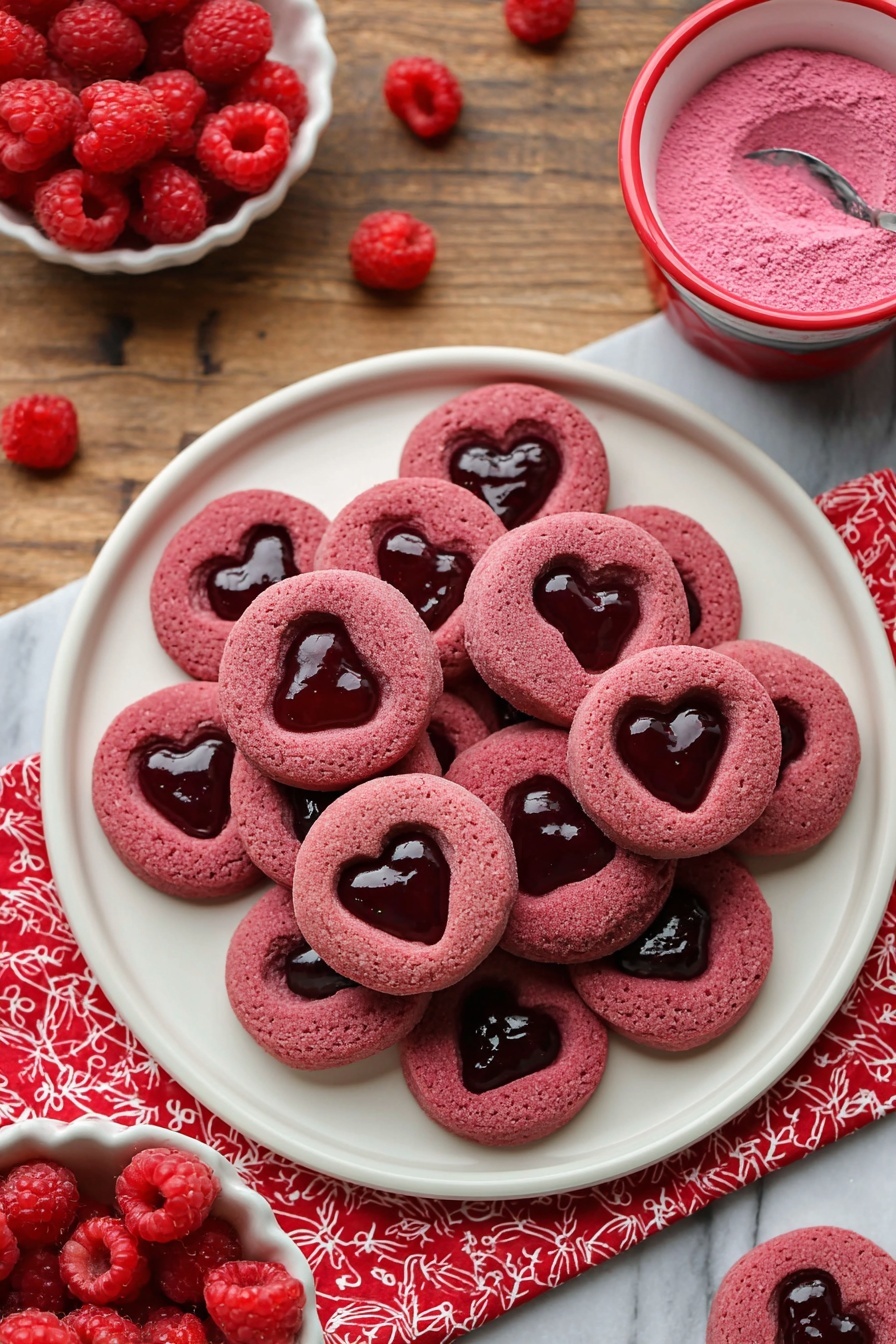
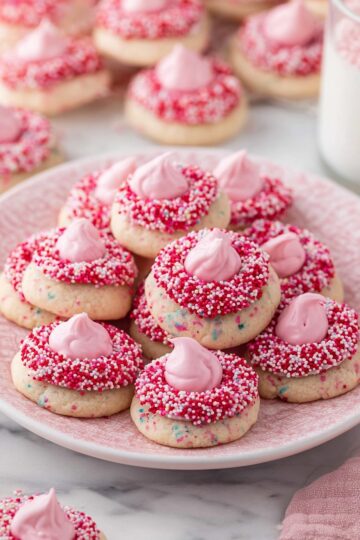
There’s something truly heartwarming about a cookie that looks as sweet as it tastes, isn’t there? This Raspberry Heart Thumbprint Cookies Recipe is one of my favorites to bake when I want to impress with minimal fuss. These little gems offer a tender, buttery base with a zingy whisper of raspberry powder and a stunning heart-shaped jam center that’s just perfect for sharing (or sneaking a few for yourself!).

Jump to:
- Why You'll Love This Recipe
- Ingredients & Why They Work
- Make It Your Way
- Step-by-Step: How I Make Raspberry Heart Thumbprint Cookies Recipe
- Top Tip
- How to Serve Raspberry Heart Thumbprint Cookies Recipe
- Make Ahead and Storage
- Frequently Asked Questions:
- Final Thoughts
- Raspberry Heart Thumbprint Cookies Recipe
Why You'll Love This Recipe
I’ve made these cookies countless times for friends, family, and festive occasions, and they never disappoint. The balance of flavors and the adorable heart-shaped jam filling make them a crowd-pleaser every single time.
- Beautiful presentation: The heart-shaped jam centers add a charming look that's perfect for Valentine’s Day or gift-giving.
- Subtle raspberry tang: The freeze-dried raspberry powder infuses just enough berry flavor without overpowering the buttery cookie.
- Simple prep: No fancy tools needed — just your fingertips, basic ingredients, and a little patience with chilling.
- Perfect texture: Soft, crumbly, and buttery cookies that melt in your mouth.
Ingredients & Why They Work
Before you dive in, a quick tip: using high-quality ingredients really makes a difference here, especially with the butter and raspberry jam. Also, freeze-dried raspberry powder packs a punch, so I always sift it to keep the texture silky smooth in the dough.
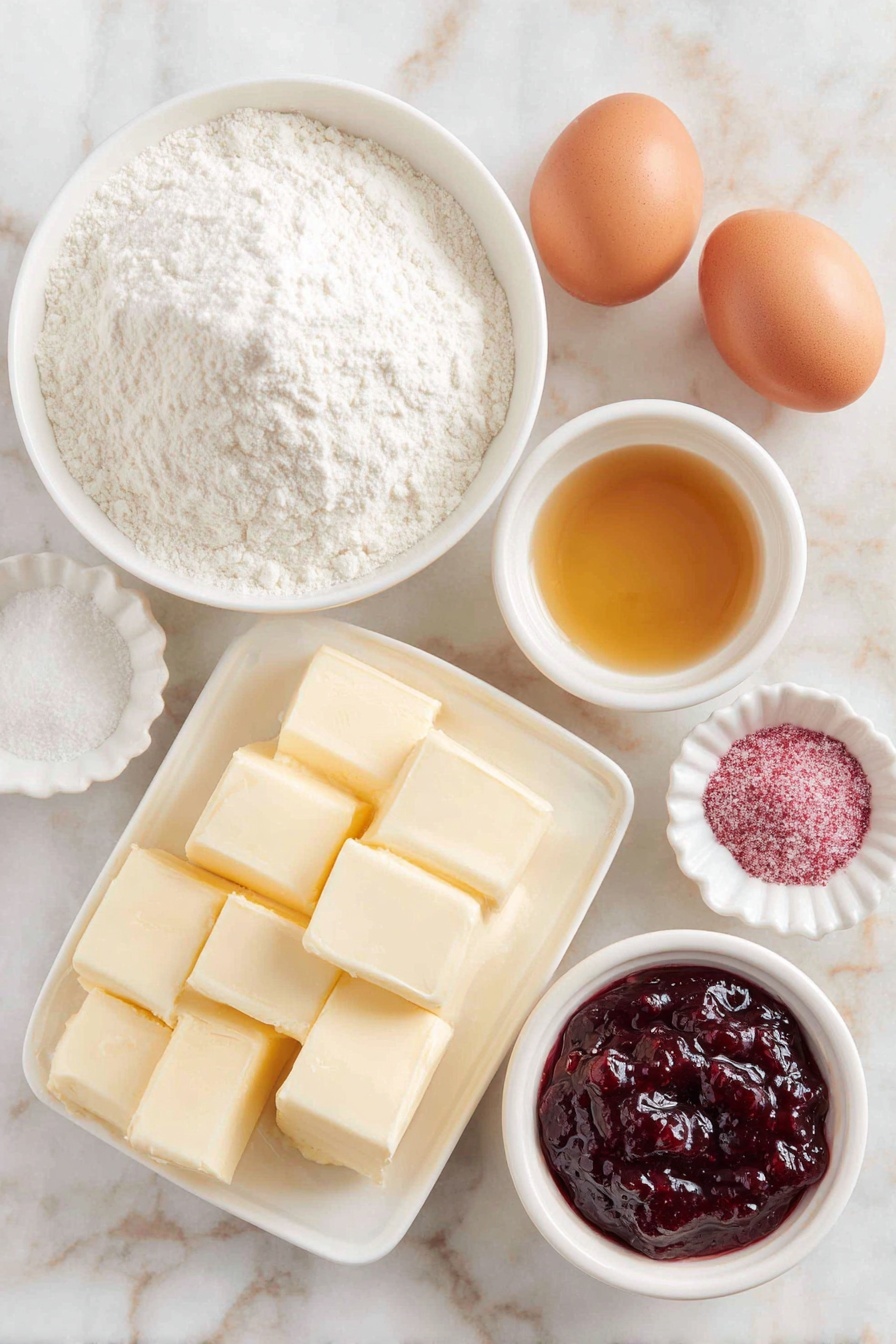
- Unsalted butter: Provides a rich, creamy base and lets you control the salt level perfectly.
- Granulated sugar: Adds sweetness and a slight crispness to the cookie edges.
- Egg yolks: Contribute to a tender, rich crumb texture.
- Vanilla extract: Enhances the overall flavor with a warm, inviting aroma.
- All-purpose flour: The structure of the cookie depends on this staple ingredient.
- Kosher salt: Balances the sweetness and elevates all the flavors.
- Freeze dried raspberry powder: Delivers natural raspberry flavor without extra moisture, keeping the dough shape perfect.
- Raspberry jam: The sweet and tangy star of the filling, creating that dreamy heart center.
Make It Your Way
One of the best things about this Raspberry Heart Thumbprint Cookies Recipe is how effortlessly it lends itself to your personal touch. Whether you want to swap flavors, experiment with dietary needs, or adapt it for holidays, these cookies happily accommodate your creativity.
- Variation: For a citrus twist, I love adding a teaspoon of finely grated lemon zest to the dough along with the raspberry powder. It adds a bright freshness that pairs beautifully with the sweet jam.
- Gluten-Free Option: Substitute the all-purpose flour with a gluten-free blend and add a pinch of xanthan gum to maintain structure. The buttery texture stays intact, and the raspberry flavor still shines through.
- Jam Alternatives: Don’t feel limited to raspberry jam! Apricot, strawberry, or even mixed berry jams work wonders here—and each creates a slightly different but equally delightful heart center.
- Holiday Flair: Around Valentine’s Day, I sometimes brush the cookie edges with a little melted white chocolate or sprinkle finely crushed freeze-dried rose petals on top for a romantic, elegant touch.
Step-by-Step: How I Make Raspberry Heart Thumbprint Cookies Recipe

Step 1: Cream the Butter and Sugar Until Fluffy
Start by placing your softened unsalted butter and granulated sugar in a large mixing bowl. Using an electric mixer, beat them together on medium speed for about 3 minutes until the mixture looks pale and fluffy. This step is key for a tender, melt-in-your-mouth texture—so don’t rush it! You’ll notice the sugar begins to dissolve into the butter, creating a light, airy base for the cookie dough.
Step 2: Add Egg Yolks and Vanilla for Smoothness
Next, add the 2 egg yolks and 1 teaspoon of vanilla extract into the creamed butter and sugar. Continue mixing until the batter becomes smooth and well combined, with a luscious consistency. This enriches your dough, adding depth of flavor and enhancing its tender crumb.
Step 3: Whisk Together Dry Ingredients
In a separate bowl, whisk together the all-purpose flour, kosher salt, and the sifted freeze-dried raspberry powder. This ensures the powder is evenly distributed for consistent bursts of tangy raspberry flavor in every bite. The vibrant pink hue also starts to peek through the dough here, promising a pretty cookie.
Step 4: Gently Combine Dry and Wet Ingredients
Gradually add your dry mixture to the wet ingredients in two batches. Mix gently—just until combined—to avoid overworking the dough, which can make cookies tough. You’ll want a soft, pliable dough that holds its shape but still feels tender to the touch.
Step 5: Chill the Dough for Perfect Shaping
Cover the bowl with plastic wrap and place it in the refrigerator for 30 minutes. This chilling period firms up the dough, making it easier to roll and shape without sticking to your hands. It also helps the cookies keep their lovely heart indentations during baking.
Step 6: Prepare to Bake – Preheat and Line Sheets
While your dough chills, preheat your oven to 350 degrees Fahrenheit. Line two baking sheets with parchment paper to prevent sticking and ensure even baking. Having everything ready means you can get those cookies into the oven right after shaping.
Step 7: Shape Your Cookies and Create Heart Indentations
Scoop a tablespoon of dough and roll it into a smooth ball. Slightly flatten it into a puck shape and place it on your baking sheet. Using your pinky or index finger, gently press down about three-quarters of the way through the dough ball to create a charming heart-shaped indentation. The chilled dough makes it easier to shape those perfect hearts without cracking.
Step 8: Fill Each Heart with Raspberry Jam
Spoon or pipe generous dollops of raspberry jam right into the heart indentations. Fill them almost up to the top, leaving a tiny gap to prevent jam from spilling over as they bake. This glossy jewel-like filling is what makes these thumbprint cookies utterly irresistible.
Step 9: Chill Again for Shape Perfection
Pop the shaped and filled cookies back into the refrigerator for 10 to 15 minutes. This short chill helps the cookies maintain their crisp edges and keeps the jam from spreading too much while baking.
Step 10: Bake Until Golden and Set
Bake the cookies for 12 minutes, or until the bottoms turn a lovely light brown. The tops might still be a bit soft, but don’t worry—they’ll firm up as they cool. Watch for that subtle golden bottom; it’s a signal your cookies are perfectly baked.
Step 11: Cool Completely Before Enjoying
Carefully transfer your cookies to a wire rack and let them cool fully. This step is important—the cookies set as they cool, giving you that tender, crumbly texture combined with the luscious jam center that’s pure bliss in every bite.
Top Tip
Making perfect Raspberry Heart Thumbprint Cookies is all about gentle handling and proper chilling—trust me, it makes a world of difference in texture and shape!
- Chill the Dough Thoroughly: I’ve found that letting the dough chill for a full 30 minutes before shaping helps it hold together beautifully and prevents spreading in the oven.
- Create the Heart Indentations Carefully: Using your pinky or index finger to press gently but firmly about three-quarters into the dough ensures a lovely defined heart shape without breaking the cookie.
- Refrigerate Shaped Cookies Before Baking: Popping the prepared cookies back in the fridge for 10-15 minutes before baking really helps them keep their shape and avoids jam overflow.
- Don’t Overmix the Dough: Mixing the dry ingredients just until combined keeps the cookies tender, so stop as soon as you see no more flour streaks!
How to Serve Raspberry Heart Thumbprint Cookies Recipe
Garnishes
Sprinkle the cookies lightly with powdered sugar for a delicate snowy effect, or add a tiny fresh raspberry on top of each jam heart just before serving for a pop of color and extra freshness. A small mint leaf beside each cookie can also brighten the presentation beautifully.
Side Dishes
These charming cookies pair wonderfully with a cup of hot tea, like Earl Grey or chamomile. For a cozy gathering, serve alongside a scoop of vanilla ice cream or a small dish of whipped cream to complement the sweet-tart raspberry jam. Fresh fruit salad or lemon bars also make delightful companions on a dessert tray.
Make Ahead and Storage
Storing Leftovers
Store your Raspberry Heart Thumbprint Cookies in an airtight container at room temperature for up to one week. This keeps them soft and crumbly, just like the day you baked them.
Freezing
For longer storage, freeze the cookies for up to three months. Just layer them between sheets of parchment paper in an airtight container or freezer bag to prevent sticking and preserve their beautiful heart shapes.
Reheating
If you want to enjoy them warm, simply thaw frozen cookies at room temperature for about 30 minutes. To refresh the texture, pop them in a preheated oven at 300°F for 5 minutes before serving—just be careful not to overheat, or the jam may run.
Frequently Asked Questions:
Freeze-dried raspberry powder provides concentrated flavor and a dry ingredient effect, which fresh raspberries can’t replicate because they add moisture. Using fresh raspberries instead may result in softer dough and more spreading during baking.
Use the same finger—your pinky or index finger—pressing gently about three-quarters down into each cookie ball. Taking a steady, gentle approach helps keep the heart shapes uniform across all cookies.
Absolutely! While raspberry jam complements the raspberry powder beautifully, you can try strawberry, cherry, or even apricot jam. Just pick a jam with a smooth texture to fill the heart indentations nicely.
The tops can be soft immediately out of the oven because these cookies are tender and buttery. They firm up as they cool on the rack, so allow them to rest completely before handling or storing.
Final Thoughts
These Raspberry Heart Thumbprint Cookies aren’t just a treat—they’re little bites of joy, perfect for sharing with friends and family, or keeping close for a sweet moment to yourself. With their delicate crumb and charming jam-heart centers, they always bring a smile. I hope this recipe inspires you to bake a batch and fill your kitchen with the warmth and love these cookies embody.
Print
Raspberry Heart Thumbprint Cookies Recipe
- Prep Time: 15 minutes
- Chilling Time: 45 minutes
- Cook Time: 12 minutes
- Total Time: 1 hour 7 minutes
- Yield: 32 cookies
- Category: Dessert
- Method: Baking
- Cuisine: American
- Diet: Vegetarian
Description
Delight in these charming Raspberry Heart Thumbprint Cookies, featuring a tender buttery base infused with freeze-dried raspberry powder for a subtle tang and crowned with sweet raspberry jam. Perfect for gift-giving or special occasions, these cookies combine a beautiful heart-shaped jam center with a soft, crumbly texture that melts in your mouth.
Ingredients
Cookie Dough
- 1 cup unsalted butter, softened to room temperature
- ⅔ cup granulated sugar
- 2 egg yolks
- 1 teaspoon vanilla extract
- 2 ¼ cup (280g) all-purpose flour
- ¼ teaspoon kosher salt
- 4 tablespoons freeze dried raspberry powder, sifted
Filling
- 10 oz raspberry jam
Instructions
- Cream Butter and Sugar: In a large bowl, use an electric mixer to cream the softened butter and granulated sugar until the mixture is light and fluffy, which should take about 3 minutes.
- Add Egg Yolks and Vanilla: Add in the egg yolks and vanilla extract to the creamed butter and sugar, then continue mixing until the batter is smooth and well combined.
- Combine Dry Ingredients: In a separate bowl, whisk together the all-purpose flour, kosher salt, and sifted freeze dried raspberry powder to ensure even distribution.
- Incorporate Dry Ingredients: Gradually add the dry ingredient mixture to the wet ingredients in two batches, mixing gently until just combined to avoid overworking the dough.
- Chill Dough: Cover the bowl with plastic wrap and refrigerate the dough for 30 minutes to firm it up for easier shaping.
- Preheat Oven and Prepare Baking Sheets: Preheat your oven to 350 degrees Fahrenheit and line two baking sheets with parchment paper to prevent sticking.
- Shape Cookies: Scoop a tablespoon of chilled dough and roll it into a smooth ball. Slightly flatten the ball into a puck shape and place it on the prepared baking sheet. Using your pinky or index finger, press down about three-quarters of the way into the dough ball to create a heart-shaped indentation.
- Add Jam Filling: Spoon or pipe raspberry jam into the heart-shaped indentations, filling them almost to the top but leaving a little room so the jam doesn't overflow during baking.
- Chill Before Baking: Return the shaped cookies to the refrigerator for 10 to 15 minutes to help them maintain their shape while baking.
- Bake Cookies: Bake the cookies in the preheated oven for 12 minutes or until the bottoms are lightly browned. The tops may still be soft, but they will set as they cool.
- Cool Completely: Carefully transfer the baked cookies to a wire rack and allow them to cool completely before serving or storing.
Notes
- To make freeze-dried raspberry powder at home, pulse 1-2 ounces of freeze-dried raspberries or strawberries in a food processor or spice grinder until finely ground. Sift through a fine mesh sieve and discard seeds.
- If you don't have a food processor, crush freeze-dried berries using a rolling pin inside a sealed bag, then sift.
- Store these cookies in an airtight container for up to one week to maintain freshness.
- For longer storage, freeze cookies separated by parchment paper layers for up to three months to prevent sticking.
Nutrition
- Serving Size: 1 cookie
- Calories: 120 kcal
- Sugar: 8 g
- Sodium: 45 mg
- Fat: 6 g
- Saturated Fat: 3.5 g
- Unsaturated Fat: 2 g
- Trans Fat: 0 g
- Carbohydrates: 15 g
- Fiber: 1 g
- Protein: 2 g
- Cholesterol: 30 mg


Leave a Reply