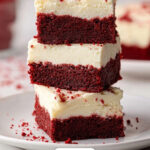
If you're craving something that’s both rich and eye-catching, this Red Velvet Brownies with Cream Cheese Frosting Recipe is the perfect treat. It brings together the fudgy goodness of brownies with that signature red velvet charm and a dreamy cream cheese finish you'll swoon over.

Jump to:
- Why You'll Love This Recipe
- Ingredients & Why They Work
- Make It Your Way
- Step-by-Step: How I Make Red Velvet Brownies with Cream Cheese Frosting Recipe
- Top Tip
- How to Serve Red Velvet Brownies with Cream Cheese Frosting Recipe
- Make Ahead and Storage
- Frequently Asked Questions:
- Final Thoughts
- Red Velvet Brownies with Cream Cheese Frosting Recipe
Why You'll Love This Recipe
I’ve made these brownies countless times, and every single bite feels like a little celebration. They’re not only stunning with their vibrant red hue but also incredibly moist and flavorful, topped with that silky cream cheese frosting that just melts in your mouth.
- Rich and Fudgy Texture: Enjoy the classic brownie chewiness paired with subtle cocoa notes unique to red velvet.
- Beautiful Presentation: The bold red color makes these brownies perfect for any festive occasion or casual treat.
- Easy to Frost: The cream cheese frosting is simple to whip up but adds a luxurious topping.
- Make Ahead Friendly: These brownies store well and taste even better after a day or two.
Ingredients & Why They Work
Before diving in, make sure you have the essentials on hand—quality ingredients make a world of difference. Look for a good natural cocoa powder and cream cheese that’s perfectly softened for that smooth frosting.
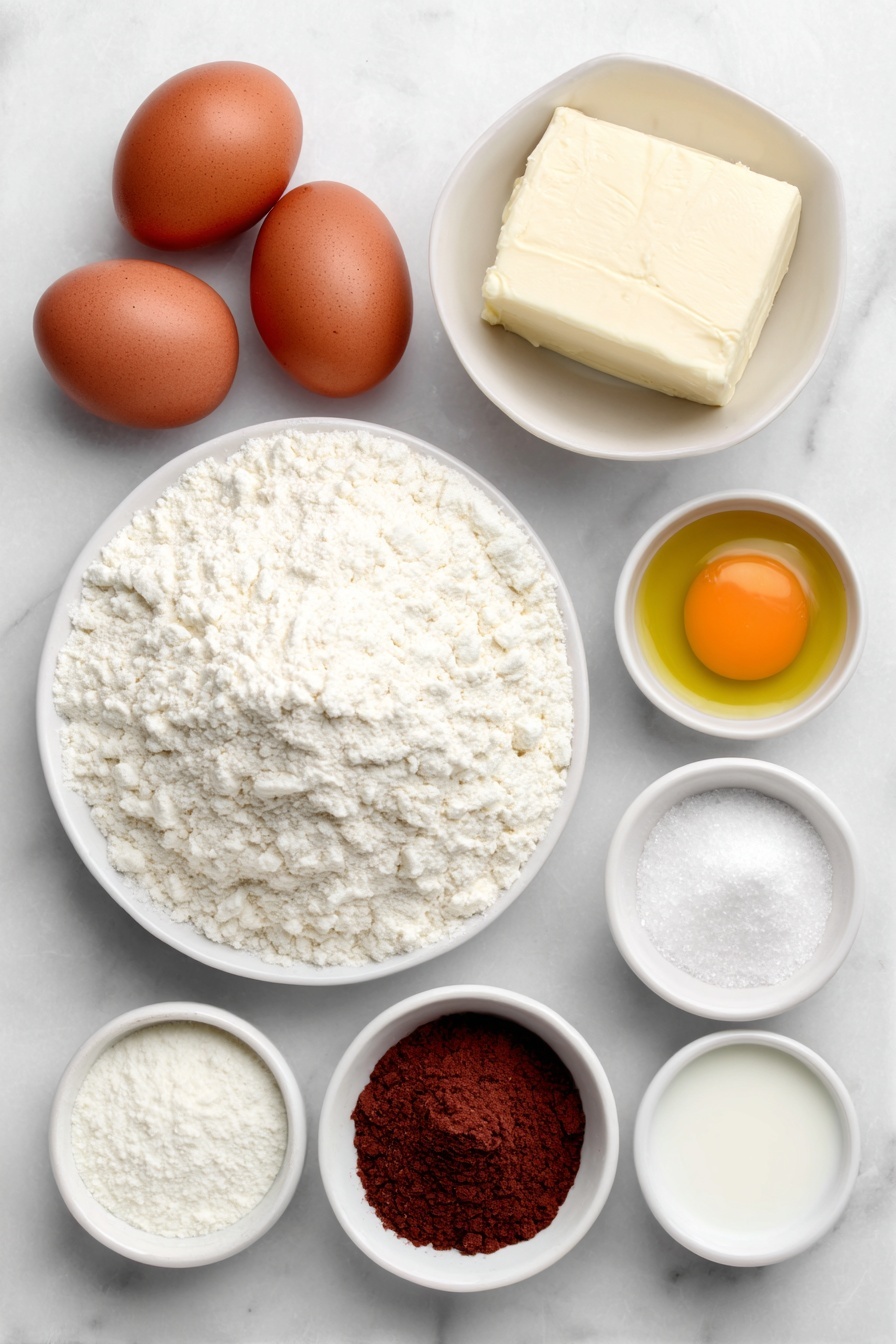
- Unsalted Butter: Melting it brings moisture and richness without overpowering the flavor.
- All-Purpose Flour: Provides structure so the brownies hold their shape while staying tender.
- Cornstarch: A secret ingredient to keep the texture soft and slightly cakey.
- Salt: Balances the sweetness and enhances the cocoa flavor in the brownies.
- Unsweetened Natural Cocoa Powder: Gives that classic red velvet depth without bitterness.
- Granulated Sugar: Sweetens and helps create that fudgy crumb.
- Large Eggs and Egg Yolk: Essential for richness and binding the batter together.
- Vegetable Oil: Keeps the brownies moist and tender for days.
- White Vinegar: Reacts with the cocoa and food coloring to give that signature red velvet tang and identity.
- Vanilla Extract: Rounds out the flavors beautifully.
- Red Gel Food Coloring: The vibrant color that makes these brownies stand out; using gel avoids extra liquid in the batter.
- Cream Cheese: The star of the frosting, providing tang and creaminess.
- Powdered Sugar: Sweetens and thickens the frosting for perfect spreading.
- Optional Salt and Milk/Heavy Cream: To tweak frosting balance and consistency just how you like it.
Make It Your Way
One of the best things about this Red Velvet Brownies with Cream Cheese Frosting Recipe is how flexible it is. You can easily tweak it to suit your taste or dietary needs without losing that rich, moist texture and that dreamy cream cheese topping.
- Gluten-Free Variation: I swapped the all-purpose flour with a 1:1 gluten-free baking blend once and was thrilled with how tender and fudgy the brownies still turned out. Just be sure your blend contains xanthan gum for structure.
- Less Sweet Frosting: If you prefer a less sweet finish, I recommend starting with 2 cups of powdered sugar and gradually adding more only if needed. This keeps the cream cheese tang shining through without being overpowering.
- Seasonal Twist: During fall, I love mixing a teaspoon of pumpkin pie spice into the batter for a subtle cozy flavor that pairs beautifully with the red velvet. It gives a festive touch without overwhelming the original taste.
- Vegan Adaptation: For a vegan take, substitute the butter and cream cheese with plant-based alternatives and use flax eggs in place of the eggs. The texture will be a little different but still delicious and satisfying.
Step-by-Step: How I Make Red Velvet Brownies with Cream Cheese Frosting Recipe
Step 1: Preheat oven and prep your pan
Start by preheating your oven to 350°F. This ensures it’s nice and hot once the batter is ready. Line an 8×8 or 9×9-inch pan with parchment paper, leaving some overhang on the sides. This little trick makes it super easy to lift out the brownies once they’re baked and cooled—no sticky fingers or broken edges!
Step 2: Melt butter and whisk dry ingredients
In a microwave-safe bowl, melt ½ cup (113g) of unsalted butter and set it aside to cool. Meanwhile, in another bowl, whisk together ¾ cup (90g) all-purpose flour, 1 tablespoon cornstarch, ½ teaspoon salt, and ⅓ cup (28g) unsweetened natural cocoa powder until fully combined. This helps distribute the cocoa and salt evenly throughout the batter.
Step 3: Beat wet ingredients to fluffy perfection
Using a stand mixer or a hand mixer, beat the melted butter, 1¼ cups (248g) granulated sugar, 2 large eggs, and 1 large egg yolk on medium speed for 60 seconds. Aim for a pale yellow color and that the mixture looks like it has doubled in volume. This step is essential to get those beautifully light, fudgy brownies.
Step 4: Add remaining wet ingredients
Next, pour in ¼ cup (59ml) vegetable oil, 1 tablespoon white vinegar, and 1 teaspoon vanilla extract. Mix on low just until everything is combined — you want moist, smooth batter but avoid overmixing here.
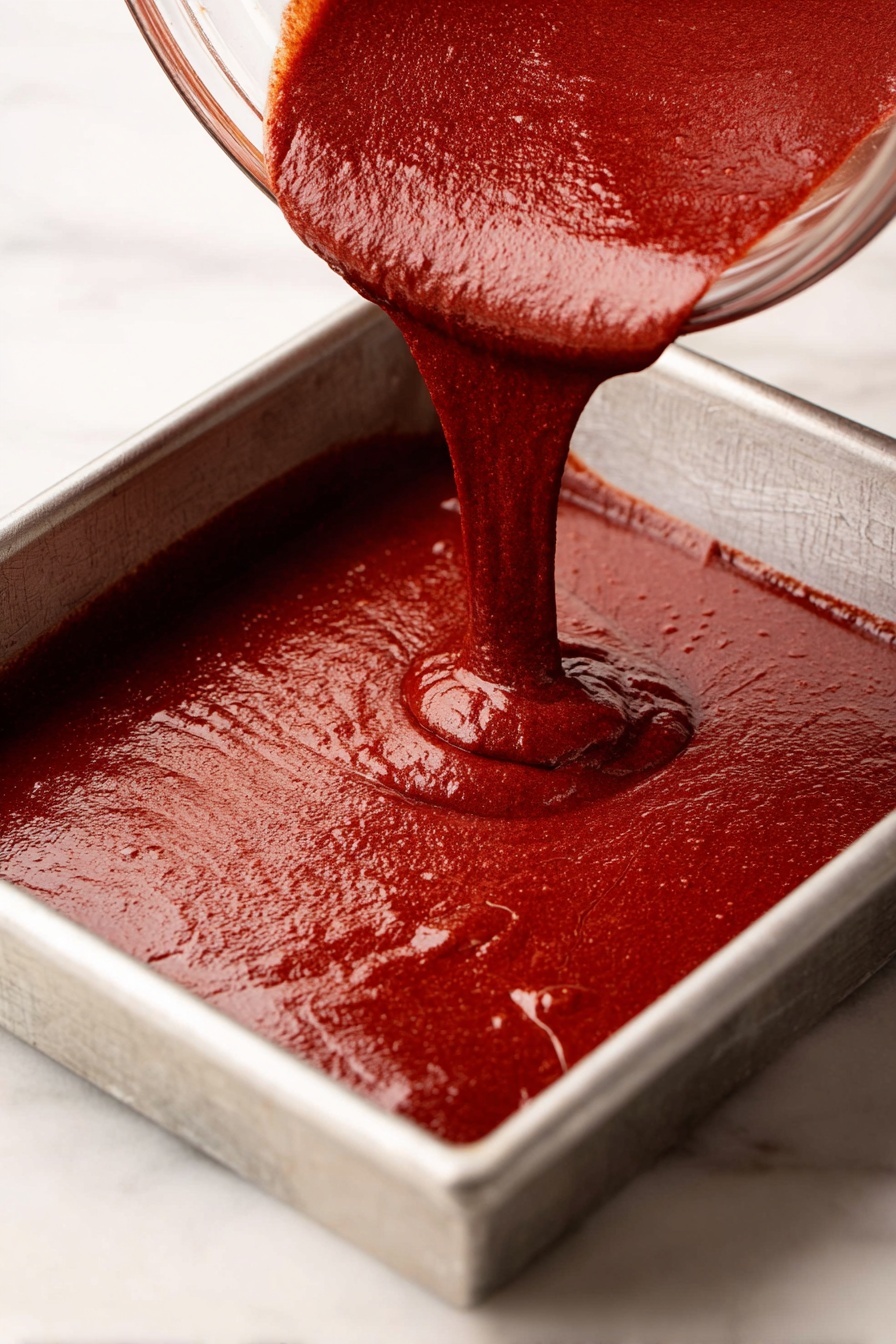
Step 5: Combine dry ingredients and add color
Slowly add the dry mixture to the wet one while mixing on low speed. Then, add 1 teaspoon red gel food coloring to get that signature vibrant hue. Mix just until everything is fully combined — a few streaks of red are fine, but avoid overmixing to keep the brownies tender.
Step 6: Bake your brownies just right
Pour the batter into your prepared pan and smooth the top with a spatula. Depending on your pan, bake times vary: for a glass pan, bake 35-40 minutes; for a metal pan, 30-35 minutes. If you want chewier brownies with a bit less fudginess, extend the baking to 40-45 minutes. Test doneness by poking a toothpick into the center — it should come out clean.
Step 7: Cooling is key
Once baked, allow your brownies to cool completely in the pan. This usually takes about 1 hour. Cooling fully is crucial before frosting, so you don’t end up with a melting mess and your frosting stays beautifully creamy on top.
Step 8: Prepare luscious cream cheese frosting
In a mixing bowl, beat together 4 oz (114g) softened cream cheese and ¼ cup (57g) softened unsalted butter on medium speed for 1-2 minutes until fluffy and light. Add 1 teaspoon vanilla extract and 2 to 4 cups (227-454g) powdered sugar, plus an optional ⅛ teaspoon salt. Beat on low for another 1-2 minutes, scraping down the bowl to incorporate everything evenly.
Step 9: Adjust frosting consistency
If your frosting feels too thick, add a splash of milk or heavy cream and beat again until smooth and spreadable. Be careful to add liquid gradually — you want creamy frosting, not runny!
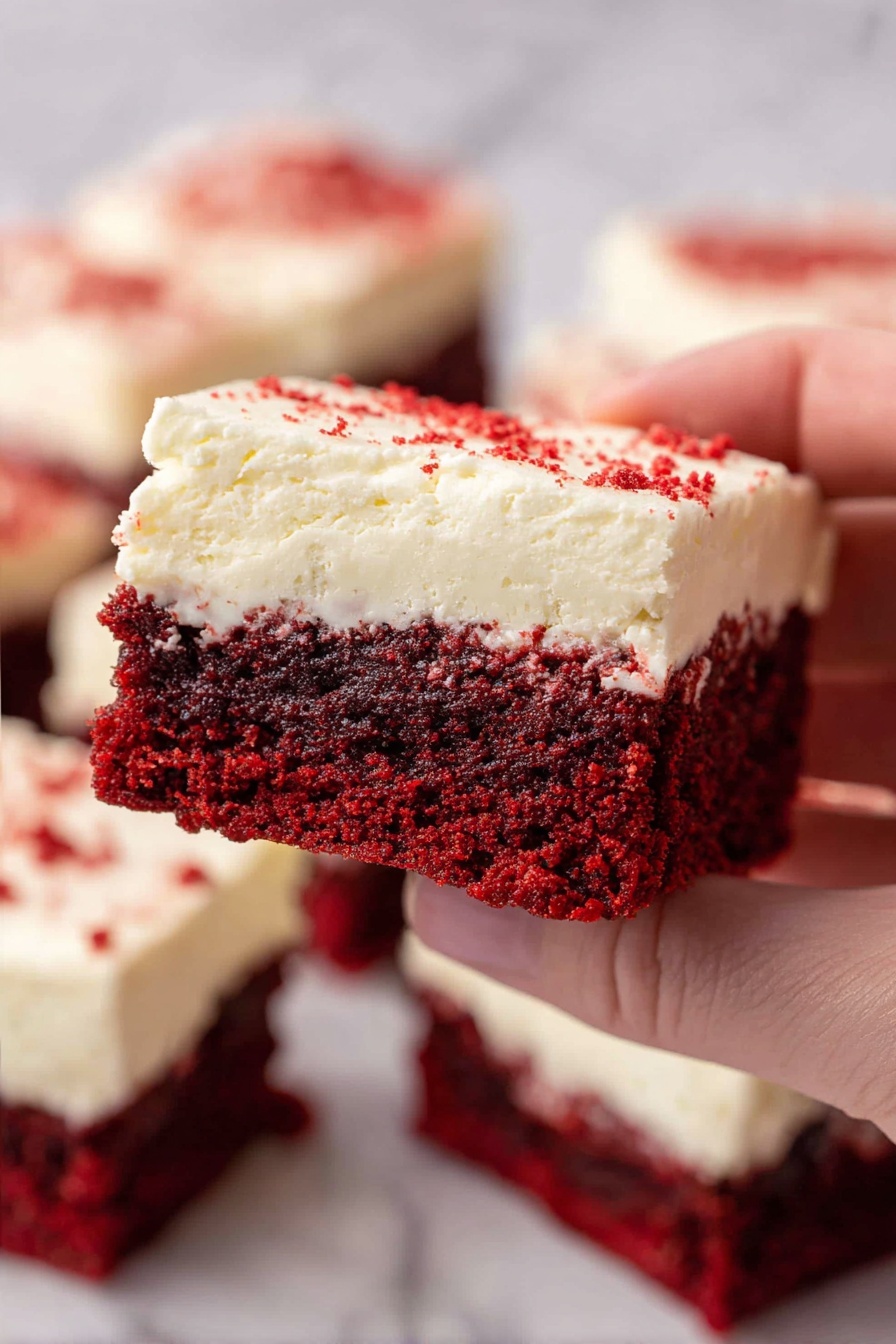
Step 10: Frost and chill for clean slices
Spread the cream cheese frosting evenly over your cooled brownies. For neat, clean slices, pop the frosted brownies in the freezer for 15-20 minutes before cutting. Use a sharp knife and wipe the blade after each cut to keep edges crisp and frosting intact.
Top Tip
Getting your Red Velvet Brownies with Cream Cheese Frosting just right is all about a few simple yet important tricks that make all the difference in texture, flavor, and appearance.
- Use Parchment Paper with Overhang: This makes lifting the brownies out of the pan a breeze and keeps the edges intact for cutting.
- Don't Overmix the Batter: After adding the dry ingredients, mix just until combined to keep the brownies fudgy and tender rather than dense.
- Freeze Before Slicing: Pop your frosted brownies in the freezer for 15-20 minutes before cutting to avoid smudging the cream cheese frosting and to get those clean, sharp edges.
- Melt and Cool Butter Properly: Make sure your melted butter is cooled before mixing it with the eggs to prevent cooking the eggs prematurely, ensuring a smooth batter.
How to Serve Red Velvet Brownies with Cream Cheese Frosting Recipe
Garnishes
To elevate your Red Velvet Brownies, consider adding a sprinkle of white chocolate shavings or a few fresh raspberries on top. A dusting of cocoa powder or a drizzle of melted chocolate complements the cream cheese frosting beautifully, adding an elegant touch to this vibrant dessert.
Side Dishes
These brownies pair wonderfully with a scoop of vanilla ice cream or a dollop of lightly sweetened whipped cream. For a refreshing contrast, serve alongside some fresh fruit like strawberries or a citrus salad. A cup of rich coffee or a creamy latte also makes a perfect companion to balance the sweetness.
Make Ahead and Storage
Storing Leftovers
Store your frosted Red Velvet Brownies in an airtight container at room temperature to keep them moist for up to 3 days. If your kitchen is warm, refrigeration is also a good option to preserve freshness, but let the brownies come back to room temperature before serving for best flavor and texture.
Freezing
You can freeze the brownies uncut or sliced. For uncut, wrap the whole pan tightly in plastic wrap and then in aluminum foil—freeze for up to 2 months. For sliced brownies, individually wrap each piece and place them in a freezer-safe container. Thaw overnight in the fridge before serving, and you’ll still get that creamy frosting and rich texture.
Reheating
If you prefer warm brownies, reheat a single slice in the microwave for about 10-15 seconds or until slightly warmed through. Avoid overheating to keep the cream cheese frosting intact and luscious. Warming enhances the fudgy texture and the flavors really come alive!
Frequently Asked Questions:
Yes, but it's best to use unsweetened natural cocoa powder as indicated in the recipe. Using Dutch-processed cocoa may change the acidity and affect the red color and texture of the brownies.
The white vinegar reacts with the baking soda or certain acidic ingredients to enhance the red color and add a subtle tang that balances the sweetness, characteristic of red velvet flavor.
Make sure both the cream cheese and butter are softened to room temperature before mixing. Beat them together on medium speed until light and fluffy, then add powdered sugar gradually. If the frosting is too thick, add a splash of milk or heavy cream to reach the desired consistency.
Freeze the frosted brownies for 15-20 minutes before cutting. Use a sharp knife and clean the blade between cuts to get clean, sharp edges without smudging the frosting.
Final Thoughts
Making Red Velvet Brownies with Cream Cheese Frosting is such a rewarding experience—each bite offers that perfect combo of fudgy brownie and velvety frosting that warms the heart. Whether you’re baking for a special occasion or just treating yourself, this recipe is a keeper you’ll turn to again and again. Remember, enjoy the process, and don’t be afraid to add your personal twist. Happy baking!
Print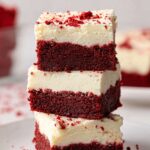
Red Velvet Brownies with Cream Cheese Frosting Recipe
- Prep Time: 10 minutes
- Cooling Time: 1 hour
- Cook Time: 40 minutes
- Total Time: 1 hour 50 minutes
- Yield: 12 brownies
- Category: Dessert
- Method: Baking
- Cuisine: American
- Diet: Vegetarian
Description
These Red Velvet Brownies with Cream Cheese Frosting combine the classic rich and fudgy texture of brownies with the vibrant color and subtle cocoa flavor of red velvet. Topped with a luscious cream cheese frosting, they make a perfect dessert for any occasion.
Ingredients
Red Velvet Brownies
- ½ cup (113g) unsalted butter, melted and cooled
- ¾ cup (90g) all-purpose flour
- 1 tablespoon cornstarch
- ½ teaspoon salt
- ⅓ cup (28g) unsweetened natural cocoa powder
- 1 ¼ cups (248g) granulated sugar
- 2 large eggs
- 1 large egg yolk
- ¼ cup (59ml) vegetable oil
- 1 tablespoon white vinegar
- 1 teaspoon vanilla extract
- 1 teaspoon red gel food coloring
Cream Cheese Frosting
- 4 oz (114g) cream cheese, softened
- ¼ cup (57g) unsalted butter, softened
- 1 teaspoon vanilla extract
- 2-4 cups (227-454g) powdered sugar
- optional: ⅛ teaspoon salt and dash of milk or heavy cream
Instructions
- Preheat and Prepare Pan: Preheat the oven to 350°F. Line an 8×8 or 9×9-inch pan with parchment paper for easy removal of the brownies.
- Melt Butter: In a microwave-safe bowl, melt the butter and set it aside to cool while you prepare the dry ingredients.
- Mix Dry Ingredients: In a medium bowl, whisk together the flour, cornstarch, salt, and cocoa powder until well combined.
- Beat Wet Ingredients: Using a stand mixer or hand mixer, beat the melted butter, granulated sugar, eggs, and egg yolk together on medium speed for 60 seconds until the mixture is pale yellow and has doubled in volume.
- Add Additional Wet Ingredients: Add the vegetable oil, white vinegar, and vanilla extract to the batter and mix on low until combined.
- Combine Dry and Wet Mixtures: Slowly add the dry ingredients and the red gel food coloring to the wet mixture, mixing until just fully combined.
- Bake Brownies: Pour the batter into the prepared pan and bake. For glass pans, bake for 35-40 minutes; for metal pans, bake for 30-35 minutes. To achieve chewier brownies, extend baking to 40-45 minutes. Test doneness by inserting a toothpick in the center; it should come out clean.
- Cool Completely: Allow the brownies to cool completely in the pan before frosting.
- Prepare Cream Cheese Frosting: In a mixing bowl, beat the softened cream cheese and unsalted butter on medium speed for 1-2 minutes until light and fluffy.
- Add Flavor and Sugar: Mix in vanilla extract, powdered sugar, and optional salt on low speed for 1-2 minutes until fully incorporated. Scrape down sides of the bowl as needed.
- Adjust Frosting Consistency: If the frosting is too thick, add a dash of milk or heavy cream and beat until creamy.
- Frost Brownies: Spread the frosting evenly over the cooled brownies.
- Chill and Slice: Place the frosted brownies in the freezer for 15-20 minutes before slicing to get clean cuts. Use a sharp knife and clean the blade after each cut for best results.
Notes
- Use parchment paper with overhang on sides to easily lift brownies out of the pan.
- For deeper red color, add more red gel food coloring as needed.
- Make sure the butter is melted but slightly cooled before mixing to avoid cooking the eggs.
- Do not overmix after adding dry ingredients to keep brownies tender.
- Adjust powdered sugar in frosting based on desired sweetness and consistency.
- For a thinner frosting, add milk or cream gradually to avoid making it too runny.
- Storing brownies in an airtight container keeps them moist for up to 3 days.
- Freezing brownies before slicing prevents the frosting from smudging and helps achieve clean edges.
Nutrition
- Serving Size: 1 brownie
- Calories: 280 kcal
- Sugar: 25 g
- Sodium: 140 mg
- Fat: 16 g
- Saturated Fat: 7 g
- Unsaturated Fat: 7 g
- Trans Fat: 0 g
- Carbohydrates: 32 g
- Fiber: 2 g
- Protein: 3 g
- Cholesterol: 55 mg


Leave a Reply