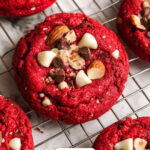
If you're on the hunt for a show-stopping treat that feels a little fancy but is totally doable, you’ve got to try this Red Velvet Chocolate Chip Cookies Recipe. Imagine rich red velvet flavor meeting gooey, melty chocolate chunks — pure cookie magic.

Jump to:
Why You'll Love This Recipe
Honestly, these cookies have quickly become one of my favorite go-to desserts — and I think you’ll feel the same once you bake (and taste!) them.
- Irresistible flavor combo: The nutty browned butter base perfectly complements the classic red velvet and chocolate mix-ins.
- Perfect soft and gooey texture: Thanks to chilling the dough, these cookies bake up tender with melty pockets of chocolate.
- Beautiful vibrant color: That signature red hue makes these cookies as stunning as they are delicious.
- Flexible and easy: Whether you want to bake immediately or chill overnight, this recipe adapts to your schedule.
Ingredients & Why They Work
Before we dive into the kitchen, let’s talk ingredients. Using quality basics and a good mix of chocolates really lifts this recipe — plus, the gel red food coloring keeps that gorgeous, rich red tone without tasting artificial.
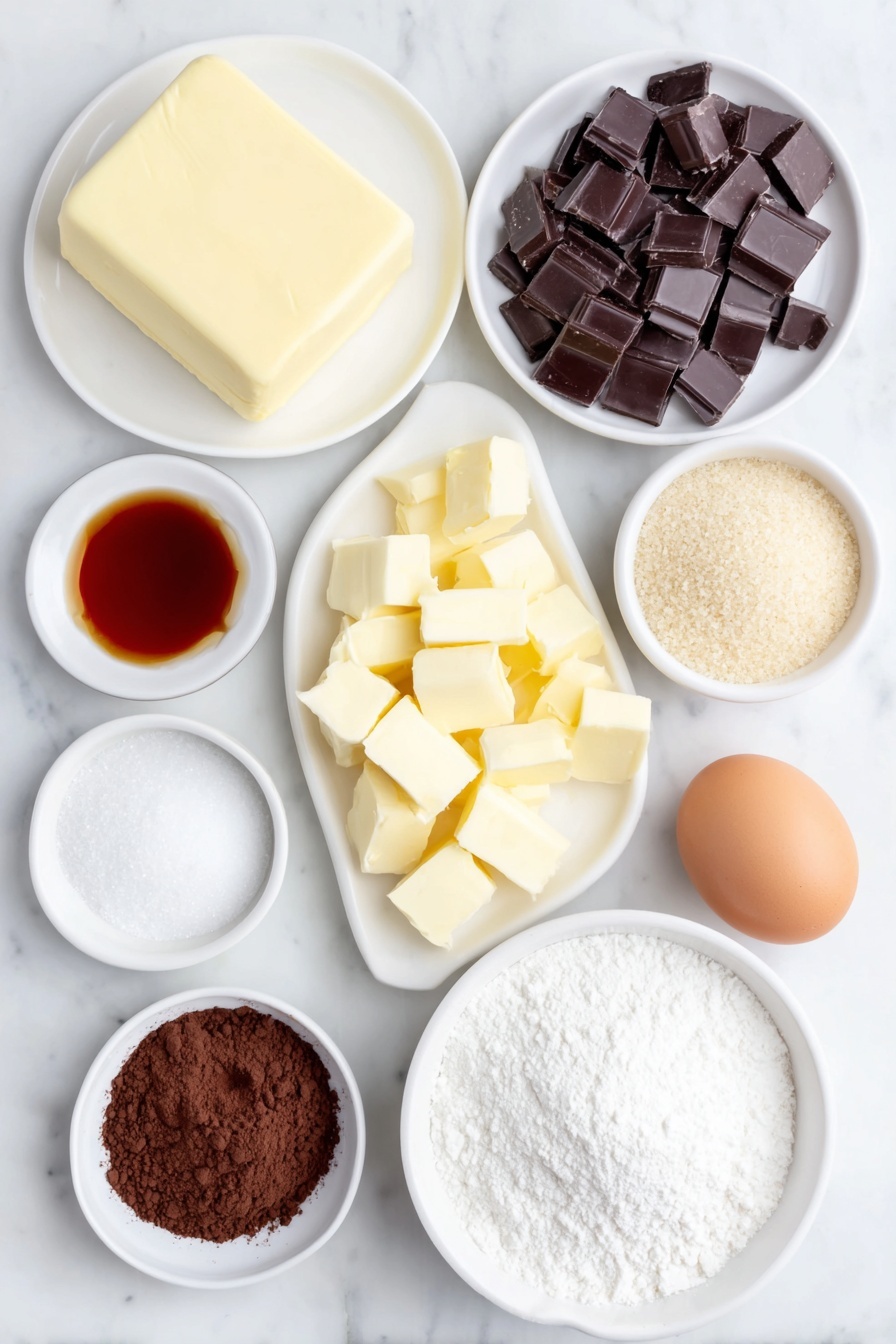
- Unsalted butter: Browning it brings out a lovely nutty flavor that adds depth and richness.
- Light or dark brown sugar: Adds moisture and a subtle molasses undertone for chewiness.
- White sugar: Balances sweetness and helps with the cookie structure.
- Egg and egg yolk: Egg yolk adds extra tenderness and richness to each bite.
- Vanilla bean paste: Adds aromatic warmth beyond what plain vanilla extract offers.
- Vinegar: Works behind the scenes to enhance the red velvet flavor and tenderize the dough.
- Gel red food color: Provides vivid color without messing with batter consistency.
- All purpose flour: The base that holds everything together with just the right chew.
- Dutch processed cocoa powder: Brings the classic red velvet chocolate flavor with smooth, less acidic cocoa.
- Salt: Balances sweetness and lifts flavors throughout the cookie.
- Baking powder and baking soda: Work in tandem for the perfect soft rise and chewy texture.
- Chopped chocolate (white, milk & dark): A melty, multi-chocolate blend makes every bite extra indulgent.
- Flakey sea salt (optional): A sprinkle on top intensifies the chocolate and balances sweetness beautifully.
Make It Your Way
The beauty of this Red Velvet Chocolate Chip Cookies Recipe is how easy it is to make it your own. Whether you want to swap chocolates, add a twist to the dough, or cater to dietary needs, there are plenty of delicious options to explore!
- Variation: I love adding a handful of toasted pecans or walnuts to the dough for a bit of crunch and a nutty contrast to the soft, gooey cookie. It makes every bite even more decadent!
- Dairy-Free: Swap the unsalted butter for a quality dairy-free butter or coconut oil. This tweak still gives you that delicious browned butter flavor with a subtle twist.
- Chocolate Swap: If you prefer one type of chocolate, go ahead and use all dark chocolate for a richer, slightly bitter cookie or all white chocolate for extra sweetness and creaminess.
- Seasonal Flair: For festive occasions, mix in mini marshmallows or crushed peppermint candy canes on top before baking. It’s a dreamy holiday treat!
- Color Play: No gel red food color? No worries! Powdered or liquid food coloring can work, though a gel color really gives you that vibrant red hue everyone loves.
Step-by-Step: How I Make Red Velvet Chocolate Chip Cookies Recipe
Step 1: Brown That Butter to Perfection
Start by melting the unsalted butter in a non-stick pan over medium-low heat. Keep stirring continuously — this is the magic moment where the butter transforms, turning a warm golden brown and releasing a caramelized, nutty aroma that fills your kitchen. This step usually takes a few minutes, so be patient and watch it carefully to avoid burning.
Step 2: Sweeten and Cool Down
Turn your stove down to the lowest flame and whisk in both the light or dark brown sugar and white sugar gently for about a minute. The goal here is to dissolve the sugars a bit and deepen their flavor, without caramelizing or melting them entirely. Once done, remove the pan from heat and let this luscious butter and sugar mixture cool for 5 minutes—it should be warm, but never hot, for the next step.
Step 3: Whisk in the Flavorful Wet Ingredients
Into the cooled butter-sugar mixture, add the egg, egg yolk, fragrant vanilla bean paste, a splash of vinegar, and that brilliant gel red food color. Whisk vigorously for about 2 minutes until you achieve a smooth, creamy consistency. This vibrant mixture is the heart of your dough’s rich color and flavor.
Step 4: Sift and Combine the Dry Ingredients
Now sift together your all-purpose flour, Dutch processed cocoa powder, salt, baking powder, and baking soda in a separate bowl. Sifting ensures these ingredients are evenly blended and aerated, giving your cookies that tender crumb. When your wet mixture has cooled enough to touch but isn’t cold, gently fold in the dry ingredients using a rubber spatula. Take your time and fold until just combined—you want to keep the dough light and airy!
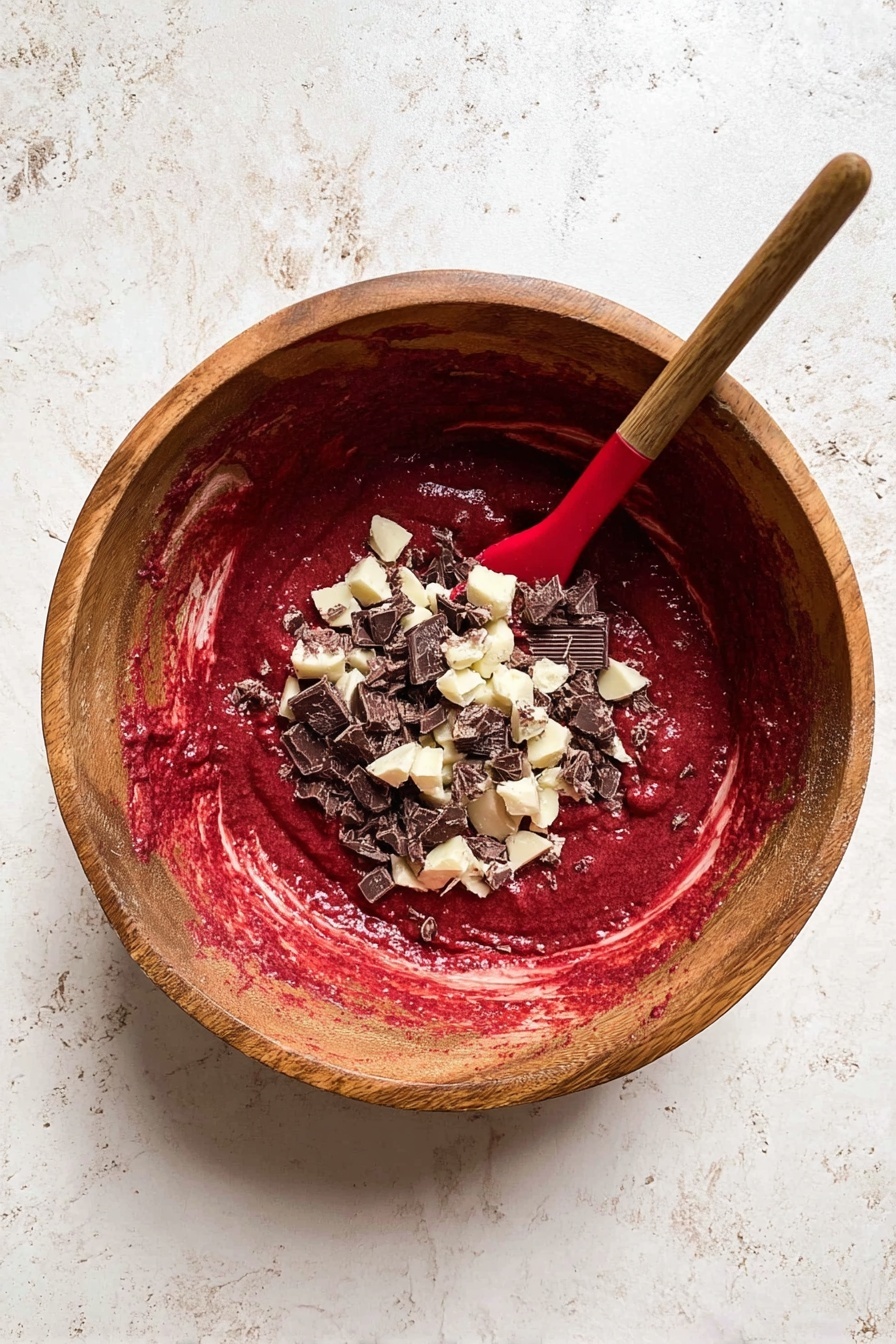
Step 5: Fold in the Chocolaty Goodness
Next up, fold in the 8 oz of chopped chocolate—a mix of white, milk, and dark chocolate makes these cookies a perfect balance of sweet and rich. Make sure the chunks are evenly distributed but avoid overmixing, or the dough might lose its structure.
Step 6: Scoop, Chill, and Prep
Using a 2-tablespoon cookie scoop, gently form 10 dough balls. If your dough feels too soft to handle, pop it into the fridge for 10 minutes to firm up—it makes scooping so much easier. Place the balls on a plate or baking sheet and, if you like, press a few extra chocolate chunks on top for that irresistible look and melty goodness. Chill the dough in your refrigerator for at least 2 hours, but if you can, overnight really brings out the best flavor and texture.
Step 7: Bake to Gooey Perfection
When ready, preheat your oven to 375°F (conventional, no fan) and line a large, light-colored baking sheet with parchment paper. Arrange your chilled dough balls at least 3 inches apart—they’ll spread beautifully as they bake. Bake for 12 minutes—if you like your cookies softer or gooier, you can dial the time slightly. I always recommend baking a test cookie first to find your perfect timing.
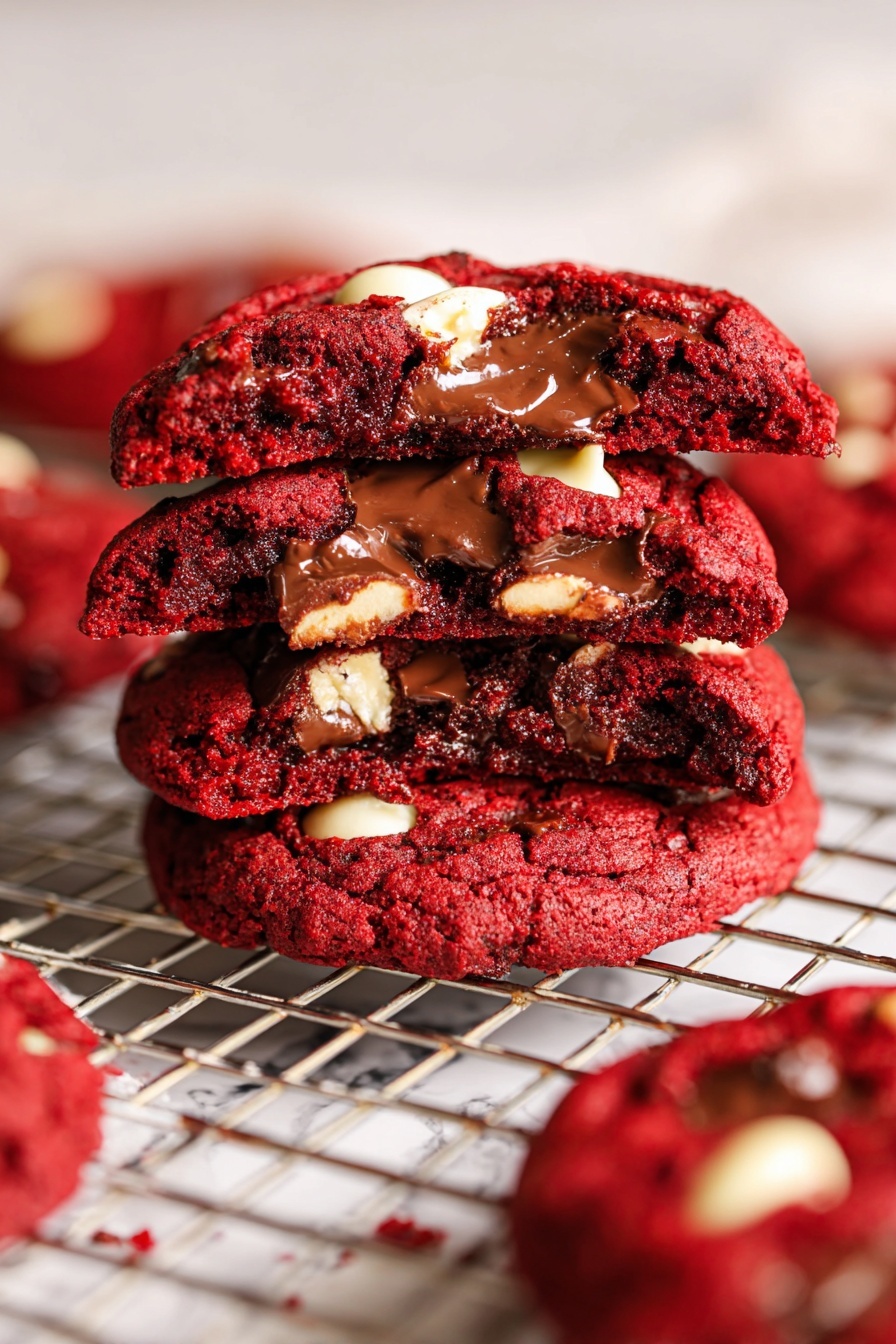
Step 8: Finishing Touches and Serving
Right out of the oven, you can sprinkle the warm cookies with a pinch of flaky sea salt to enhance all those deep chocolate and buttery notes. Let the cookies cool on the baking sheet for 10 to 15 minutes—this lets them set up just enough but keeps them delightfully soft. Serve them warm for the ultimate indulgence. Trust me, they disappear fastest this way!
Top Tip
These tips will help you get the most delicious, soft, and gooey texture from your Red Velvet Chocolate Chip Cookies Recipe every single time. I’ve learned a few things through trial and error that make all the difference!
- Chill the Dough: Don’t skip the 2-hour or overnight chilling — it really develops the flavors and keeps the cookies from spreading too thin in the oven.
- Brown the Butter Carefully: Stir constantly over medium-low heat until you get that lovely caramelized aroma but don’t burn it! This step adds a nutty depth that’s key to these cookies' uniqueness.
- Gentle Folding: When combining dry and wet ingredients, fold gently to avoid overmixing, which can toughen the dough. Keeping it light helps maintain that perfect soft bite.
- Test Bake One Cookie: Oven temps and cookie softness preference vary, so always bake a test cookie first to find your ideal baking time between 10 and 12 minutes.
How to Serve Red Velvet Chocolate Chip Cookies Recipe
Garnishes
Sprinkling a pinch of flaky sea salt right after baking adds a perfect balance to the sweetness and enhances the chocolaty flavors. For a festive touch, dust with a little powdered sugar or top with a small dollop of cream cheese frosting for a classic red velvet twist.
Side Dishes
These cookies are a treat on their own but pair wonderfully with a tall glass of cold milk or a cup of freshly brewed coffee or hot chocolate. For a more decadent dessert, serve them alongside vanilla ice cream or a berry compote to complement and cut through the richness.
Make Ahead and Storage
Storing Leftovers
Store any leftover cookies in an airtight container at room temperature for up to 3 days. This keeps them soft and flavorful. Avoid stacking the cookies too tightly to prevent them from sticking together.
Freezing
You can freeze the cookie dough balls in an airtight container for up to 3 months. When you’re ready to bake, place them directly from frozen onto a lined baking sheet and add 2-3 extra minutes to your baking time. This is perfect for making ahead and having freshly baked cookies on demand.
Reheating
If your cookies aren’t freshly baked, simply microwave one for 10-15 seconds to warm them up. This revives their soft, gooey texture — just like fresh from the oven!
Frequently Asked Questions:
Yes! You can use powdered or liquid food coloring if gel isn’t available, but gel is preferred for its vibrant color and less impact on dough consistency.
Chilling allows the butter to solidify, preventing excessive spreading during baking, and it also helps flavors meld together for a richer taste and better texture.
Absolutely! Mixing white, milk, and dark chocolates gives a lovely balance, but feel free to use your favorite chocolate type or whatever you have on hand.
They’re soft and gooey with a tender crumb, especially if you bake closer to 10 minutes. Baking longer will firm them up slightly but still keep some chewiness.
Final Thoughts
Making these Ultimate Red Velvet Chocolate Chip Cookies is like treating yourself to a comforting hug in cookie form. The nutty browned butter combined with luscious chocolate chunks and that signature red velvet color brings smiles with every bite. Remember, patience with chilling and gentle mixing are key — but the joy of fresh, warm cookies is well worth the wait. I hope this recipe becomes one of your favorites for cozy days, celebrations, or whenever you need a little indulgence!
Print
Red Velvet Chocolate Chip Cookies Recipe
- Prep Time: 15 minutes
- Chilling Time: 2 hours
- Cook Time: 12 minutes
- Total Time: 2 hours 27 minutes
- Yield: 10 cookies
- Category: Dessert
- Method: Baking
- Cuisine: American
- Diet: Vegetarian
Description
These Ultimate Red Velvet Chocolate Chip Cookies combine the rich flavors of red velvet and a mix of white, milk, and dark chocolates for an indulgent treat. With a nutty browned butter base and a vibrant red color, these cookies are soft, gooey, and perfect for enjoying warm from the oven or reheated. Chilling the dough enhances the flavors and texture, making them a delightful dessert or snack for any occasion.
Ingredients
Wet Ingredients
- 10 tablespoon unsalted butter (140g)
- ½ cup light or dark brown sugar, packed (100g)
- ⅓ cup white sugar (65g)
- 1 large egg
- 1 egg yolk
- 1 tablespoon vanilla bean paste
- ½ teaspoon vinegar
- ½ tablespoon gel red food color
Dry Ingredients
- 1 ¼ cup all purpose flour (160g)
- 2 tablespoon Dutch processed cocoa powder (12g)
- ¾ teaspoon salt
- ½ teaspoon baking powder
- ¼ teaspoon baking soda
Mix-ins and Toppings
- 8 oz chopped chocolate (225g) - mix of white, milk, and dark chocolate (e.g., 3 oz white, 2.5 oz dark, 2.5 oz milk)
- Optional: flakey sea salt to sprinkle on top
Instructions
- Brown the butter: Place the butter in a non-stick pan and melt it over medium-low heat. Stir continuously for several minutes until the butter turns a light brown color and develops a caramelized, nutty aroma.
- Add sugars: Reduce the heat to the lowest setting and add the brown sugar and white sugar. Whisk gently for 1 minute, ensuring the sugars dissolve slightly without melting or caramelizing. Remove from heat.
- Cool the mixture: Let the butter-sugar mixture cool for 5 minutes until it is warm but not hot to the touch.
- Mix wet ingredients: Add the egg, egg yolk, vanilla bean paste, vinegar, and red food coloring to the cooled butter mixture. Whisk vigorously for about 2 minutes until the mixture is smooth and creamy.
- Prepare dry ingredients: Sift together the all-purpose flour, Dutch processed cocoa powder, salt, baking powder, and baking soda into a separate bowl. Mix gently to combine.
- Combine wet and dry: Ensure the wet ingredients are not hot. Fold the dry ingredients into the wet mixture gently using a rubber spatula until just combined, avoiding overmixing.
- Add chocolate chunks: Fold in the chopped chocolate pieces until evenly distributed throughout the dough.
- Scoop dough balls: Using a 2-tablespoon cookie scoop, form 10 cookie dough balls. If the dough is too soft to scoop, refrigerate for 10 minutes to firm up. Handle dough gently to maintain airiness.
- Chill dough: Place the dough balls on a plate or baking sheet and chill in the refrigerator for at least 2 hours, preferably overnight, for best flavor and texture.
- Preheat oven and prepare sheet: Preheat your oven to 375 degrees Fahrenheit (conventional, no fan). Line a large, light-colored baking sheet with parchment paper.
- Arrange cookie balls: Transfer the chilled dough balls to the prepared sheet, spacing them at least 3 inches apart to allow spreading during baking. Optionally, add extra chocolate chunks on top.
- Bake cookies: Bake for 12 minutes, adjusting the time depending on desired softness or gooeyness. Bake a test cookie first if unsure.
- Add finishing touches and cool: Optionally sprinkle the warm cookies with flaky sea salt. Allow the cookies to cool at room temperature for 10 to 15 minutes before serving.
- Serve: Enjoy the cookies warm for the best texture and flavor.
Notes
- For optimal texture, consume freshly baked cookies while still warm.
- If not fresh, microwave cookies for 10-15 seconds to regain softness.
- You can freeze the cookie dough balls in an airtight container and bake directly from frozen; increase baking time by 2-3 minutes accordingly.
- Use a mix of white, milk, and dark chocolate according to your preference for a balanced flavor.
- If no gel red food color is available, powdered or liquid food coloring can be substituted, but gel is preferred for color vibrancy.
Nutrition
- Serving Size: 1 cookie
- Calories: 290 kcal
- Sugar: 18 g
- Sodium: 210 mg
- Fat: 16 g
- Saturated Fat: 9 g
- Unsaturated Fat: 6 g
- Trans Fat: 0 g
- Carbohydrates: 33 g
- Fiber: 2 g
- Protein: 4 g
- Cholesterol: 65 mg


Leave a Reply