There's something truly magical about the pairing of classic red velvet flavors with the crunchy goodness of Oreos in one creamy dessert. This Red Velvet Oreo Cheesecake Recipe is a showstopper—rich, velvety, and just the right amount of indulgence that you'll want to make again and again.

Jump to:
Why You'll Love This Recipe
I remember the first time I made this Red Velvet Oreo Cheesecake Recipe for a holiday party—it was an instant hit. The rich cream cheese filling mixed with the cocoa and red food coloring gives that classic red velvet vibe, but with a twist thanks to the Oreo crust that adds a perfect chocolate crunch.
- Perfect Flavor Balance: The combination of cocoa, cream cheese, and Oreos creates layers of flavor that are both rich and refreshing.
- Simple to Make: No complicated steps, and it comes together quickly if you prep ahead.
- Great for Any Occasion: Whether it's a holiday or just a weekend treat, this cheesecake impresses every time.
- Customizable Toppings: You can keep it classic with whipped cream or get creative with your favorite frosting or decorations.

Ingredients & Why They Work
This recipe leans on a few key ingredients that blend beautifully to deliver that classic red velvet cheesecake texture and flavor. Each ingredient has a purpose, so it's worth understanding their roles.

- Chocolate sandwich cookie crumbs (Oreo): They make for a crunchy, chocolatey crust that complements the creamy filling perfectly.
- Unsalted butter: Melts into the cookie crumbs to bind the crust and add richness.
- Full-fat cream cheese: The star of the cheesecake—smooth, tangy, and creamy. Room temperature is key for no lumps.
- Granulated sugar: Sweetens the filling evenly without overpowering that tang of cream cheese.
- Full-fat sour cream: Adds a subtle tang and moisture, balancing richness and ensuring a smooth texture.
- Eggs: Help set the cheesecake to the perfect dense yet creamy consistency. Room temperature keeps the batter smooth.
- Unsweetened cocoa powder: Gives that deep chocolate base that defines red velvet flavor.
- Liquid red food coloring: The signature red glow—use a reliable brand like McCormick for the best hue.
- Vanilla extract: Enhances all the flavors with its warm aroma and depth.
- Cream Cheese Whipped Cream or Small Batch Whipped Cream: For topping, adding a light and fluffy finish that contrasts the dense cheesecake.
Make It Your Way
I love customizing this Red Velvet Oreo Cheesecake Recipe depending on the occasion—sometimes I sneak in a bit of espresso powder for a mocha twist, or swap sour cream for Greek yogurt for a slightly tangier bite. You can totally make it your own!
- Variation: Adding white chocolate chips to the batter before baking gives an extra sweet surprise that my friends always ask for again.
- Dietary modifications: I've tried a lower-sugar version by cutting sugar by a third, and it still holds up well if you're watching your sugar intake.
- Seasonal changes: Around Christmas, I like decorating with crushed peppermint Oreos for a festive crunch.
Step-by-Step: How I Make Red Velvet Oreo Cheesecake Recipe
Step 1: Prep the Crust
Start by preheating your oven to 325°F and wrapping your springform pan with foil to prevent leaks. I use a 6-inch pan because the batter fills it perfectly, but a 7-inch works too if you don’t mind a thinner cheesecake. Mix the Oreo crumbs and melted butter, then firmly press the mixture into the pan’s bottom. Bake it for 10 minutes so it sets up nicely—this prevents a soggy crust later.
Step 2: Whip Up the Filling
Using a stand mixer with a paddle attachment (or just a hand mixer), beat the room-temp cream cheese, sugar, and sour cream until fluffy and smooth—about 2 to 3 minutes. Remember to scrape the sides so no lumps hide around the bowl! Then add the eggs in one at a time, beating each in for about a minute to keep the batter silky and prevent cracks during baking.
Step 3: Add the Red Velvet Magic
Next comes the cocoa powder, red food coloring, and vanilla. Beat these in gently until your batter has that gorgeous red hue and a lovely chocolate aroma. Don’t overmix here—just combine until smooth and luscious.
Step 4: Bake in a Water Bath
Pour the cheesecake batter over the crust in your foil-wrapped pan. Then place the pan inside a larger pan, like an 8x8 baking dish, and carefully pour hot water about halfway up the sides of the springform pan. This water bath is the secret to a creamy, crack-free cheesecake—it helps regulate the heat and keeps moisture in. Bake for 65 to 75 minutes until the edges are set but the center still jiggles a bit. The internal temp should hit 150°F if you have a thermometer.
Step 5: Cooling and Chilling
Once baked, run a knife gently around the edges to loosen it from the pan which helps prevent cracking as it cools. Let it sit 15 minutes in the water bath, remove the springform pan, and then cool at room temperature for another hour. Refrigerate at least 4 hours or overnight — I promise, patience here pays off with a perfectly set and flavorful cheesecake.
Top Tip
Years of cheesecake-making taught me these little tricks that make all the difference when preparing this Red Velvet Oreo Cheesecake Recipe. Don't worry if you’re new to cheesecakes—these tips will keep your dessert silky, crack-free, and bursting with flavor.
- Bring Ingredients to Room Temperature: This stops lumps and ensures a smooth batter. I always plan ahead to let cream cheese, sour cream, and eggs sit out for about an hour.
- Use a Water Bath: It might seem fancy, but it’s the key to avoiding cracks and drying out. Wrap your pan tightly in foil to prevent leaks!
- Don't Overbeat the Eggs: Adding them slowly and mixing just enough keeps the cheesecake from being too airy, which can cause cracks.
- Cool Gradually: Rushing out of the oven to fridge can cause cracking. Patience during cooling is your best friend.
How to Serve Red Velvet Oreo Cheesecake Recipe

Garnishes
I love topping this cheesecake with a cloud of cream cheese whipped cream for that silky contrast. Sometimes I'll sprinkle crushed Oreos on top or add a few festive red sprinkles during the holidays. It just makes it look as good as it tastes!
Side Dishes
This cheesecake pairs wonderfully with a hot cup of coffee or spiced tea to balance its richness. At holiday dinners, I enjoy serving it alongside fresh berries or a berry compote to add a bright, tangy note.
Creative Ways to Present
For special occasions, I’ve turned this cheesecake into mini individual parfaits layered with chunks of the red velvet cheesecake, whipped cream, and crushed Oreos in mason jars. Guests love the personal touch, and it’s easier to serve!
Make Ahead and Storage
Storing Leftovers
I keep leftover cheesecake stored in an airtight container in the fridge to keep it fresh and moist. It lasts beautifully for about 5 to 7 days, which is handy since it’s hard to resist going back for seconds—or thirds!
Freezing
This cheesecake freezes well if you wrap it tightly with plastic wrap and then foil. When you’re ready to enjoy, thaw in the fridge overnight. Just a little tip—the texture is just as creamy once thawed, so it’s great for preparing ahead of a party.
Reheating
Personally, I don’t reheat cheesecake because it’s best served chilled, but if you prefer it slightly warmer, pop a slice in the microwave for 10 to 15 seconds. Be careful not to overdo it, or you might lose that perfect creamy texture.
Frequently Asked Questions:
For a 9-inch pan, this recipe will need adjustments to avoid a very thin cheesecake. I recommend looking for my 9 Inch Chocolate Cheesecake recipe and adding red velvet tweaks like sour cream, cocoa powder, and red food coloring for the best results.
Yes, full-fat cream cheese is important for the creamy texture and rich flavor. Low-fat or whipped varieties tend to alter the baking process and texture negatively.
Using a water bath during baking helps maintain moist heat, which prevents cracks. Also, don’t overbeat the batter or bake at too high a temperature. Cooling gradually and running a knife along the edges before cooling also helps.
Absolutely! This cheesecake actually benefits from chilling overnight; it sets up beautifully and flavors deepen. You can even freeze it up to a month before wrapping well, then thaw it in the fridge.
Final Thoughts
This Red Velvet Oreo Cheesecake Recipe holds a special place in my kitchen—it’s the perfect blend of childhood nostalgia with an adult twist of creamy indulgence. Whether you're baking for holidays or simply celebrating a cozy night in, give this recipe a try. I guarantee you’ll feel proud of your creation and maybe even tempted to sneak a slice before anyone else arrives!
Print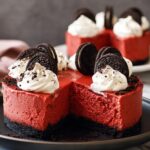
Red Velvet Oreo Cheesecake Recipe
- Prep Time: 20 minutes
- Cook Time: 1 hour 15 minutes
- Total Time: 6 hours 35 minutes
- Yield: 6 servings
- Category: Dessert
- Method: Baking
- Cuisine: American
- Diet: Vegetarian
Description
This Christmas Red Velvet Oreo Cheesecake is a festive, creamy dessert featuring a rich Oreo cookie crust and a smooth red velvet cheesecake filling. Perfect for holiday gatherings, it combines the classic flavors of red velvet cake with the indulgence of cheesecake, topped with a luscious cream cheese whipped cream or frosting.
Ingredients
Crust
- 1 cup chocolate sandwich cookie crumbs, such as Oreo
- 2 tablespoons unsalted butter, melted
Cheesecake Filling
- 16 ounces (2 blocks or 16 tablespoons) full-fat cream cheese, room temperature and not cold to the touch
- ½ cup granulated sugar
- 2 tablespoons full-fat sour cream, room temperature and not cold to the touch
- 2 eggs, room temperature and not cold to the touch
- 1 tablespoon unsweetened cocoa powder
- 2 teaspoons liquid red food coloring (McCormick brand or similar)
- 1 teaspoon vanilla extract
Topping
- Cream Cheese Whipped Cream or Small Batch Whipped Cream as desired
Instructions
- Prepare the Oven and Pan: Preheat the oven to 325°F. Wrap the outside of a 6x2 or 6x3 springform pan with foil to prevent water leakage. Lightly grease the inside of the springform pan to prevent sticking.
- Make the Crust: In a large bowl, combine the chocolate sandwich cookie crumbs with melted butter and mix until evenly moist. Press the mixture firmly into the bottom of the springform pan. Bake the crust for 10 minutes, then remove from the oven.
- Make the Cheesecake Batter: Using a stand mixer fitted with the paddle attachment on medium-high speed, beat the cream cheese, sugar, and sour cream until the mixture is light and fluffy, about 2 to 3 minutes. Scrape down the sides of the bowl as needed.
- Add Eggs to Batter: Beat in the eggs one at a time, mixing each egg for about 1 minute until fully incorporated, ensuring a smooth batter without overbeating.
- Add Flavorings: Scrape down the bowl again and beat in the unsweetened cocoa powder, liquid red food coloring, and vanilla extract until combined and evenly colored.
- Assemble Cheesecake: Pour the batter over the baked crust in the springform pan, filling it to the top if using a 6x2 pan. Place the springform pan inside a larger 8x8 or bigger pan to create a water bath.
- Prepare Water Bath and Bake: Pour hot water into the larger pan until it reaches halfway up the side of the springform pan. Take care not to let water seep inside the foil-wrapped pan. Bake the cheesecake for 75 minutes or until the edges are set and lightly browned and the center is mostly set with some gentle wobbling. The internal temperature should reach 150°F.
- Cool Cheesecake in Water Bath: Remove the pan from the oven and carefully run a knife around the edges to loosen the cheesecake. Let it cool in the water bath for 15 minutes.
- Cool at Room Temperature: Remove the springform pan from the water bath and allow the cheesecake to cool completely at room temperature for 1 hour.
- Chill Cheesecake: Cover the cheesecake and refrigerate for at least 4 hours or preferably overnight to fully set before adding the whipped cream or frosting topping.
- Serve and Store: Top with cream cheese whipped cream or frosting as desired. Store any leftovers in an airtight container in the refrigerator for up to 5 to 7 days.
Notes
- For a larger 9-inch cheesecake, omit the chocolate crust and adjust ingredients by adding ¼ cup sour cream, 2 tablespoons cocoa powder, and 1 tablespoon red food coloring to the batter.
- Prevent water seepage by securely wrapping the springform pan in multiple layers of heavy-duty foil before placing in the water bath.
- Use full-fat cream cheese and sour cream at room temperature for the smoothest batter without lumps.
- Do not overbeat the eggs to avoid adding excess air, which can cause cracks during baking.
- Allow the cheesecake to cool gradually to prevent cracking and ensure a creamy texture.
- Check the cheesecake’s doneness by looking for set edges with a gently wiggling center and using an instant-read thermometer to confirm 150°F internal temperature.
- Experiment with different types of whipped cream toppings, like flavored or lightly sweetened versions, to complement the rich red velvet flavor.
Nutrition
- Serving Size: 1 slice (⅙ of cheesecake)
- Calories: 450 kcal
- Sugar: 30 g
- Sodium: 250 mg
- Fat: 35 g
- Saturated Fat: 20 g
- Unsaturated Fat: 12 g
- Trans Fat: 0 g
- Carbohydrates: 28 g
- Fiber: 1 g
- Protein: 7 g
- Cholesterol: 110 mg


Leave a Reply