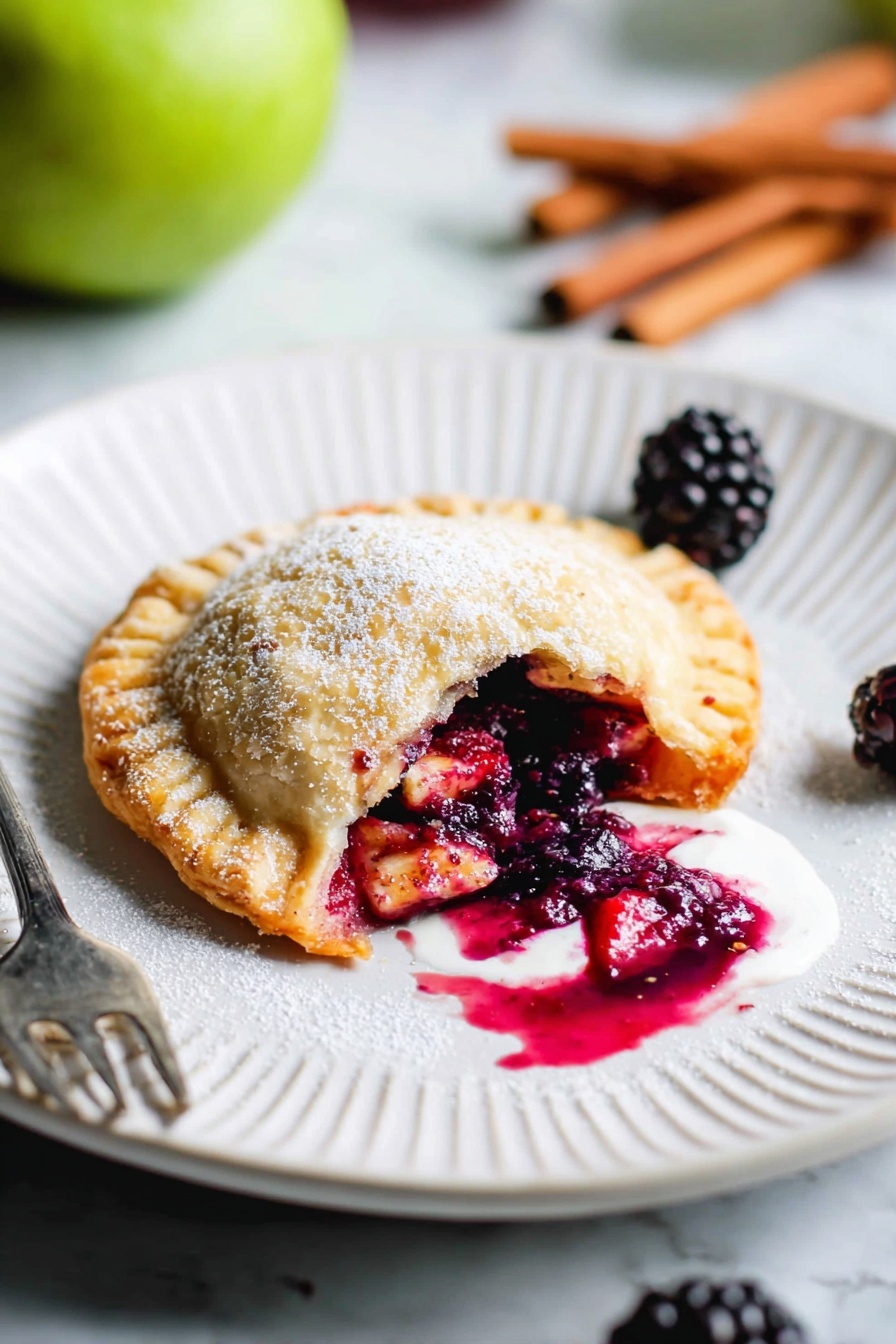
If you’re in the mood for a cozy, fruity treat with a bit of a spicy twist, you’re going to love this Spiced Apple Blackberry Hand Pies Recipe. These little pies are like a warm hug wrapped in flaky pastry – perfect for sharing (or not!).

Jump to:
Why You'll Love This Recipe
I honestly can’t get enough of how these hand pies combine sweet, tart, and cozy spice all in one bite. Making them feels like creating little pockets of happiness, perfect for dessert or a teatime treat.
- Perfectly Portable: These hand pies are individually sized, so you can take your dessert to-go with no mess.
- Flaky, Buttery Crust: The shortcrust pastry bakes up golden and crisp, adding a delightful crunch to every bite.
- Balanced Fruit Filling: Juicy apples and fresh blackberries mingle with warm cinnamon and honey for a comforting flavor combo.
- Make-Ahead Friendly: Chill or freeze the pies before baking for a stress-free dessert anytime.
Ingredients & Why They Work
To nail this recipe, quality ingredients really make a difference. I always recommend picking cooking apples that hold their shape well and fresh or frozen blackberries for that juicy punch.
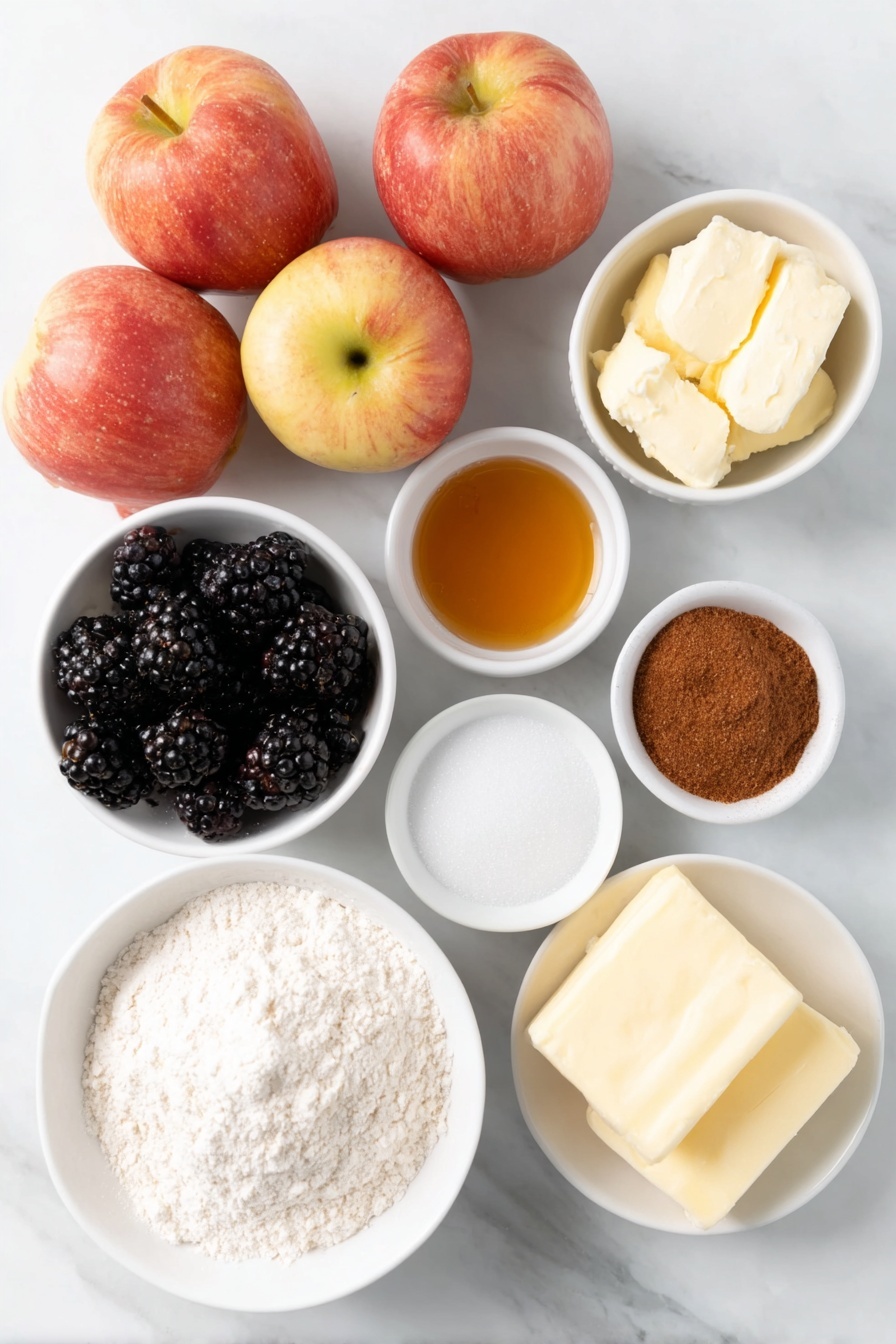
- Cooking Apples: They soften nicely without turning to mush, creating a lovely texture inside the pies.
- Golden Caster Sugar: Adds just the right amount of sweetness without overpowering the fruit flavors.
- Blackberries: Fresh or frozen, these bring a juicy tartness that complements the sweet apples perfectly.
- Cornflour: Helps thicken the filling so it’s not runny after baking.
- Honey: Adds natural sweetness and a subtle floral note that pairs beautifully with cinnamon.
- Ground Cinnamon: Brings warmth and spice to the fruit filling, making these pies comforting and aromatic.
- Shortcrust Pastry Sheets: Ready-rolled pastry keeps things simple and bakes up with a buttery, flaky finish.
- Egg (beaten): Used for sealing the pies and giving them that golden, glossy finish.
- Caster Sugar: Sprinkled on top after baking for a little extra crunch and sweetness.
Make It Your Way
One of the best things about this Spiced Apple Blackberry Hand Pies Recipe is how easy it is to make it your own. Whether you want to tweak the spices, swap fillings, or adjust for dietary needs, these hand pies are a wonderfully flexible dessert to experiment with.
- Variation – Vegan Version: Swap the beaten egg wash for a mixture of plant-based milk and maple syrup to get a lovely golden crust without using eggs. I’ve tried this myself, and the pies still bake up beautifully with a crisp, shiny finish.
- Variation – Seasonal Fruit Swap: When blackberries aren’t in season, try substituting them with fresh or frozen blueberries or raspberries. The tartness complements the spiced apple filling perfectly and adds a fresh twist.
- Variation – Extra Spice Kick: I sometimes add a pinch of ground nutmeg or ginger to the cinnamon spice mix for a warmer, deeper flavor profile. It’s a small change that really elevates the aromatic notes in the pies.
- Variation – Gluten-Free Pastry: If you need to avoid gluten, look for a ready-made gluten-free shortcrust pastry sheet. The hand pies still hold together well, and the fruit filling is irresistibly delicious regardless of the crust.
Step-by-Step: How I Make Spiced Apple Blackberry Hand Pies Recipe
Step 1: Softening the Apples to Perfection
Start by placing your peeled, cored, and chopped apples into a small saucepan. Add the golden caster sugar and 2 tablespoons of water, then cover with a lid. Cook over medium heat for about 8 minutes, stirring occasionally, until the apples are tender and just starting to break down. You’ll know they’re ready when they’re soft but still hold some shape. Spread them out in a shallow dish to cool — this prevents your pastry from becoming soggy later on.
Step 2: Mixing the Fruit Filling with Love
In a small bowl, whisk together the cornflour, honey, and ground cinnamon into a smooth paste. This will thicken the filling and add that warming spice note. Gently fold in the fresh or frozen blackberries along with the cooled apple chunks. Take care to mix lightly so the berries don’t crush too much—you want that beautiful burst of juices inside your hand pies.
Step 3: Cutting Out Perfect Pastry Circles
Unroll your shortcrust pastry sheets and using a 10 cm round cutter (or an upside-down ramekin or glass if you don’t have one), cut out 12 neat circles. Save the offcuts for your decorative leaves later. This diameter is ideal to hold just the right amount of filling while still fitting comfortably in your hand.
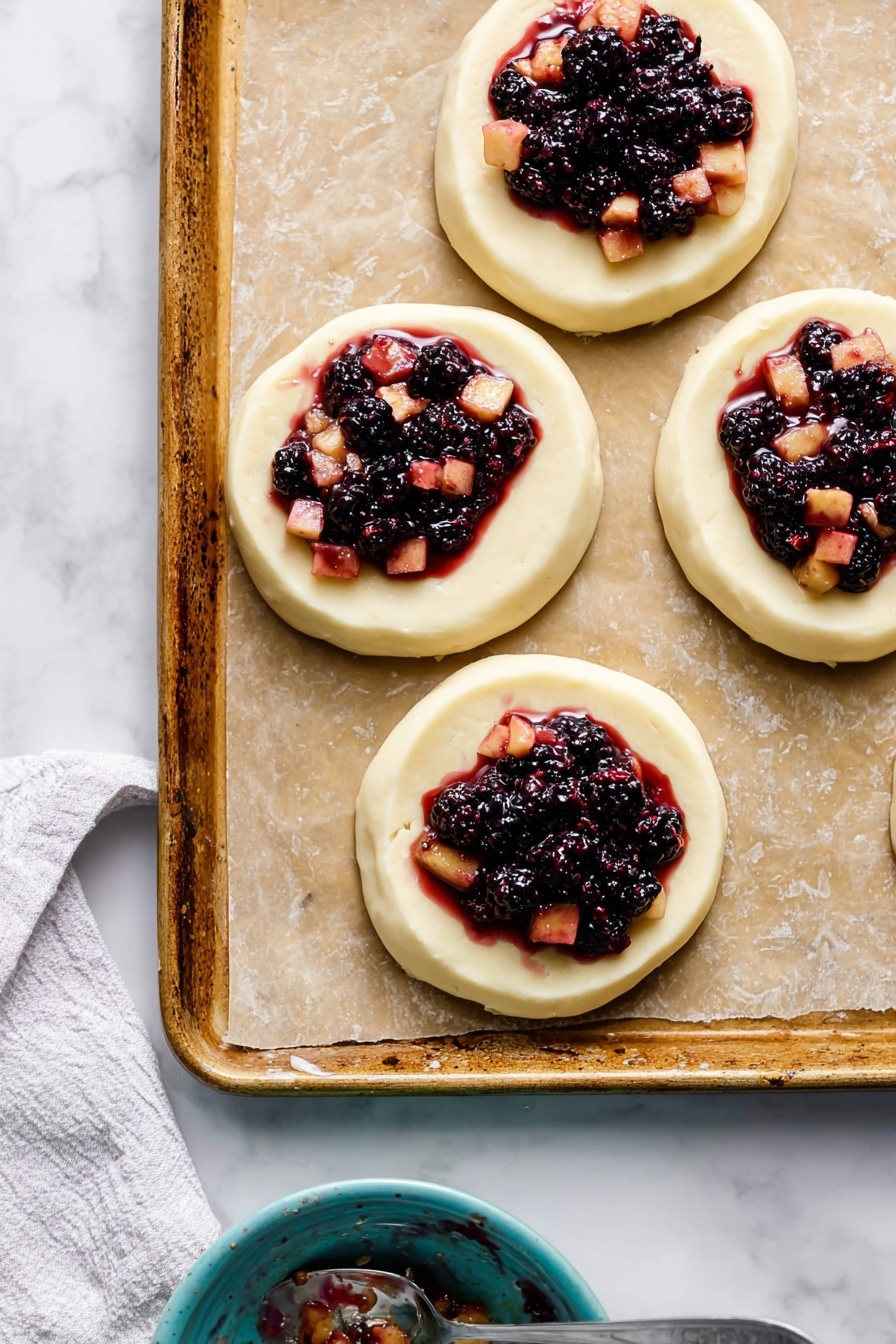
Step 4: Assembling the Hand Pies
Spoon about 1 tablespoon of your fruit mixture onto the center of half the pastry circles, leaving roughly a 1 cm border around the edge. Lightly brush the edges with beaten egg to help the top layer stick. Place a plain pastry circle on top and gently press a small dent at the top and bottom to create a charming apple shape. Press all around the edges with a fork to seal the filling in perfectly, then brush the entire surface with the egg wash for a beautiful golden finish.
Step 5: Adding Cute Details and Ventilation
Use your saved pastry scraps to cut out little leaves and stalk shapes, attaching them to the hand pies with a touch of egg wash. This not only looks adorable but adds a nice personal touch. Don’t forget to poke a small steam hole in the top of each pie with a skewer to let the steam escape while baking — this keeps your crust crisp and prevents any bursting.
Step 6: Chill Out Before Baking
Transfer your lovely pies to a baking sheet and pop them into the refrigerator for 1 hour to chill. This step helps the pastry firm up so it holds its shape during baking. If you want to make these ahead, you can freeze the pies at this stage for up to 3 months — just add 10 minutes to the baking time when cooking from frozen.
Step 7: Bake to Golden Perfection
Preheat your oven to 200 degrees Celsius (180 degrees Celsius fan). Bake the pies for 20 minutes or until they’re beautifully golden and you see the filling bubbling through the steam holes. If baking from frozen, stick them in for about 30 minutes total. The smell of cinnamon and honey will fill your kitchen, signaling that your comforting hand pies are almost ready!
Step 8: Sweet Finish and Serving Suggestions
Once out of the oven, sprinkle your warm hand pies with caster sugar for a little extra crunch and sweetness. They’re best served warm with a dollop of cream or custard on the side. Trust me, that creamy contrast with the spiced fruit filling is pure comfort on a plate.
Top Tip
Making Spiced Apple Blackberry Hand Pies Recipe is simpler and more enjoyable when you know a few insider tricks that help everything come together perfectly. Here are some tips from my kitchen to yours, so your pies turn out flaky, flavorful, and just plain irresistible every time.
- Chill the Pies Before Baking: I always chill the assembled hand pies for at least an hour before baking. This helps the pastry hold its shape and bake evenly, giving you that beautiful golden crisp crust without any shrinkage.
- Handle the Fruit Filling Gently: When mixing the cooked apples, blackberries, and cinnamon-honey paste, be gentle to avoid crushing the blackberries too much. The contrast of soft apples and intact berries makes all the difference in texture and appearance.
- Seal Edges with Care: Pressing the edges firmly with a fork and brushing with beaten egg not only locks in the filling but adds a nice decorative touch. It also prevents any juicy leaks during baking.
- Use a Round Cutter or Substitute: If you don’t have a 10 cm pastry cutter, an upside-down ramekin or glass works beautifully—and I’ve found that this small improvisation never affects the perfect apple shape of these hand pies.
How to Serve Spiced Apple Blackberry Hand Pies Recipe
Garnishes
Sprinkling the warm hand pies with a light dusting of caster sugar right after baking adds a lovely sparkle and subtle sweetness. For a finishing touch, a dollop of freshly whipped cream or vanilla custard is a warm, comforting addition. Fresh mint leaves or a pinch of cinnamon on top can also brighten up the presentation and aroma wonderfully.
Side Dishes
These hand pies pair beautifully with classic sides like creamy vanilla ice cream or a drizzle of caramel sauce for an indulgent twist. For a cozy afternoon dessert, a cup of black tea, chai latte, or even a crisp apple cider can complement the spiced fruit filling perfectly.
Make Ahead and Storage
Storing Leftovers
If you have any hand pies leftover, store them in an airtight container in the refrigerator for up to 2 days. To keep the crust from getting soggy, place parchment paper between the pies. They taste best when gently reheated to restore that flaky texture.
Freezing
For longer storage, freeze the assembled pies before baking. Once you've shaped and decorated them, place them on a baking sheet in the freezer until firm, then transfer to a freezer-safe bag or container. They keep well for up to 3 months. When you're ready to bake, add an extra 10 minutes to the original 20-minute baking time, baking directly from frozen.
Reheating
To reheat leftovers, warm the pies in a preheated oven at 180°C (fan) for about 10 minutes. This gently crisps the pastry back to life without drying out the filling. Avoid microwaving if possible, as it can make the crust soggy.
Frequently Asked Questions:
Absolutely! Frozen blackberries work well—just thaw them slightly and drain excess juice before mixing with the apples and other ingredients to avoid a soggy filling.
You can make your own shortcrust pastry or use store-bought pastry rolled to a similar thickness. Just ensure it’s chilled well before cutting to maintain the flaky texture.
Yes, maple syrup or agave nectar can be used instead of honey to add a similar natural sweetness and help bind the filling’s spices.
Look for a deep golden brown color on the crust, and you may see the filling bubbling gently through the steam holes—that’s a perfect sign that they’re ready to come out of the oven.
Final Thoughts
There’s something so comforting about a warm Spiced Apple Blackberry Hand Pies Recipe straight from the oven. They’re simple enough to make any day special, yet charming enough to impress guests or treat your family. From the crisp, golden pastry to the luscious mix of apples and berries spiced with cinnamon and honey, these hand pies truly capture cozy, delicious moments. I hope you enjoy making—and savoring—them as much as I do!
Print
Spiced Apple Blackberry Hand Pies Recipe
- Prep Time: 30 minutes
- Chilling Time: 1 hour
- Cook Time: 25 minutes
- Total Time: 1 hour 55 minutes
- Yield: 6 pies
- Category: Dessert
- Method: Baking
- Cuisine: American
- Diet: Vegetarian
Description
These spiced apple and blackberry hand pies are a delightful dessert featuring a flaky shortcrust pastry filled with a sweet and aromatic mix of cooked apples and fresh blackberries, enhanced with cinnamon and honey. Perfectly portioned and easy to handle, these hand pies offer a comforting combination of fruity flavors and a crisp golden crust.
Ingredients
Fruit Filling
- 2 medium cooking apples peeled, cored and chopped into small pieces
- 50 g golden caster sugar
- 150 g blackberries fresh or frozen
- 1 tablespoon cornflour
- 1 tablespoon honey
- 1 teaspoon ground cinnamon
Pastry
- 2 sheets 320 g shortcrust pastry sheets
- 1 small egg beaten
- 1 tablespoon caster sugar
Instructions
- Cook the apples: Place the peeled, cored, and chopped apples in a small saucepan with golden caster sugar and 2 tablespoons of water. Cover with a lid and cook over medium heat for about 8 minutes or until the apples are soft. Transfer the cooked apples to a shallow dish and spread them out to cool slightly.
- Prepare the fruit filling: In a small bowl, mix the cornflour, honey, and ground cinnamon until smooth. Add the blackberries and cooled apple chunks to the bowl, then gently combine all ingredients to evenly coat the fruit with the cinnamon and honey paste.
- Cut out the pastry circles: Unroll the shortcrust pastry sheets. Using a 10 cm round pastry cutter (or an upside-down ramekin or glass of similar diameter), cut out 12 circles from the pastry.
- Assemble the pies: Spoon about 1 tablespoon of the fruit filling onto half of the pastry circles, leaving a 1 cm border around the edges. Brush the edges with beaten egg to help seal. Place a plain pastry circle on top of each filled one. Shape the pies by gently pressing a small dent at the top and bottom to create an apple shape, then seal the edges by pressing with the tines of a fork. Brush each pie with egg wash.
- Add decorative details and steam holes: Use any pastry off-cuts to cut out small leaf and stalk shapes, attaching them to the pies with egg wash. Poke a small steam hole in the top of each pie using a skewer to allow steam escape while baking.
- Chill the pies: Transfer the pies onto a baking sheet and chill in the refrigerator for 1 hour. They can also be frozen at this point for up to 3 months.
- Bake the pies: Preheat the oven to 200 degrees Celsius (180 degrees Celsius fan). Bake the pies for 20 minutes or until golden brown and the filling bubbles through the steam holes. If baking from frozen, increase the baking time by 10 minutes.
- Finish and serve: Remove the pies from the oven and sprinkle them with caster sugar. Serve warm with a dollop of cream or custard.
Notes
- If you don't have a 10 cm round pastry cutter, an upside-down ramekin or a glass of a similar diameter works well as a substitute.
- For making ahead, prepare the pies through step 5 and store them in the refrigerator for up to 24 hours or freeze them for up to 3 months before baking.
- Using digital scales is recommended for accurate ingredient measurements.
- If frozen, allow extra baking time of 10 minutes to ensure the pies cook thoroughly.
Nutrition
- Serving Size: 1 pie
- Calories: 230 kcal
- Sugar: 15 g
- Sodium: 80 mg
- Fat: 9 g
- Saturated Fat: 4 g
- Unsaturated Fat: 4 g
- Trans Fat: 0 g
- Carbohydrates: 33 g
- Fiber: 3 g
- Protein: 2 g
- Cholesterol: 40 mg


Leave a Reply