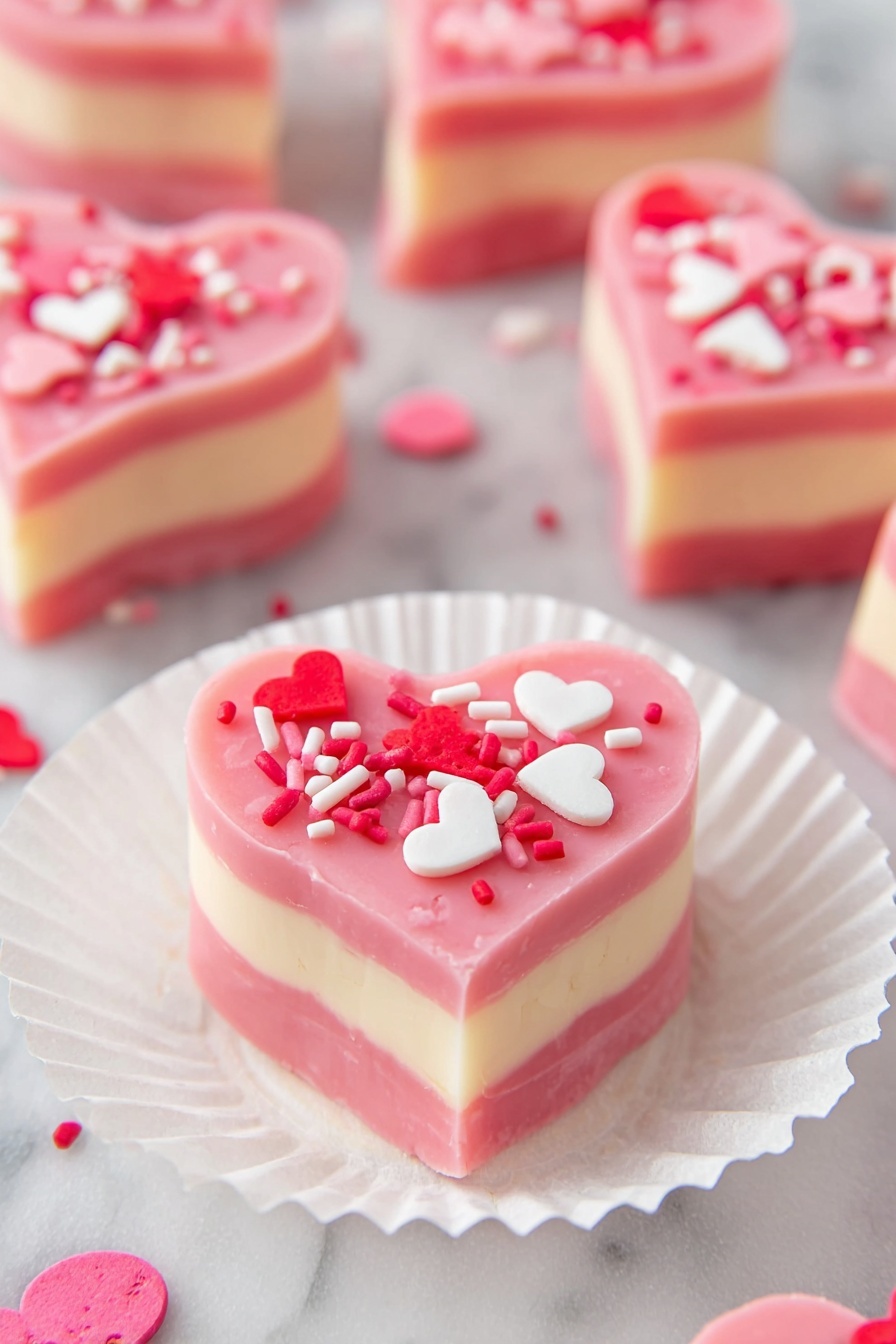
If you’re looking to impress your sweetheart (or yourself!) this Valentine’s Day, this Valentine Heart Fudge Recipe is a win. It’s a creamy, no-bake white chocolate fudge with bright red layers and cute heart-shaped sprinkles—perfect for making the day extra sweet.

Jump to:
Why You'll Love This Recipe
I can’t get enough of how simple yet stunning this layered fudge turns out. It looks like something store-bought or fancy patisserie-made, but it’s honestly one of the easiest treats you’ll whip up—no heating stovetop candy thermometer required!
- No-bake ease: Just melt, mix, and set—perfect when you need something quick but impressive.
- Layered colors: The vivid red layers against creamy white chocolate make it festive and fun.
- Perfect gift potential: Cut into adorable hearts and sprinkle some love on top.
- Simple ingredients: Uses pantry staples like white chocolate chips and sweetened condensed milk.
Ingredients & Why They Work
Before we start, make sure you grab some good-quality white chocolate chips and real sweetened condensed milk. These really make a difference in the fudge’s creamy texture and perfect set time.
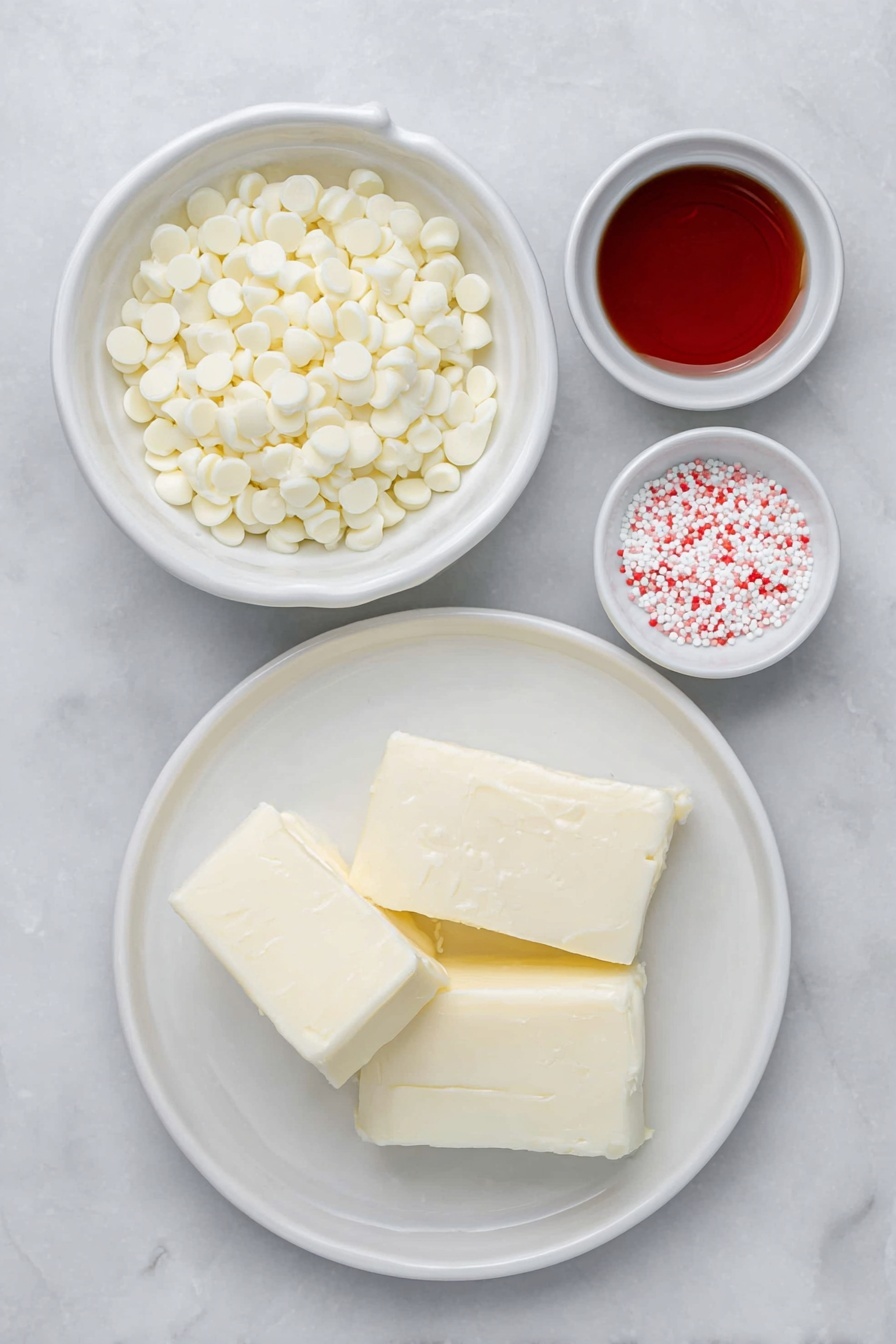
- White Chocolate Chips: High-quality chips melt smoothly and create that buttery, creamy fudge base you want.
- Sweetened Condensed Milk: This adds sweetness and helps the fudge set just right—don’t substitute evaporated milk here!
- Unsalted Butter: Adds richness and a silky texture to the fudge layers.
- Red Food Coloring: Gives the fudge its festive Valentine’s Day pop of color in the red layers.
- Heart-shaped Sprinkles: For that extra cute finishing touch that says “love” with every bite.
Make It Your Way
One of the best things about this Valentine Heart Fudge Recipe is how easy it is to personalize. Whether you want to add a twist to the layers or swap out toppings, there’s plenty of room to get creative and make this treat uniquely yours.
- Berry Bliss Variation: I love adding a teaspoon of freeze-dried raspberry powder to the red layer for a subtle fruity zing that pairs beautifully with the creamy white chocolate. It gives the fudge a fresh vibe without complicating the recipe.
- Nutty Crunch: For some extra texture, sprinkle chopped pistachios or crushed pecans between the layers. It adds a lovely contrast to the smooth fudge and makes each bite even more delightful.
- Dairy-Free Version: Use dairy-free white chocolate chips and coconut condensed milk to make this recipe vegan-friendly. The fudge turns out wonderfully creamy and just as festive!
- Seasonal Flair: Swap the heart-shaped sprinkles for edible gold stars or festive confetti for other occasions like anniversaries or birthdays. The layered colors always make these fudge squares a showstopper.
Step-by-Step: How I Make Valentine Heart Fudge Recipe
Step 1: Prep Your Pan Thoughtfully
Start by lining an 8 x 8 inch square pan with parchment paper or sprayed aluminum foil. This step makes all the difference in lifting out the fudge easily and ensures you get those clean, cute heart-shaped pieces when cutting later. Trust me, it’s worth the extra minute!
Step 2: Melt and Color Your Red Chocolate Layer
In a microwave-safe bowl, combine 2¼ cups of white chocolate chips, ⅔ of the sweetened condensed milk, and 2 tablespoons of butter. Heat in 20-second bursts, stirring thoroughly each time until everything melts to a silky smooth consistency—this should take less than 2 minutes total. Then, mix in about 10 drops of red food coloring, stirring until the color is evenly blended and vibrant. This is the magical start to those festive, eye-catching layers!
Step 3: Set Your First Red Layer
Spoon half of this red fudge mixture into your prepared pan and smooth it out gently with a spoon. The mixture will be sticky, so take your time to finesse it evenly. Pop it into the freezer for a few minutes to firm up—this helps keep those layers neat. Keep the remaining red fudge warm by wrapping the bowl in a couple of towels so it stays pliable for the next step.
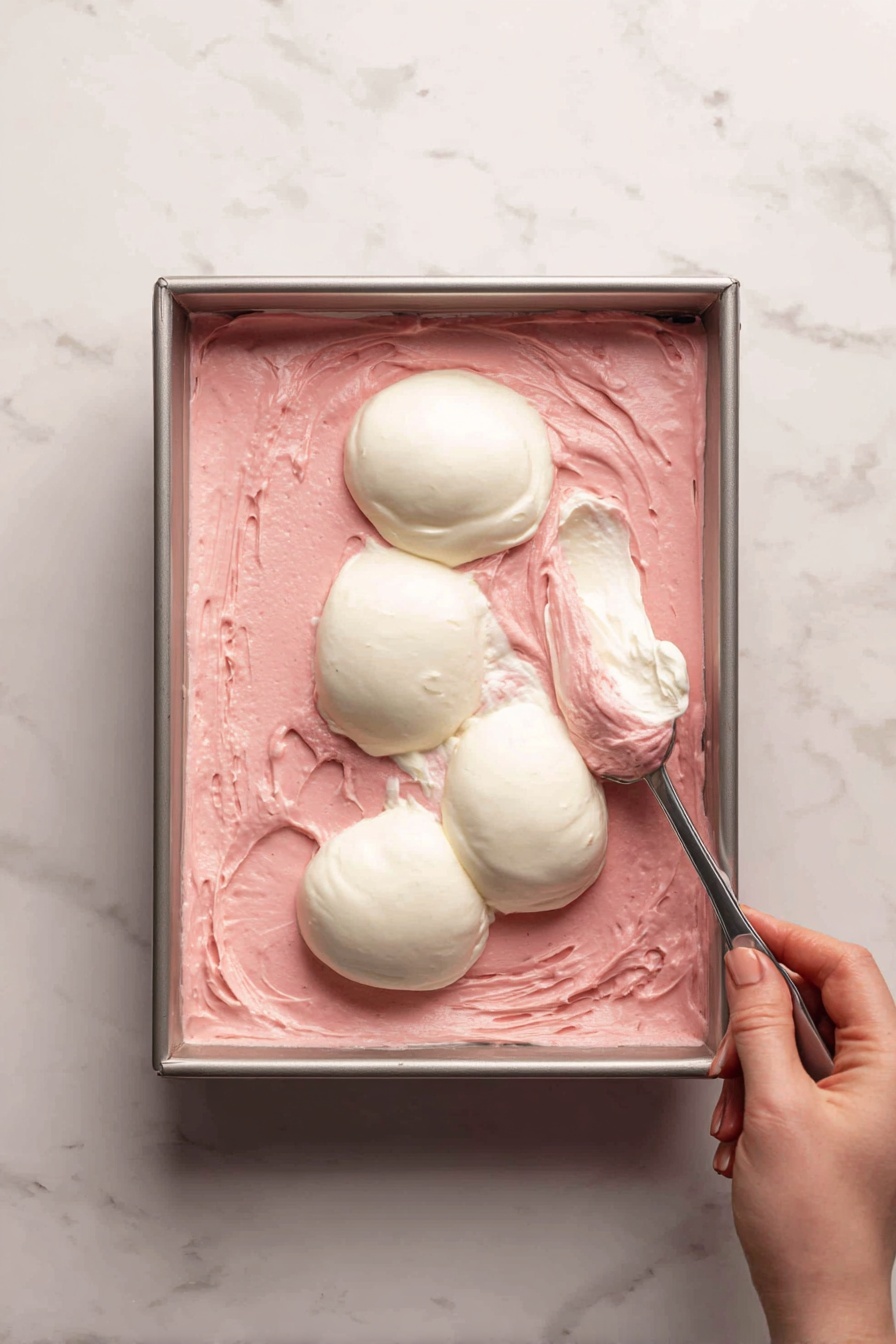
Step 4: Create and Layer the Creamy White Fudge
Next, combine the remaining 1¼ cups white chocolate chips, ⅓ of the sweetened condensed milk, and 1 tablespoon of butter in a clean microwave-safe bowl. Repeat the gentle melting process in 20-second bursts, stirring until smooth and luscious. Pour this white fudge over the chilled red layer, smoothing the top carefully. Back into the freezer it goes for a few minutes, allowing this layer to solidify perfectly.
Step 5: Finish With the Final Red Layer
Warm the remaining red fudge gently just enough to soften it, then spread it evenly over the set white fudge layer, smoothing the top to create that perfect polished look. Cover the whole pan with plastic wrap and let it chill in the fridge for 2 full hours so all the layers can set beautifully.
Step 6: Cut and Decorate Your Heart-Shaped Fudge
When your fudge is fully set, gently lift it out using the parchment paper. Place it on a flat surface and grab a small heart-shaped cookie cutter to cut out your festive treats. Cut efficiently to minimize waste—you’ll be surprised how many adorable hearts you can make. Finally, sprinkle those heart-shaped sprinkles evenly on top for a charming and colorful finish. Now, dig in and enjoy your delicious Valentine Heart Fudge!
Top Tip
Mastering the Valentine Heart Fudge Recipe is all about small details that make a big difference in texture and appearance. These tips are what I've picked up to ensure your fudge turns out creamy, colorful, and picture-perfect every time!
- Choose Quality White Chocolate: Using high-quality white chocolate chips makes melting smoother and gives your fudge a silkier texture. I’ve noticed generic brands can turn out grainy, which is definitely not the vibe we want!
- Keep an Eye on Melting Time: Melting white chocolate in 20-second bursts and stirring in between is a game-changer. Overcooking leads to graininess, so patience here really pays off.
- Line Your Pan Thoughtfully: Lining the pan with parchment or foil lets you lift out the fudge easily for neat cutting. It's a simple trick that saves you from a messy cleanup and uneven pieces.
- Handle the Layers Gently: When spooning the layers, take your time to smooth them out without mixing. It keeps those beautiful red and white stripes clear and vibrant.
How to Serve Valentine Heart Fudge Recipe
Garnishes
Though the Valentine Heart Fudge Recipe already delights with festive heart-shaped sprinkles, you can elevate presentation with extra touches. Consider dusting lightly with edible glitter or adding a few fresh raspberries or strawberries on the side for a pop of freshness and color. A drizzle of melted dark chocolate can add a lovely contrast if you want to add more depth to the flavor.
Side Dishes
This fudge pairs wonderfully with a hot cup of coffee or a creamy latte to balance the sweetness. For an elegant dessert spread, serve alongside fresh fruit salad or a simple vanilla bean ice cream. It’s also a great sweet treat after a light meal like a mixed green salad with walnuts and goat cheese.
Make Ahead and Storage
Storing Leftovers
Store any leftover Valentine Heart Fudge in an airtight container in your refrigerator. It will keep beautifully for up to two weeks. Before serving leftovers, let the fudge sit at room temperature for a bit to soften and bring out that perfect creamy texture.
Freezing
If you want to stash some for later, wrap pieces individually or the whole block first in parchment paper, then tightly in aluminum foil. This double wrapping protects the fudge’s delicate layers and keeps it freezer-fresh for up to 2 months.
Reheating
To enjoy your Valentine Heart Fudge after freezing, thaw it overnight in the fridge, then bring it to room temperature before serving. Avoid microwaving as it can cause melting and affect texture. Simply letting it soften naturally is best for that creamy bite.
Frequently Asked Questions:
No, it’s important to use sweetened condensed milk in this Valentine Heart Fudge Recipe. Evaporated milk does not have the same thickness or sweetness, so the fudge won’t set properly.
Melting white chocolate slowly in short bursts and stirring frequently is key. Avoid overheating and use a microwave-safe bowl, stirring in 20-second intervals to keep the chocolate smooth and shiny.
Line your pan with parchment paper so you can lift the whole block out easily. Place it on a flat counter and use a small heart-shaped cookie cutter to cut out hearts—this method helps minimize fudge waste and makes cleaner cuts.
After assembling all the layers, cover the fudge and refrigerate for 2 full hours to ensure it is fully set and firm enough for clean cutting into heart shapes.
Final Thoughts
Making this Valentine Heart Fudge Recipe is such a joyful way to celebrate the season of love, whether you’re gifting it or enjoying it yourself. The creamy layers and adorable heart shapes feel like a sweet hug from the kitchen. I hope these tips and serving ideas help you create a fudge that’s as delightful to make as it is to eat. Happy Valentine's Day, and happy munching!
Print
Valentine Heart Fudge Recipe
- Prep Time: 10 minutes
- Chill Time: 2 hours
- Cook Time: 3 minutes
- Total Time: 2 hours 13 minutes
- Yield: 10 servings
- Category: Dessert
- Method: No-Cook
- Cuisine: American
- Diet: Vegetarian
Description
This Valentine Hearts Fudge is a delightful layered white chocolate treat perfect for special occasions. Featuring creamy white chocolate fudge with vibrant red layers and festive heart-shaped sprinkles, this no-bake recipe is easy to prepare using simple ingredients like white chocolate chips, sweetened condensed milk, and butter. Chilled to set and cut into adorable heart shapes, it makes a charming and sweet gift or dessert for Valentine’s Day.
Ingredients
Fudge Layers
- 3½ cups white chocolate chips (divided into 2¼ cups and 1¼ cups)
- 1 can sweetened condensed milk (divided into ⅔ and ⅓ portions)
- 3 tablespoons unsalted butter (divided into 2 tablespoons and 1 tablespoon)
- 10 drops red food coloring
Topping
- 1 tablespoon heart-shaped sprinkles
Instructions
- Prepare Pan: Line an 8 x 8 inch square pan with parchment paper or sprayed aluminum foil for easy removal of fudge later.
- Make Red Layer: In a microwave-safe bowl, combine 2¼ cups white chocolate chips, ⅔ of the sweetened condensed milk, and 2 tablespoons butter. Microwave in 20-second bursts, stirring after each, until melted and smooth (less than 2 minutes). Stir in red food coloring and adjust to desired color.
- Set First Layer: Spoon half of the red fudge mixture into the prepared pan and smooth with a spoon. Place in the freezer for a few minutes to set. Wrap and keep the remaining red fudge warm with towels.
- Make White Layer: Combine the remaining 1¼ cups white chocolate chips, ⅓ sweetened condensed milk, and 1 tablespoon butter in a microwave-safe bowl. Microwave in 20-second bursts, stirring until melted and smooth (less than 2 minutes).
- Layer White Fudge: Pour and smooth the white fudge over the set red layer. Freeze for a few minutes to solidify.
- Top with Final Red Layer: Warm the remaining red fudge to soften, spoon it evenly over the white fudge layer, and smooth the surface.
- Chill to Set: Cover the fudge with plastic wrap and refrigerate for 2 hours to fully set.
- Cut Shapes: Lift the fudge from the pan using parchment paper. On a flat surface, use a small heart-shaped cookie cutter to cut out hearts efficiently to minimize waste.
- Add Sprinkles and Serve: Evenly sprinkle heart-shaped sprinkles over the hearts and enjoy your festive Valentine fudge treats!
Notes
- Store leftover fudge in an airtight container in the refrigerator for up to two weeks. Bring to room temperature before serving for a softer texture.
- For freezing, wrap fudge in parchment paper and then tightly in aluminum foil. Freeze for up to 2 months.
- Use high-quality white chocolate chips for smooth melting; generic brands may cause grainy texture.
- Be sure to use sweetened condensed milk, not evaporated milk, to ensure the fudge sets properly.
- Avoid overcooking to prevent graininess and maintain smooth texture.
- Lining the pan with parchment or foil allows easy removal and cleaner cutting outside the pan.
Nutrition
- Serving Size: 1 heart (approx. 40 g)
- Calories: 180 kcal
- Sugar: 24 g
- Sodium: 40 mg
- Fat: 9 g
- Saturated Fat: 5 g
- Unsaturated Fat: 3 g
- Trans Fat: 0 g
- Carbohydrates: 24 g
- Fiber: 0 g
- Protein: 2 g
- Cholesterol: 10 mg


Leave a Reply